My last post was about setting up an auto reply to email inquiries, and I thought I would share another tip on how we use Gmail and some cool add ons: setting up recurring reminder emails. I’ll be using Boomerang for Gmail – one of my favorite gmail/chrome extensions – to set up recurring reminder emails.
The use case here is that Kildal Services has a few payroll clients that have employees that get a quarterly commission payout, and we want to remind our clients to send us those totals. (For the record, the body of the email and the dates I use here are just to illustrate this task; they don’t necessarily represent the actual commission payroll cycle our clients use.)
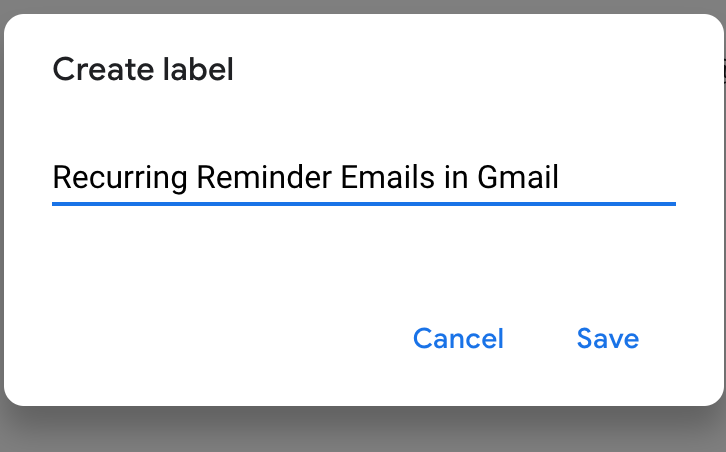
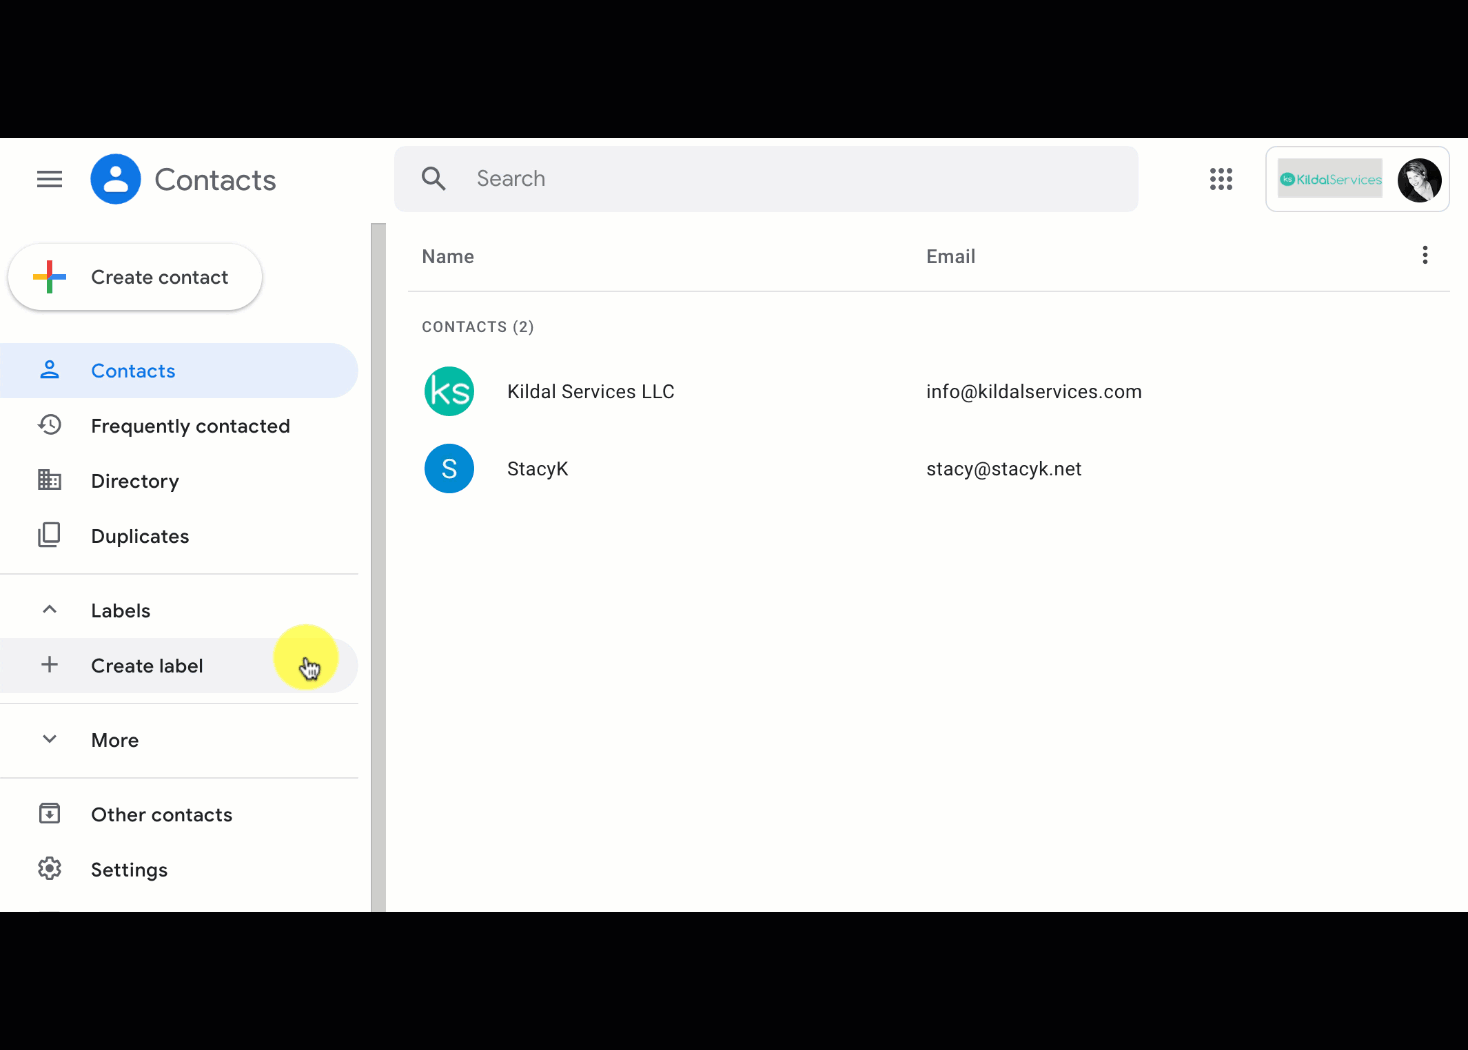
Create a group for your reminder emails in Gmail
The first thing I want to do is head over to my Gmail Contacts to create a label and add it to the clients that will need to get this recurring reminder:
Now that I have the clients categorized in my contacts, it will be much easier to add them to the reminder email. I’m going to send this TO MYSELF, and BCC the client group in my contacts.
Creating your reminder email in Gmail
After I create the email, I want to click the Send Later button that Boomerang adds, click Schedule Recurring Message, and edit the start date and time, how often I want it to repeat (monthly, every 3 months), and if I want an end date (for now, no end date, because I’m expecting to have these clients forever ☺)
Once I have all of that set, I’ll click that red Schedule button, and now every three months, this email will go out. Because I’m sending to myself and bcc’ing the clients, no one will forget!
If I ever need to edit this, I can click on the Boomerang icon in Gmail to manage any recurring messages:
There you go! Easy method for setting up reminder emails in Gmail!
If you’re like most businesses, you have some sort of contact form on your website and one way to save time with them is to set up an auto reply to email inquiries. (If you’re a ProAdvisor, this comes in handy for leads from FindaProadvisor.com.)
Since we use GSuite/Google for Business/Gmail, I’ll show you how we do this – create an auto reply to email inquiries – with Gmail’s filter and canned response features. Added bonus – I’ll show you how to use another free tool to track whether your auto reply has been opened.
Enable canned response
Our first step is to create a canned response in gmail.
Click the Settings icon, choose Settings, then Advanced, click to Enable, then scroll down to Save Changes:
Compose your canned response
Now we want to create the response.
Compose a new email, leaving the subject and recipient blank, then click 3 dots/More Options next to the trash can, canned response and choose to save this as a new template and name it:
So now your canned response is ready to be used as an auto reply to email inquiries. You can use this any time you’d like when replying manually to an email, but we want to use this one with a filter for inquiries sent via our website.
Create a filter in Gmail
We just need to create the filter. For one of our landing pages, when a prospect uses our contact form, each email comes to us with a default subject line: “I’m Interested in a QuickReview!”, so we’ll use that as our filter criteria.
We want to again click the Settings icon, choose Settings, then Filters and Blocked Addresses, click Create a New filter, add the text subject to the filter criteria, click Create Filter, then choose our new canned response, then click the Create Filter button:
Here’s the end result of creating an auto reply to email inquiries, as seen from your end (in your sent folder):
So there you have it! Without any extra apps (or cost!), you can create an auto reply to email inquiries about your business!
Back from a bit of a summer break, we’re diving right in with a guest blog post. My friend and co-host of QBOShow.com, Woody Adams, has written this piece about automating data entry in QuickBooks Online. there are a variety of options to choose from, and below are a few:
Bank Rules/Auto-add—google vendor upload show result
Invoice automatically for unbilled activity—invoice L1386
Let’s dig in to automating data entry using QuickBooks Online, and thanks so much to Woody for writing this!
First, we all know why we prefer QuickBooks Online Plus over Essentials, right? Need I remind you…
5 Users included (can expand to 25) + 2 Bookkeeper/Accounting Firms + Unlimited Reports Only Users
Class/ Location Tracking
Purchase Orders
Inventory using FIFO valuation/ track profitability with two-sided items
Billable Time/ Expenses, Two-sided items
Budgeting
100 + Reports
Yeah, two-sided items is my sleeper hit, but I just think Plus is most akin to QB Pro, minus a few features still: Labor burden tracking, finance charges, loan manager (LOL), Estimate v Actual reporting, single unit of measure, just thinking of some of the key gaps…still, Plus is the QuickBooks Online most similar in feature set. That being said, QuickBooks Online supports data entry automation in a better way than QB Desktop. While both platforms can Auto-send reports and enter Memorized (Recurring) transactions, this is where QuickBooks desktop ends re automating transaction or form entry. And this is the part of the story that QuickBooks Online continues…
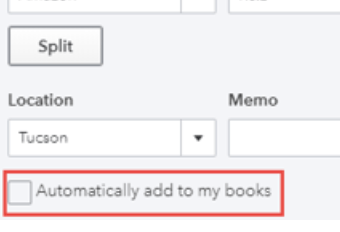
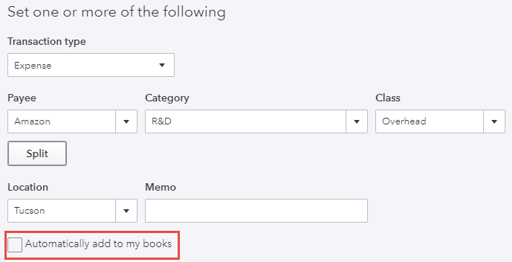
“Automatically add to my books”
This feature lives inside of a bank rule. It is a tiny checkbox at the bottom of the rule window. The box is NOT default checked and probably for good reason. Imagine the havoc. However, if you are establishing a rule for how a bank feed transaction is to be categorized and the correct Payee is assigned, and you do not need to review the activity, but can just let it dive into the register once the rule is applied, then this feature is your new best friend.
Literally, I kid you not, the downloaded transactions skips the For Review tab and just ends up in the books. You can see the Mode too the bank feed applied when click the blue link at top left of transaction that is NOW in the register…
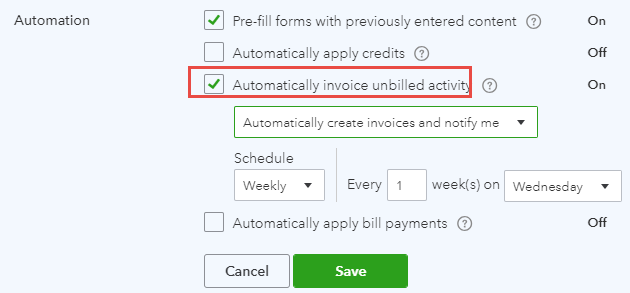
Invoice Automatically for Unbilled Activity
Quite a mouthful, eh? Even if you are not from Canada…
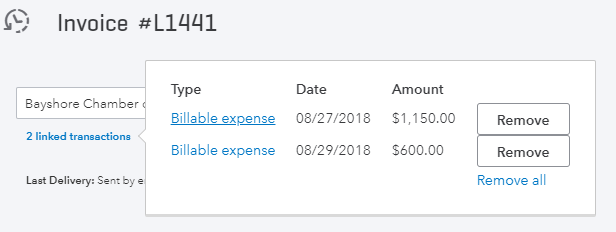
Go to Gear icon, Account and Settings, Advanced tab. You will see this sub-section entitled “Automation”. It’s the 3rd option. See screenshot below. This will enter invoices for any unbilled activity from the following posting or non-posting events: Bills, checks, expenses, time, delayed charges and bank feed transaction (not yet supported at the rule level), assuming the Billable box is checked. QuickBooks Online, like QuickBooks desktop will assume you want to create invoices for the yet to be invoiced time, material, expense, but go one step further…regardless of client, create invoices for all unbilled activity based on the interval you choose. What about Journal Entry you say? There is no Billable box on a JE in QuickBooks Online Plus at this time. Why do I say Plus you ask? Cause Plus is required if you want to tag “TME” to a customer, sub-customer or project (sort a’ new) and is the only QuickBooks Online level that offers making this stuff billable. In QuickBooks desktop it is the Add Time/Costs window on route to the invoice. In QuickBooks Online Plus, it can be invoices automatically created. The below invoice was created while I had that automation feature active…Woody forgot he had all this unbilled activity for this customer once, turned on the feature, the next day an invoice was created that had 150 target lines on it. LOL. I saw the invoice. He emailed it to me because we find that kind of thing hilarious…
Qualification: This is a Global setting, no I don’t meant like overseas. I mean it will create invoices like Jack Bauer would; rogue and coming in heavy guns blazin’. If you require to select what customers get what invoices for what unbilled activity, do NOT turn this feature on. Instead, leverage the next feature that QuickBooks desktop also has but only in part…
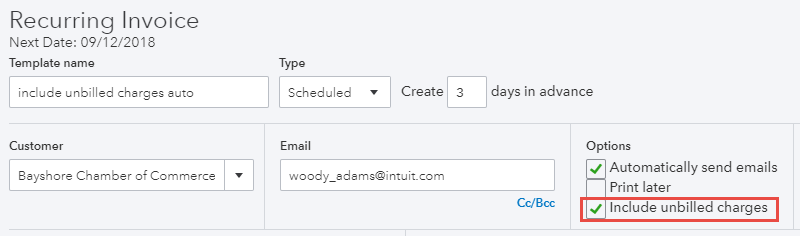
Recurring Invoices
Yes, I know. I been using QuickBooks Online since 2003 and QuickBooks desktop from way before that. I know Desktop has memorized invoices capability. However, when we’re talking about automating data entry using QuickBooks Online, the same recurring invoice feature in QuickBooks Online offers the ability to include unbilled activity. This is great as while I like the more global setting, this feature can focus on a specific customer.
The above recurring invoice template will be created and any unbilled activity tagged to the customer anywhere else in the QuickBooks Online file (bills, checks, expenses, delayed charges, time) will be included. Sweet!
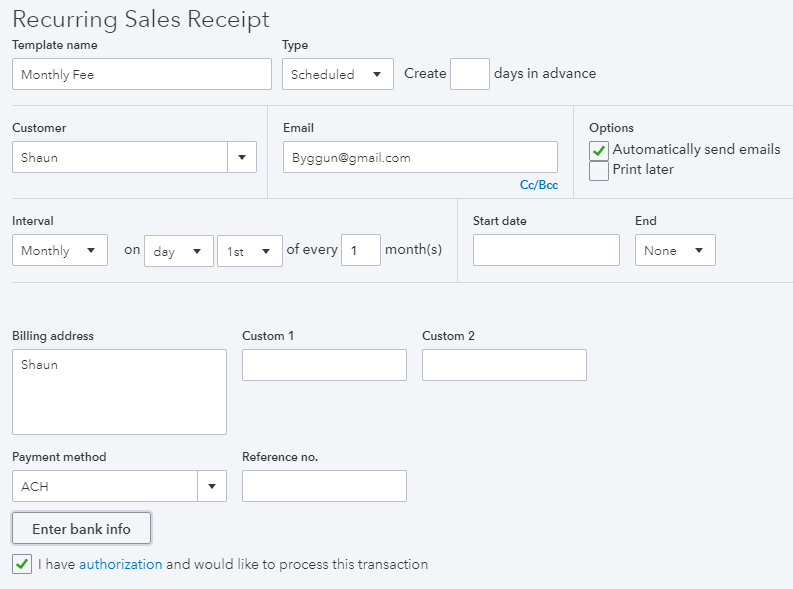
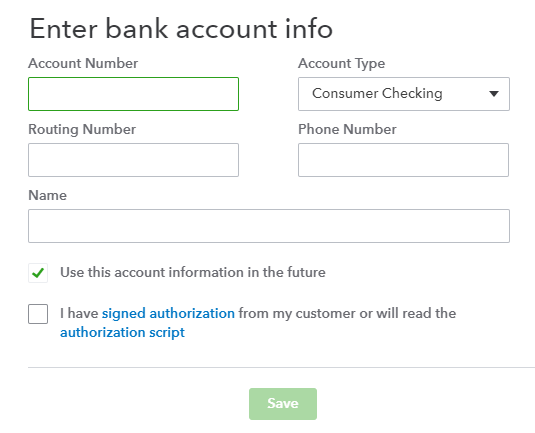
One of the coolest features for automating data entry using QuickBooks Online, period. We do this with most of our subscription billing based clients. In our QuickBooks Online file, we set up a recurring Sales receipt for each client. QB Payments is turned on in Settings. I check the box in the recurring Sales receipt template to auto send to client (input their email address) and I enter their banking/routing numbers in the Payment method field. There is a PCI compliance script you can read to them, a box to check, and then I just leave it alone. Every month the clients gets the emailed receipt, 5 days later I get paid. QB Payments is free and ACH is free so it costs me only the time to set up the recurring transactions for my clients. 5 day funding period might raise a few eyebrows. I have one question to bring them down to a reasonable level: How many days does it take to collect against an open invoice for one of your clients? It’s not 5 days. LOL Maybe you even have to send a drone over to their home or location. As far as you know, Shannon and I have never had to do that…
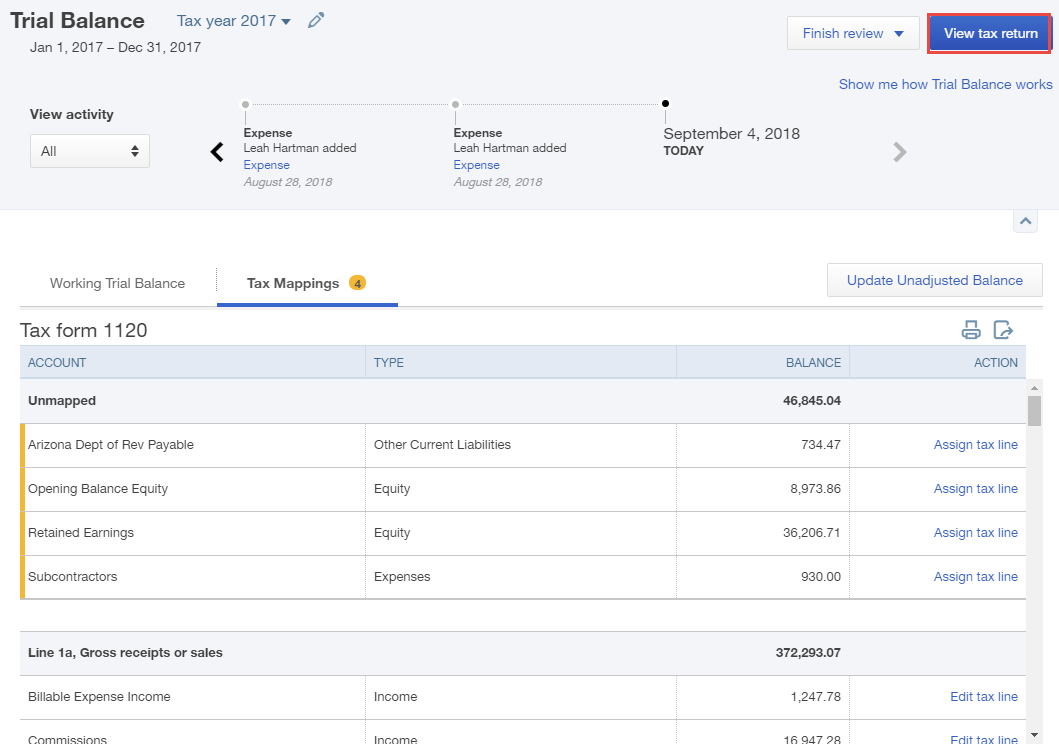
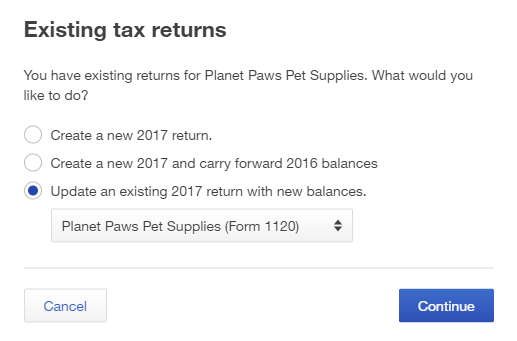
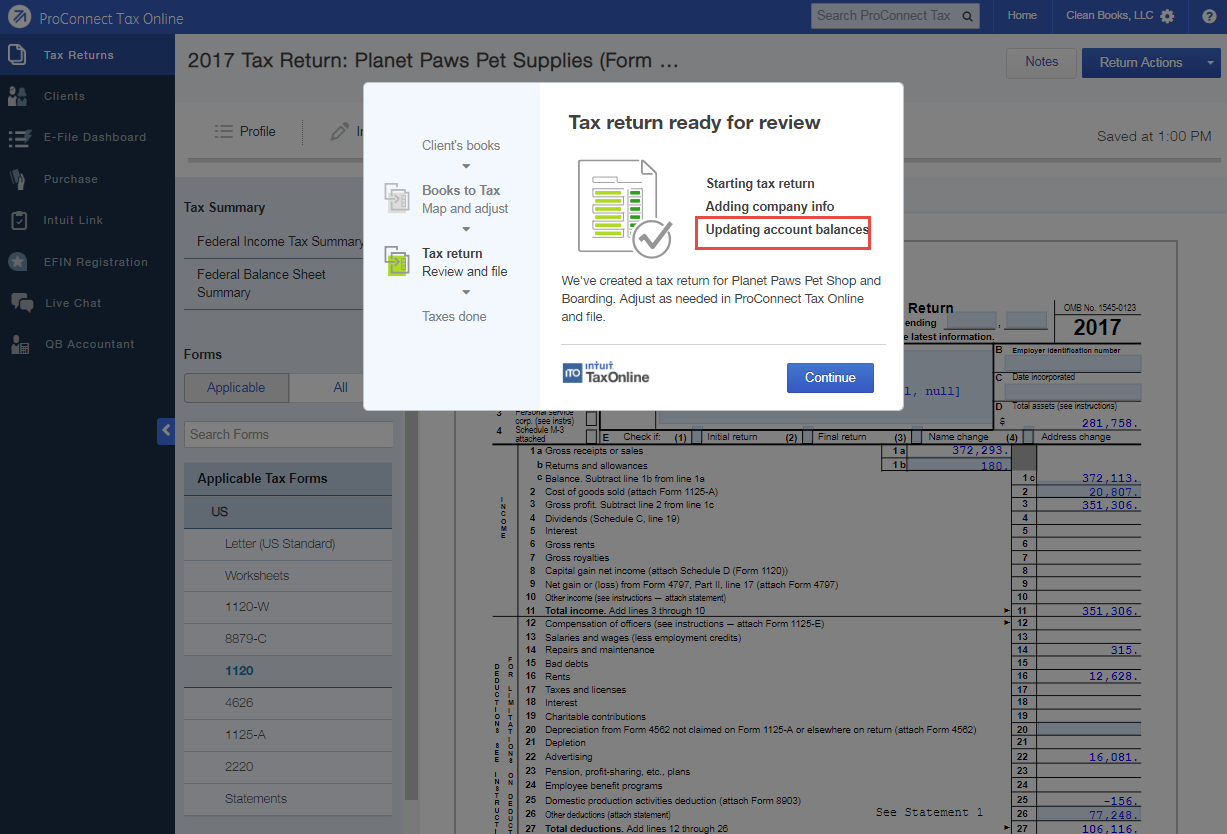
Lastly, automating data entry to the tax return in ProConnect Tax Online. We don’t have any tax clients but I have seen Woody do this in webinars. No, he does not have any tax clients either, but he is a QuickBooks Online nerd just like me and you. And not having to enter data into the data fields in ProConnect Tax Online does qualify as automating data entry.
In the Trial Balance tool under the Accountant Toolbox, when in a client QuickBooks Online file from QuickBooks Online Accountant, you will see Trial Balance. This is not the report but a Working trial balance that also is the launch pad for the native integration we know have with ProConnect Tax Online. Pictures worth 15 or 16 words…
By the way, all the above functionality that automates data entry is in QuickBooks Online as it is, with no other apps required. Of course there are several great data fetching apps that help with Automating Data Entry Using QuickBooks Online. Ask me about them someday!
Comparing QuickBooks Online Plus Feature Set: Parity with QuickBooks Pro
To what QuickBooks Desktop product are you really comparing QuickBooks Online? This is an important question to ask yourself if you really prefer QuickBooks Desktop for your clients over QuickBooks Online. Having presented QuickBooks Online and QuickBooks Desktop to thousands of firms since early 2009, I can say when it comes to QuickBooks Online distaste from an accountant’s point of view, it is mostly about lack of parity in report customization and click-thru workflow.
There are gaps in report customization in QuickBooks Online, for sure, as well, some workflow cumbersomeness; too many clicks to get to same result in QuickBooks Desktop , tabbed browsing vs open windows, etc. However, your clients, for the most part, do not care about that. Accountants are using QuickBooks Accountant Edition to work with their client QuickBooks Pro files, and QuickBooks Accountant Edition is a Premier level desktop program.
My contention is that many of your clients don’t need build assemblies, job costing, manufacture in process, sales order fulfillment as a critical feature set. Again, what QuickBooks Desktop product is your greener grass than QuickBooks Online? If most of your desktop clients are using Pro, then QuickBooks Online Plus already is on par with their current experience. That is right, apples to apples, outside of YOUR reporting and workflow preferences of QuickBooks Desktop , that your client DOES NOT consider as critical to QuickBooks Online adoption, QuickBooks Online Plus is already, save for 1 feature, on par with the QuickBooks pro feature set. Oh, I am sure there are a few other features I will not address below that is in Pro yet still not in QuickBooks Online, but again, only a few of your clients actually use Loan Manager, LOL…You see what I mean? What actual QuickBooks Desktop product are you clinging to in comparing to QuickBooks Online? If it is Premier or Enterprise Solutions, then we are asking the wrong question. Your client is using Pro. They can adopt QuickBooks Online. Even if you do not want them to, they can, and you can stop with the age old file transfer model that is just the very definition of cumbersome…
Let’s take a look at the key QuickBooks Pro features that your product and service based business clients are going to want in QuickBooks Online, and run thru a few of the key settings to turn them on in QuickBooks Online Plus.
My feature set parity is really about comparing QuickBooks Online Plus vs QuickBooks Pro, and while some features below will also be in Essentials, my apple to apple is Plus v Pro. And the two features I mention above still not in QuickBooks Online that I consider critical and awesome in QuickBooks Pro is Estimate vs Actual reporting and the Markup column on Estimate. Pro just does that getting out of bed in the morning, where you will see below, QuickBooks Online Plus requires a lot of extra steps to get to the same result. But even without a 3rd party app, it can be done. For me, the question of comparing QuickBooks Online to QuickBooks Desktop is not about my wants and preferences/bias, and more about mobility and collaboration. Does your client want to be mobile more than the ability to use Loan manager? Don’t keep them on QuickBooks Desktop just cause it is your comfort zone. For whom are you really solving?
What are you comparing QuickBooks Online to? For whom are you really solving?
By the way, QuickBooks Pro does not support Build assemblies, customer price levels per item, multiple unit of measure conversion, WIP reporting, sale order workflow either. What QuickBooks Desktop product are you comparing QuickBooks Online to again? Ok, Ok, I will stop…
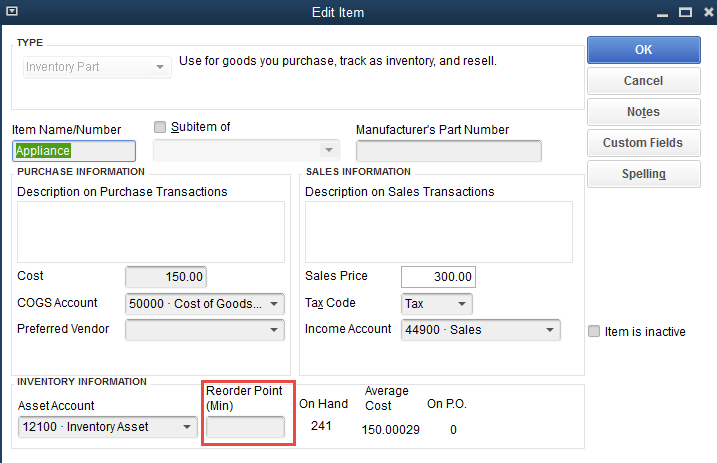
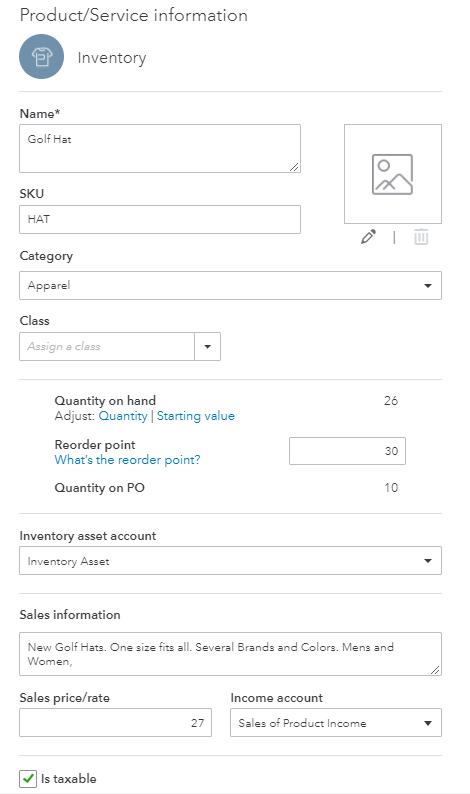
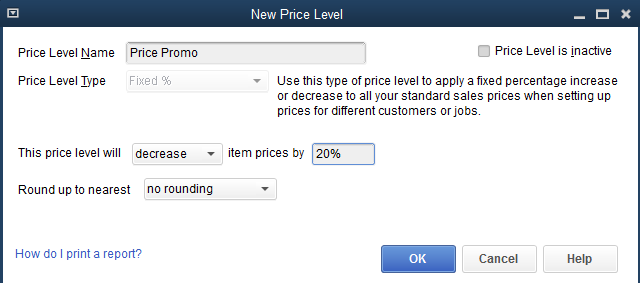
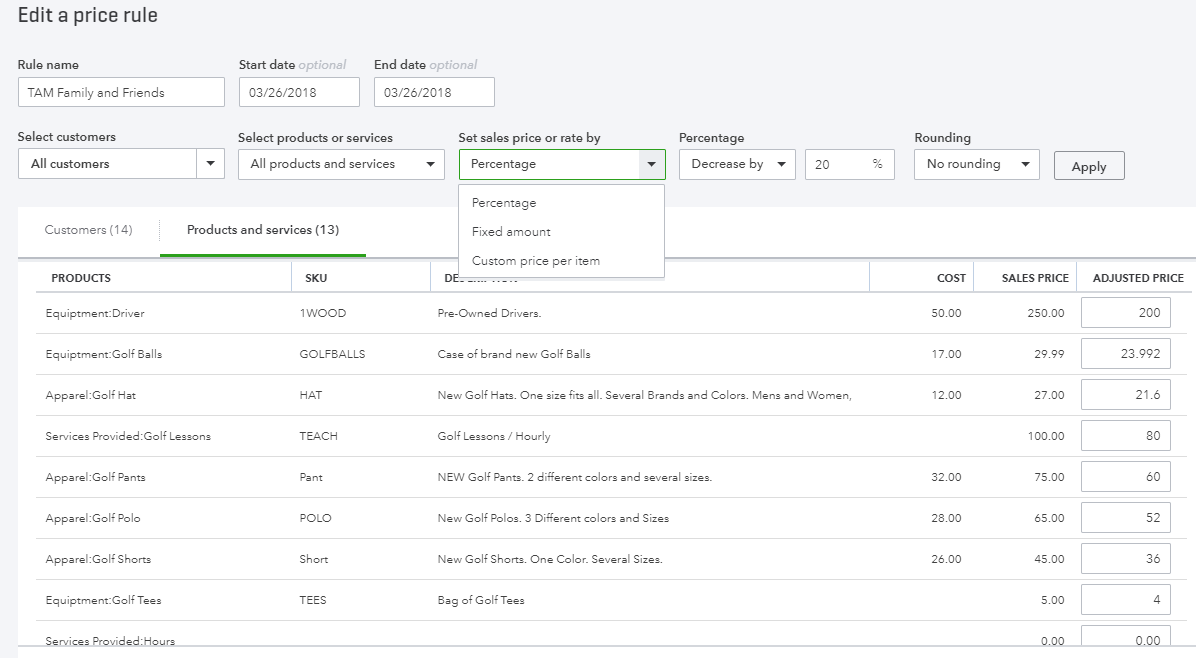
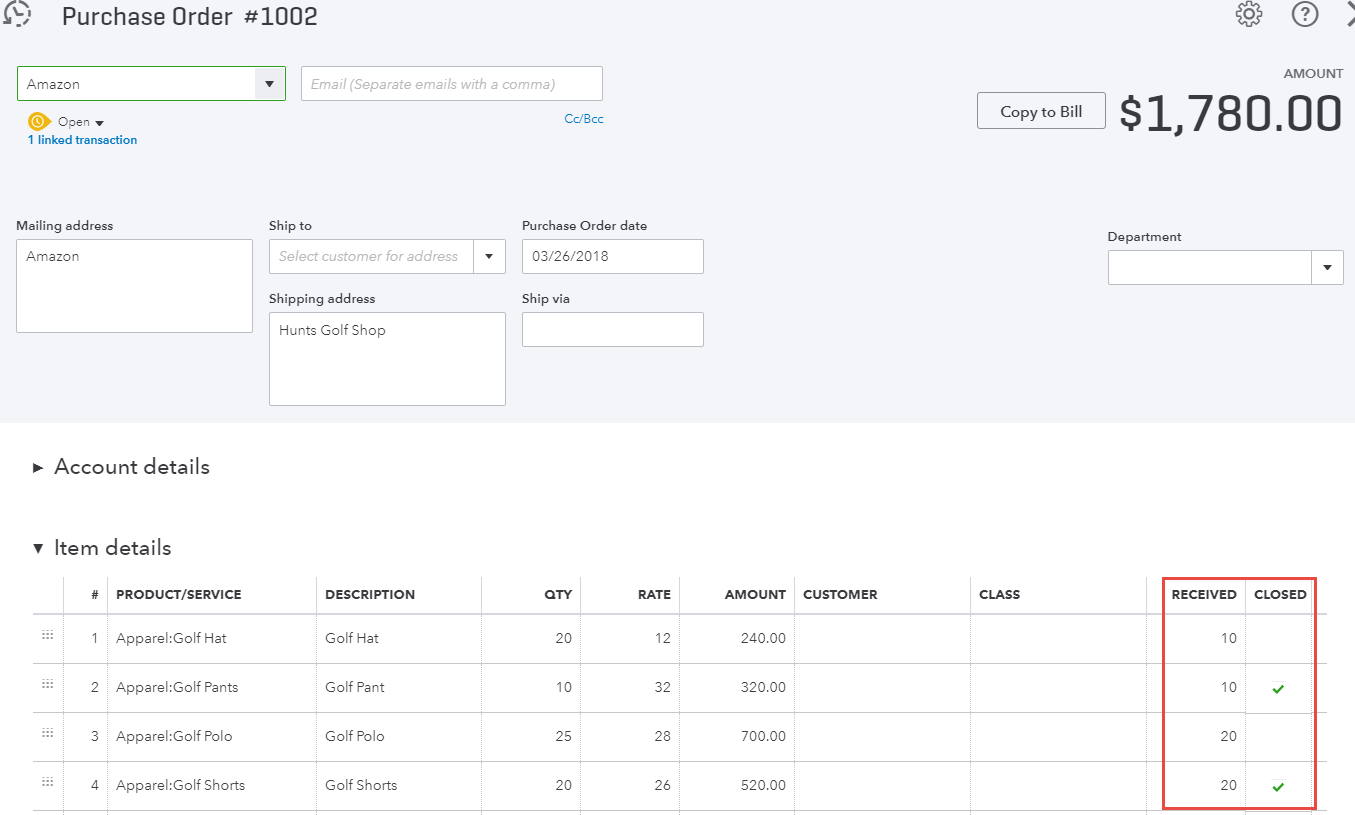
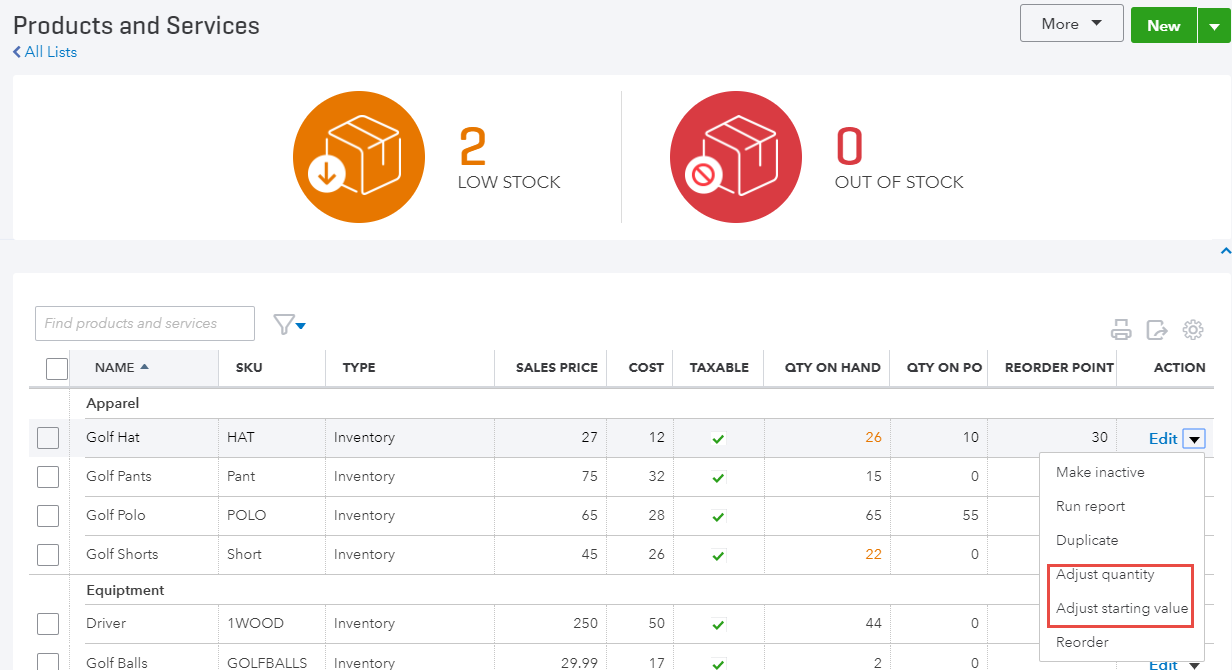
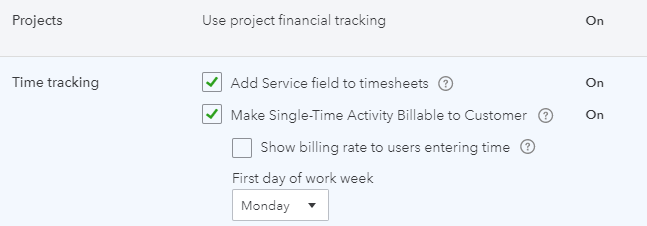
Gear icon/Account and Settings. From the screenshots below, there are two features that need to be turned on else you will think QuickBooks Online does not support these Pro features. Namely, Price Rules (Price levels and still in beta) and Inventory (FIFO, not average cost). Price Rules in Essentials and Plus are more akin to Premier level Price levels, in that I can create custom prices for items. One better, I can even set a date range for the rule to apply. Pro price levels support not date ranges and are only a Fixed %. Neither product supports price level reporting. QuickBooks Pro inventory items are 3 sided, so it is in QuickBooks Online Plus. Inventory asset, revenue and COGS are hit, and cogs is debited when the item is sold, just like in QuickBooks Desktop . QuickBooks Online Plus supports inventory adjustments, while the “starting” value adjustment is intended as a one-time adjustment, where in Pro you can make ongoing cost or value adjustments. I like that in Pro. Pro supports partial receiving against purchase orders, so does QuickBooks Online Plus. Pro does handle single units of measure, Plus does not. But multiple unit of measure conversion is a Premier/ES thing, as is assemblies and sales order fulfilment. Pro supports none of that. Keep in mind, there are plenty of good 3rd party apps that solve for the more Premier/QBES level features if a client really wants to stay on QuickBooks Online for mobility, but I will not address them in this article. You can find out more on apps.com…
Please see several screenshots below re what I have been discussing re inventory and price rules, shots are all taken from my QuickBooks Online Plus file…
Pro supports reorder points, so does Plus. As well, note the 3-sided items in both for inventory parts, as well as Quantity On Hand, Sku or Manufacturer Part No, and other important item detail fields. Pro does have custom fields which Plus will not, I miss that one too.
Comparing QuickBooks Online to QuickBooks Desktop
I do like how the Price rule is shown at the item record level in QuickBooks Online Plus, whereas Pro I have to go to the actual Price level list to see. Also, see how lame Pro’s Price level function is vs Plus…Again, Plus supports price ruling customized by item, customer type and by date.
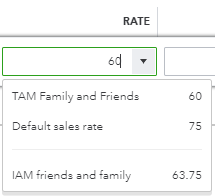
And on a sales form, in rate field, just like in Pro, QuickBooks Online will show the default sales rate and the price rule rate:
Pro supports partial PO receiving, and so does Plus…
As well as QOH adjustment, value adjustment (starting value remember, not to be done all the time), and even preferred vendor…Oh I also love the Stock status at top of P&S list in Plus now.
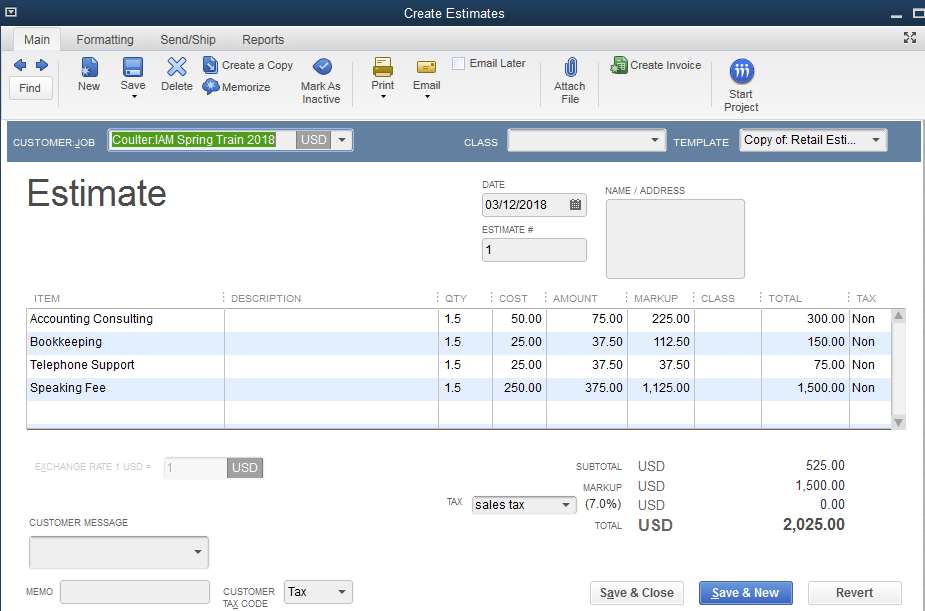
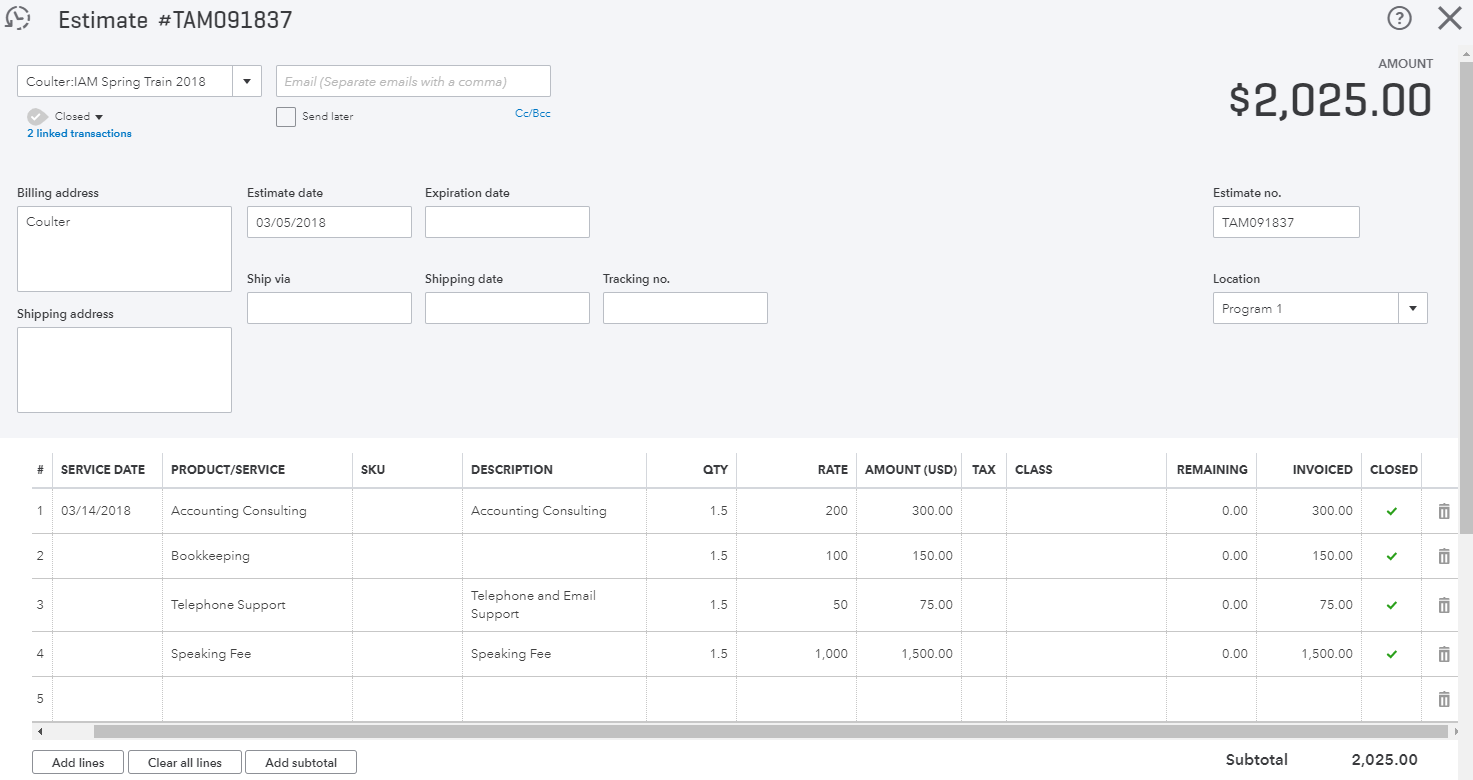
If I prefer QuickBooks Pro at all, it is due to custom fields at the item and name level, as well as the Markup column on Estimates. In Pro, I can see my estimated cost and revenue on the form itself, without even running a report. Not so with Plus, though I can get really close and there are some key settings to turn on to get the Estimating feature set. We not turn our gaze to those, think key features for service based businesses…
Now, look at the QuickBooks Online Plus estimate above. I have already invoiced progressively against it. Progress invoicing is supported in Pro, and also in Beta in Plus right now, soon to be rolled out to all Plus subs. It behaves just like the same feature in Pro save for reporting. At this time in Beta, not a lot of good visibility outside of the actual estimate or invoice of what has been invoiced against etc…But that will be added soon. Pro gets the same pop as below re Progress Invoicing…
QuickBooks Pro supports Estimate to Actual reporting, for me the last real gap in QuickBooks Online that matters. I hope we get it in Plus sometime soon…
That being said, since I can do more than 1 budget per year in QuickBooks Online Plus, I can create a budget for the customer/sub-customer/project, like I can for a customer/job in Pro, and run the Budget vs Actual report filtered for that sub-customer/project to get the same info/result in Plus as in Pro…
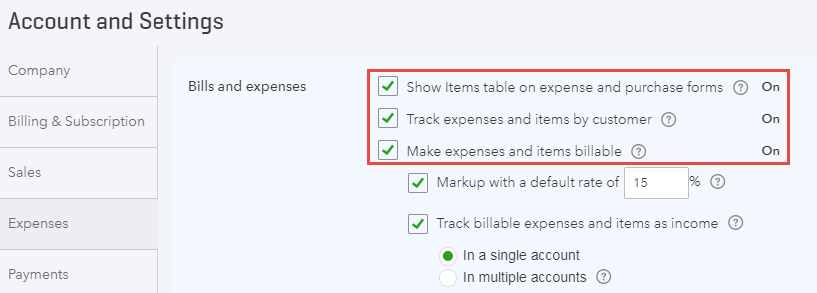
A few key settings to get the job costing going in QuickBooks Online Plus to be like QuickBooks Pro, see screenshots below. This allows me to pass thru time, expense and material to an invoice, or just tag jobs for profitability reporting.
As well, I can tag a customer, sub-customer or project to time entry in QuickBooks Online like in Pro, but remember, time is non-posting till you add it to a posting transaction…and no, QuickBooks Online cannot track labor burden by job yet.
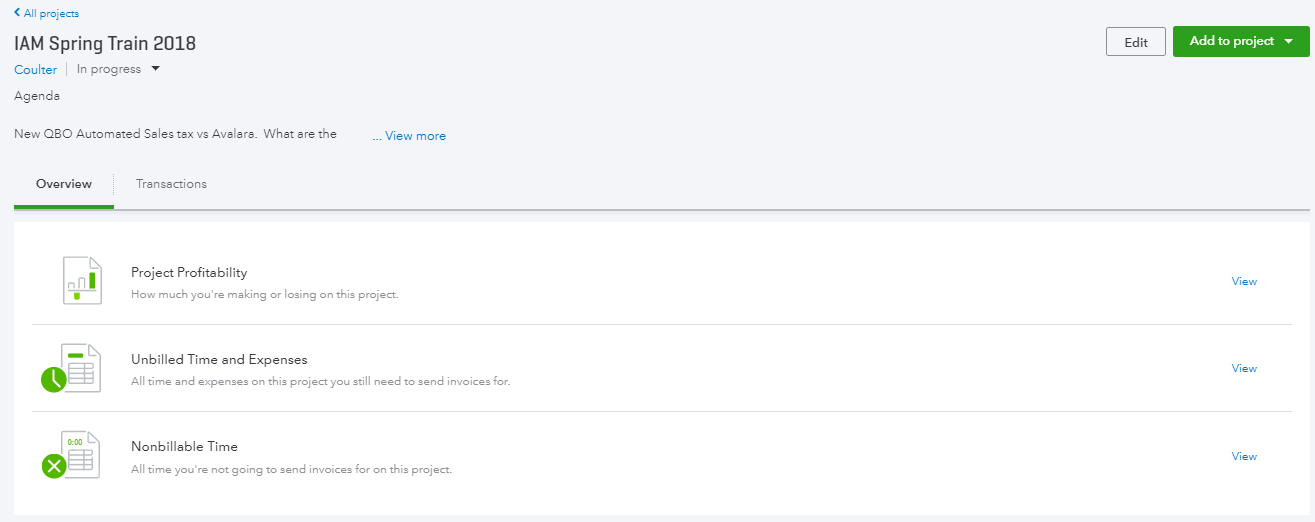
The Projects tracking feature can be turned on too, as it gives a Project center for good transaction, report and progress visibility. Pro does not offer the below visually or even in a center…
Net…net…QuickBooks Online Plus is super close to QuickBooks Pro feature set wise. Just a couple more enhancements and they will be literally interchangeable as options for your clients to track their businesses. There are advantages and disadvantages in both platforms, and I think a firm should support both for the most part, as our industry moves closer and closer to cloud only.
Side by side: comparing QuickBooks Online to QuickBooks Desktop
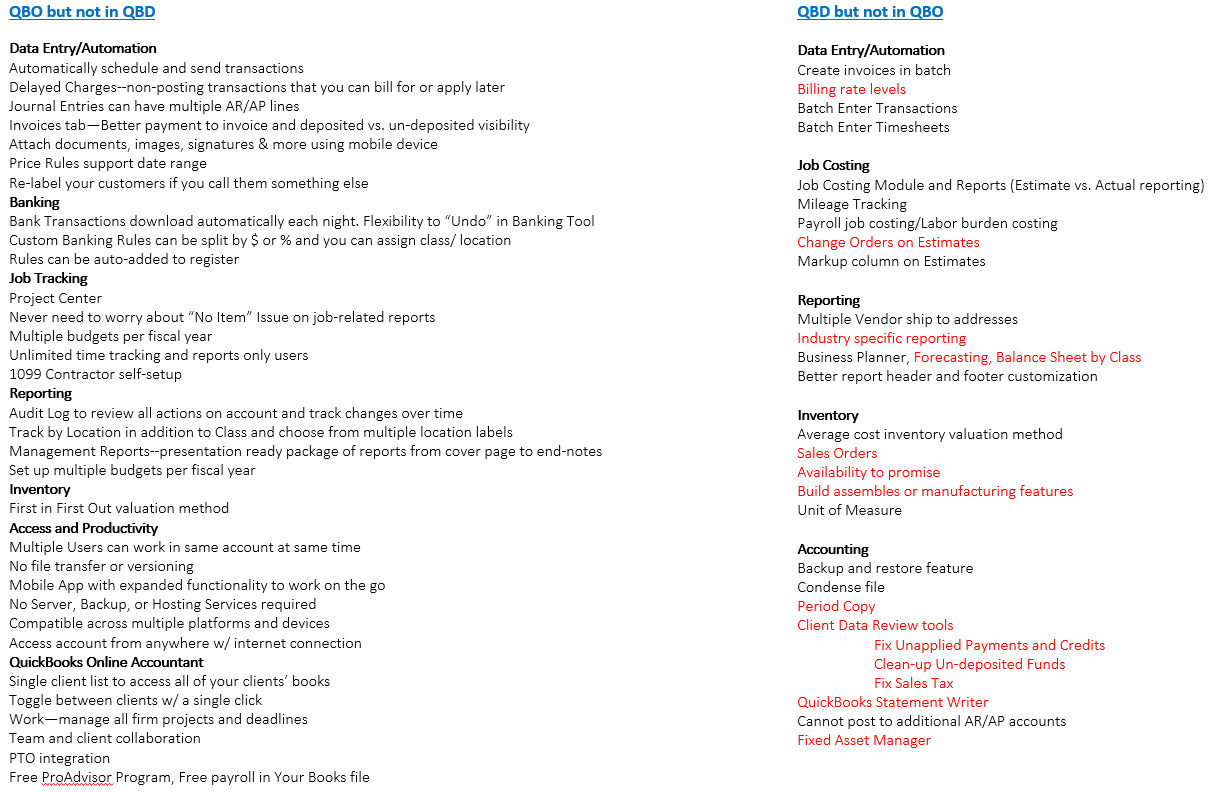
Last, I wanted to leave you with a thorough comp chart of QuickBooks Desktop and QuickBooks Online. Important to note, the stuff in red in the QuickBooks Desktop and Not in QuickBooks Online column is not in QuickBooks Pro ☺.
The below permissions are set in the Firm Administration and Books tab in the team member’s record. You access this page by clicking on Team tab in QBOA (assuming you have access), then click on team member name in list you want to affect.. Regardless of the below QBOA team member access level settings, team members are Company Admins on any QBO client file to which they have access.
Basic Access Level Settings—This team member is completely Basic access level. All they see is the Clients and ProAdvisor tabs in the firm QBOA. Essentially, this is for the staff that you only want to access the clients you want them to access, and nothing else. Absolutely NO firm admin duties allowed. There is only one Basic option, and it is the mode in the screenshot below. If you allow access to any other field, Access mode turns to Custom:
By changing anything in the access column drop downs, the type of access changes to “Custom”
There are different options for QBOA Team member permissions for your firm’s books and client access
Custom Access Level Setting—Manage your clients
The first Custom access level is for the Basic staff team member needing the ability to Add a QBO client sub to the firm QBOA. You choose Yes for Manage your clients setting. As you can see in the next picture below, Firm Admin and Firm Books are still completely restricted, but I have the ability to allow a team member to add a QBO sub. The team member will see nothing in QBOA but the Clients they have access to, ProAdvsor tab and the Add Client tab. While the team member can add the QBO sub to Wholesale Billing, he or she cannot edit, view, or manage Wholesale billing settings at all. Nor can this team member move existing clients under Wholesale. As well, this team member cannot assign other team members to the newly added QBO sub. Net, net: I can give a QBOA team member the ability to add a QBO sub, add it to wholesale, work on their appropriate assigned clients, and get certified in QBO as a free ProAdvisor.
This QBOA team member has NO other firm admin abilities:
This QBOA team member will have no access to the firms books, aka “YOUR BOOKS”
Custom Access Level Settings—The Rest
Note: I decided not to test any View Only settings per access level, as why would I set a team member to view something if I didn’t want them to have access to modify it? Also, I kept the Manage your clients set to Yes for all of the following, which you may or may not want to do depending on need. We just broke down Manage your clients so hopefully this does not cause any confusion.
Firm Information Edit, All other settings None, Manage your clients Yes—No differences noted. As far as I can tell in my testing, this minor setting change makes no difference to the above Basic team member with Manage your clients set to Yes.
Firm Information Edit, Firm Users Edit, Manage your clients Yes—The team member now has some firm administrative access. Upon giving team member Edit access to Firm Users, team member can now see Clients they have access to, Team tab, ProAdvisor tab, Add Client (remember, Manage your clients set to Yes), and Your Books. Team member can add staff to the team and edit any staff member save for the QBOA Master admin. While the team member sees Your Books, they have no access to it. All Your Books pages throw a “We’re Sorry warning.”
This QBOA team member still has no access to manage wholesale billing or see the firm credit card, nor can they move existing clients not under Wholesale to Wholesale billing:
This QBOA team member won’t be able to edit Wholesale Billing information.
Firm information Edit, Firm users Edit, Subscriptions and billing Edit, Manage your clients Yes—All same abilities as the above setting, with the addition to Edit billing information for Wholesale Billing, aka, access and change the firm credit card. This team member can still NOT move existing QBO clients not under Wholesale to Wholesale, nor manage any wholesale billing duties that have to do with adding payroll, upgrading Essentials to Plus, cancelling payroll or removing a client from Wholesale billing.
This QBOA team member can edit Wholesale Billing settings.
Firm Administration Access Edit for all, Your Firm Books Customers and A/R Yes, Manage your clients Yes—The below setting allows the team member to access all customer and sales related forms and reports in the Your Books file, plus the same permissions allowed in the above setting. The team member will have NO access to chart of accounts, registers, online banking, vendor/expense related forms and reports, attachments, budgeting, bank reconciliation or payroll.
This QBOA team member does have access to time forms and reports. NO access to financial reports.
Custom access for this QBOA team member.
Full Access Level Setting—This team member has access to all areas and tasks in QBOA, as well as all the permissions allowed in the settings above. The only move this team member cannot make is remove the Master admin of QBOA. This team member has access to all of the Your Books file, including Payroll, registers, banking and financial reports. The Full team member is basically a Company admin of QBOA.
Only the Master Admin is greater than Company Admin, but not by much.
A recent conversation in my Facebook group was all about how to attach bank and credit card statements in QuickBooks Online. I thought it would be a great to show the two methods of doing this.
Using zero dollar transactions to attach bank and credit card statements in QuickBooks Online
The first way to attach bank and credit card statements in QuickBooks Online is a bit more “old school” method, and my preferred way of doing this, because you can create custom reports that make it easy for users to find statements for any account in one place.
First, create a new vendor that corresponds to the account: in this case, we’ll add “Amex 30018 Statements” to our vendor list:
Vendor Center > New Vendor
Next, you’ll navigate to the Amex register and create a transaction that posts to/from the Amex account, and has the same ending date shown on the statement:
Quick Create > Expense
Do the same for all of the accounts that you’d like to attach bank and credit card statements in QuickBooks Online: PNC, Bank of America, even PayPal.
Now you can create a report that will list all transactions to which attach bank and credit card statements in QuickBooks Online. We’ll set the filter to just show transactions for the current year, and selected vendors:
Reports > All reports > Transaction List By Vendor > Customize
Sharing the report for other users makes it very easy for everyone to access the bank statements. They simply open the report (or bookmark it for easy access) and click on each transaction to find the statement attached.
Using the vendor detail page to attach bank and credit card statements in QuickBooks Online.
The second method is much more simple, but doesn’t allow for the ability to see all statements in one list or report.
As in the first method, you create a new vendor.
Next, you simply navigate to the vendor detail page, click on the attachments tab, and drag and drop the statement.
Vendor List > Edit Vendor
Either way works, you just need to decide what method works for user needs, when you attach bank and credit card statements in QuickBooks Online.