Do you have a remote team? I’ve been advocating the work-at-home lifestyle since my son Arik was born, 7 years ago. At that point, I realized there is no need to go into the office everyday—I can be as productive at home; probably even more so, if I try to avoid all the Law & Order reruns that are on.
Work at home is no longer a trend—a remote team is a proven way for small and large companies to save money while increasing productivity. In fact, according to an article in Remote.co, two-thirds of managers say employees who work remotely increase their overall productivity. The same article cited that remote working policies decrease employee turnover and increase employee engagement.
Remote team members are more engaged.
Increased employee engagement when working from home, how is that possible? A 2012 Harvard Business Review article found that remote team workers are MORE engaged than those who work in the office. According to the article (and me), people work harder to connect when they aren’t in the same location.
Take my home-based bookkeeping practice and consulting firm as an example. I have clients and colleagues all over the country. Even though I’m at home, I’m constantly collaborating with my remote team. We see each other rarely (even the folks that live in the same town as I do), yet we really know one another, our strengths and weaknesses and what’s happening. That’s important because all teams work better when the members take the time to know each other.
I’m here to tell you, you can have great team relationships wherever your team members may be—in the cubicle next to you or working from a Wi-Fi connection on the beach. It just takes a little effort and the right technology.
In it, I’ll cover techniques to engage your remote team and technology to keep it simple. Register now—this webinar may just be what your business needs to improve team communication and collaboration.
PS: If you can’t make the live webinar – please register! I’ll send a link to the recording.
PPS: There are two other opportunities to find out about Ooma Office: Thursday, April 21, we’ll have Ooma VP of Product Dennis Pang as our guest on the QBO Show & Monday, April 25, we’ll be doing a special Q&A with Ooma in our FaceBook group, Between Wall & Main (you’ll need to request access to the group to participate).
Step by Step: Convert QuickBooks Desktop to QuickBooks Online
So you or your client wants to make the move from QuickBooks Pro, Premier, Mac, or Enterprise to having access the books virtually anywhere? QuickBooks Online, yes? Mmmm. yes please!
I shall happily guide you through this process. Come with me, and let’s go down this path together. I promise you’re in good hands; I’ve been doing this for a very long time.
If you haven’t seen QuickBooks Online in a while, things have changed a quite a lot, but this is great news! It’s so easy to create a QuickBooks Online account and convert your QuickBooks Desktop data these days. Just a few clicks of the mouse, really.
If you’re an accounting professional using QuickBooks Online Accountant, you have a few options.
You can have your client create an account, then invite you as an accountant user.
If you’d like to offer a discount and build the subscription cost into your fees, you could add them to your Wholesale Billing account.
You could do what I do – place the order via an Intuit Reseller (I just happen to be one, and if you’d like, you can place orders through me – I share commissions!), get a discount, but the client pays for the subscription. This last option, we remain Master Admin until we get QuickBooks Online setup, then we invite the client and transfer the Master Admin status over to the client and say on as Accountant User.
Once you have the QuickBooks Online subscription set up, you’ll want to get your QuickBooks desktop file ready to convert. I’ll show how to do this with Pro & Premier editions first, and then we’ll go over converting a QuickBooks Enterprise file (yah, you can convert these too!)
Converting from QuickBooks Pro or Premier to QuickBooks Online
Before you do the actual conversion, you want to do any clean up work in the .QBW file; if you’re a small business, I would recommend finding a QuickBooks ProAdvisor to do this. (Fortunately, you’re reading this and guess what? That’s what we do at Kildal Services.) You’ll also want to check out this article to see what will convert and how they’re handled in QuickBooks Online.
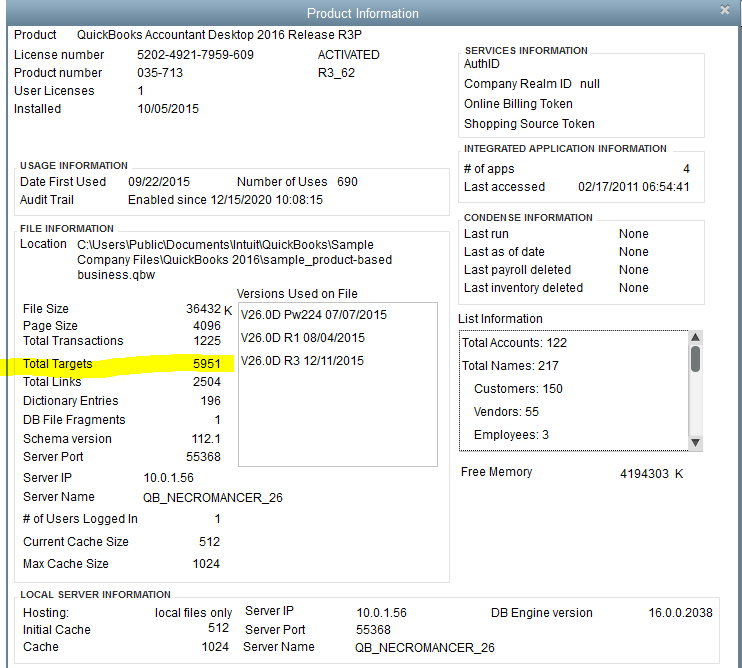
Once all of that is done, you need to make sure your file can be converted. Open it in QuickBooks desktop, and hit F2 on your keyboard– look at the number of targets. If it’s under 350k, you’re good to go. If not, you need to condense file.
^ F2 Screen in QuickBooks Desktop
With a file that meets the target requirements, now you’ll want to verify the data by clicking File > Utilities > Verify Data. The official recommendation from Intuit is to “Verify and rebuild, if prompted”. However, at Kildal Services, our standard practice is to verify, rebuild even if not prompted, create a portable file, restore the portable file, and then convert that restored portable file.
Why go through all of this? Just to make sure there are no broken data base links and to reduce as many issues as possible before converting. If there is data corruption in the .QBW file, this will remove as much of it as possible – without sending it to Intuit’s Data Services. (And frankly, if the file is that bad, you probably shouldn’t be converting it anyway.)
Open the file, click the Company > Export Company File to QuickBooks Online near the bottom of the menu:
Now, just follow the prompts –
Login to QuickBooks Online:
Choose the account you want to which you want to convert the desktop file:
If you’re converting a file with Inventory to a QuickBooks Plus account, you’ll need to answer the question about whether to bring in inventory, and if so, what date to begin using the FIFO valuation method (QuickBooks Pro & Premier use Average Cost:
JANUARY 25, 2016 UPDATE, per Intuit Product Specialist, Woody Adams:
When you convert existing activity from QB Desktop to QB Online:
If you elect to turn on inventory in QBO, sales transactions with inventory parts dated before the FIFO start date record the sale only, no adjustments to inventory asset or cost of goods sold. A separate adjustment is created at the time of conversion to record the historical QBD weighted average inventory valuation for each inventory product outside of the individual sales transactions. These sales transactions dated before the FIFO start date can not be updated.
If you elect to turn on inventory in QBO, sales transactions with inventory parts dated after the FIFO start date record the sale and and the cost of the products sold via the FIFO method.
If you elect NOT to turn on inventory in QBO, sales transactions with inventory parts show three lines for each inventory part to account for the sale of the product, the removal from inventory, and the cost of the sale. Be aware of this and notify your clients not to re-send these invoices if they do not want to share this sensitive cost information with customers.
Now, QuickBooks Online will tell you to sit back, relax and let it do all the work while it copies your file onto the World Wide Web:
Last, you’ll see this screen, telling you that you can go take a nap, and that you’ll get an email when the data is ready. It usually doesn’t take that long, unless you have a giant file, just so you know:
The email confirmation looks like this:
Converting from QuickBooks Desktop with Multi-Currency turned on to QuickBooks Online
One super cool thing that was released just before writing this: users can now convert a QuickBooks desktop file that has multi-currency turned on. For years and years and years, if the desktop file had that preference set, it was impossible to convert that file. In the summer of 2015, Intuit added multi-currency to the US version of QuickBooks Online, and in December 2015, the ability to do this was finally granted to us. YAY!
The difference here is that you’ll be asked to confirm your home currency during the conversion wizard,, similar to how you’re asked to confirm the switch to FIFO inventory:
The rest of the conversion process is the same as what I’ve just outlined, and after conversion, Multi-currency will be turned on in QuickBooks Online. Your home currency will remain the same in QuickBooks Online as it was in desktop, if you’ve selected the same in the screen you see above ^. Reminder;just as in desktop, you cannot turn this preference off in QuickBooks Online, so make sure you want it, before conversion.
Converting from QuickBooks Enterprises Solutions to QuickBooks Online
The first step in converting a QuickBooks Enterprise Solutions is to open the data file you want to convert, and hit that F2 button (you can get to the same screen by clicking CTRL +1) again.
Once the Product information screen is up, you’ll click CTRL+ b q
Next, just close the Product Information screen – you can do that by clicking the OK button at the bottom.
What happens next is the Export to QuickBooks Online Wizard will open up, and you’ll follow the same instructions that I just detailed when converting QuickBooks Pro/Premier:
Sign in to QuickBooks Online
Choose the QuickBooks Online account to which you want to convert the QuickBooks Enterprise Solutions file
Answer the FIFO question, if applicable
Relax and wait for the email confirmation
I also want to point out a video that my friend Woody Adams created that will show you how to do this, you can find it here.
Verifying data after converting from QuickBooks desktop editions to QuickBooks Online
Now you’ll want to check to make sure your financials all match your desktop.
It’s recommended to compare the Profit & Loss and Balance Sheet reports from both desktop and online. Set the reports in both to All Dates and Accrual basis.
Keep in mind: when moving from QuickBooks desktop to QuickBooks Online, your Cost of Goods and Inventory Asset accounts won’t match – this is because of the move from Average Cost to FIFO inventory valuation.
You’ll also want to verify the open transactions in Accounts Receivable and Accounts Payable accounts.
Last thing to remember: After conversion you’ll most likely see multiple sales tax payable accounts on the Chart of Accounts in QuickBooks Online. There will be one account in QuickBooks Online for each Sales Tax Payable account you had in desktop. In addition, QuickBooks Online, by default, will create a Sales Tax Agency Payable account for each sales tax jurisdiction the desktop file had. To clean this up, you’ll need to make the accounts that came from desktop inactive (delete them) and use the new accounts in QuickBooks Online to track sales tax – make sure you make the proper adjustments to zero out the balances in these accounts. In QuickBooks Online, all sales tax payments must be made by using the Sales Tax Center – you get to this via the left hand navigation bar
For more information on how QuickBooks Online handles importing from QuickBooks Desktop, check out this article.
I’m a cute dresses and high heels kind of gal. When I started my bookkeeping and consulting practice in 2004, it was because I wanted to work on my own terms. In 2008, I went remote be able to from home after my son was born. I soon realized that working in my jammies or on my deck or snuggled up in bed was TOTALLY AWESOME, no matter how much I love a fantastic pair of heels.
Moving the majority my clients to QuickBooks Online freed up a ton of my time, enabling me to post answers on forums, and essentially build a brand for myself as a great bookkeeper, QBO expert and help others perfect what I call Work/Life Integration (because balance, I think, is BS).
When Intuit asked for video submissions to the Firm of the Future this summer, I almost didn’t enter. They wanted accounting firms across the U.S. to showcase their forward thinking, future-ready business practices and tell us why they are a Firm of the Future. And I thought, “Well hell, is this futuristic? I’ve been doing it for, like, 7 years.”
To me, what is most exciting about my practice is the work/life integration, and helping others find it as well. I’m passionate about helping others get to where I am in my life: being able to work from anywhere, being able to take a hike in the middle of the day, doing what I want to do while running my business – how awesome is that!
Well, Intuit agreed that it is awesome and has made me a finalist in the Firm of the Future contest. Thanks Intuit! Not only for including me as a finalist but for enabling me to have that work/life integration!
I don’t mean in general, like “turn off your phone and disconnect” or “get back to nature”. I mean, really, who actually does that? Not me. I even have a little waterproof case so I can take my phone to the pool, or the beach.
Disconnect your cancelled apps from QuickBooks Online
That is what I’m talking about.
Yes!
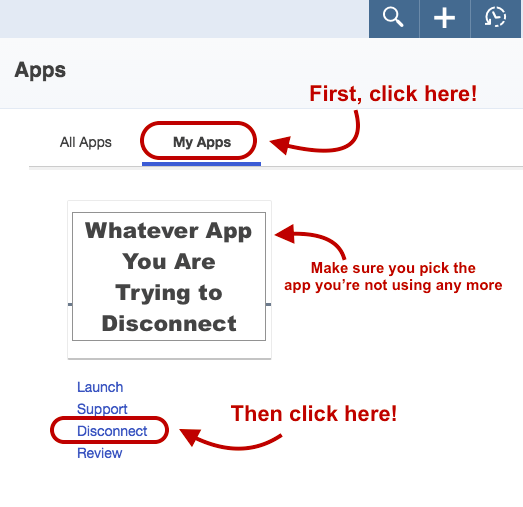
You need to remember to disconnect any add-ons you’ve signed up for via apps.com – then cancelled, for whatever reason.
Why do I need to this, you ask?
Just because you’ve cancelled the account with the app… doesn’t mean they can’t (or won’t) read all of your data in QuickBooks Online.
No. You. Didn’t.
I’m the last person to really make a big deal about this sort of stuff. I’m definitely concerned about security and privacy, but I’m not losing sleep over the fact that Google probably knows intimate details about me than my husband.
I just think it’s one of those best practices that rarely gets mentioned, because many of us think it’s just something everyone would know to do – and I realized as I was leaving the ASBDC conference last week, that I’ve NEVER TALKED ABOUT IT IN ANY APP SESSION I’VE PRESENTED.
For this, I apologize to all of you that are reading this and have been in any of these sessions.
Don’t get me wrong – I have no idea if this has happened. I have no proof of any apps that have done, or continue to do this.
What I do know is that unless you login in to QBO, and then head over to your left nav bar…
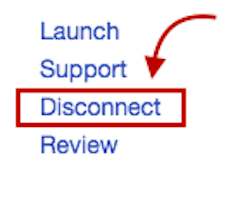
…Then go to “My Apps”, find the app you’ve cancelled, and click “Disconnect”:
If you don’t do disconnect… Any apps that you connected, but have otherwise cancelled directly via their website, will still have access to read your data.
So yeah, always remember to disconnect your cancelled apps from QuickBooks Online, okay peeps?
I know. I know. You’re thinking: “Hand write? What the what??”
I love my iphone, my ipad, my MacBook Air. I’ve said over and over again: if I could do everything for work from my phone, I would be in heaven. I work remotely, I leverage technology to do everything I can.
Except my To Do list.
Trust me, I’ve tried just about everysingletaskmanagerappthereis. And we DO use a project management app here at Kildal Services. I have yet to find a task manager that I love – that works for me personally.
I want pull a George Constanza and to tell each app: “It’s not YOU, it’s ME.”
The reason is that I really only remember things well if I read them; if I write them, I’ll remember them for damn near forever.
In the past, I’ve used an app in the past for random things, called MyScriptMemo. It was pretty close to perfect – what I wanted was an app that I could hand write a list, and that would sync between my ipad/iphone for editing and my mac for viewing. I’ve come to terms with the fact that this just ain’t gonna happen.
Fortunately, two things happened recently, that may lead me to leave behind my beloved pink Moleskinenotebooks & pink ink pens.
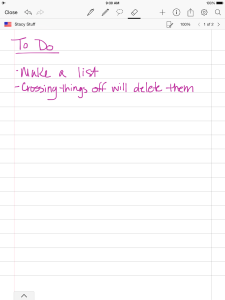
The first is that I’ve upgraded to an iPad Air. SO MUCH smaller and lighter than the 2nd gen iPad I had. It’s about the same size as the notebooks I’ve always used to write my To Do Lists – a new page each day. I transfer the items that didn’t get finished each night for the next day. With, of course, pink ink.
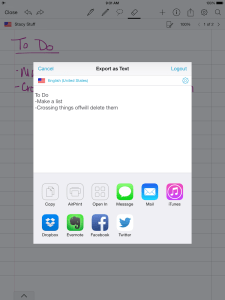
The second is that I discovered another app from MyScript, called Smart Note. Better interface the other app I was using, very similar to Penultimate, which is the app I’ve always used to take notes during client meetings. With Smart Note, I’ll be able to delete Penultimate, because now I can keep multiple notebooks and instead of sending the notes to a client as an image or PDF, I can quickly convert them to a text, and edit needed. This creates a more polished, professional image.
The best part? I don’t have to give up my pink ink 🙂
For someone that refuses to give up real books for an e-reader (although I have read a few books with my Kindle app), the big question is: do I really WANT to give up my paper & pen?