My friend and co-host of The QBO Show, Woody Adams and I have been working out the best way to manage post QuickBooks Desktop to QuickBooks Online Conversion Sales Tax Clean Up.
Yay for you! You’ve made the move from QuickBooks Desktop to QuickBooks Online. All of your reports match, but you’ve noticed some goofy stuff in your Chart of Accounts and Products and Services list, and it all relates to your Sales Tax.
Don’t fret, I’m here to give you the step by step instructions on doing a little bit of Sales Tax clean up in QuickBooks Online after you’ve converted your QuickBooks Desktop file. I mentioned this briefly in my post called StacyK’s Step by Step: QuickBooks Desktop to QuickBooks Online: “After conversion you’ll most likely see multiple sales tax payable accounts on the Chart of Accounts in QuickBooks Online. There will be one account in QuickBooks Online for each Sales Tax Payable account you had in desktop. In addition, QuickBooks Online, by default, will create a Sales Tax Agency Payable account for each sales tax jurisdiction the desktop file had. To clean this up, you’ll need to make the accounts that came from desktop inactive (delete them) and use the new accounts in QuickBooks Online to track sales tax – make sure you make the proper adjustments to zero out the balances in these accounts.”
First thing you’ll notice are some new accounts in your Chart of Accounts. If you’ve recently signed up for a new account, you’ll head to your left nav bar and hit Accounting – this is the most likely situation if you’ve just converted. (For an older QBO account, you’ll want to go to left nav bar and choose Transactions > Chart of Accounts):

There will be one account in QuickBooks Online for each Sales Tax Payable account you had in desktop. In addition, QuickBooks Online, by default, will create a Sales Tax Agency Payable account for each sales tax jurisdiction the desktop file had.
The thing is, you can’t delete/inactivate these accounts just yet. If you try this, you’ll get this message:

Well, FINE. I didn’t really want to anyway. I have other things to do!
Unlike QuickBooks Online, QuickBooks Desktop uses Sales Tax SERVICE ITEMS, and since these new accounts in QBO are connected to those services in our QuickBooks Online account. This means we have to take care of those before we can clean up the chart of Accounts.
Unlike QuickBooks Online, QuickBooks Desktop uses Sales Tax SERVICE ITEMS.
To delete/inactivate these items, you’ll click the Sales tab in your left nav bar, and then the Products and Services tab (for older QBO accounts, hit the Gear Icon then under Lists, choose Products and Services).
I think the easiest way to find the QuickBooks Desktop sales tax service items is to click the Type to sort the list, then scroll until you find the service items you need:

Here are all of our Sales Tax Items, and all we have to do is click the drop down next to Edit and choose Make Inactive for each one:

Now that we have those deleted/inactive, we can go clean up our Chart of Accounts, so let’s head back there.
I generally make the account that came in from QuickBooks Desktop inactive first, but make note of the account number, so that I can add numbers to the accounts that QuickBooks Online created.

Remember, in QuickBooks Online: DELETE = INACTIVE.
Remember, in QuickBooks Online: DELETE = INACTIVE.
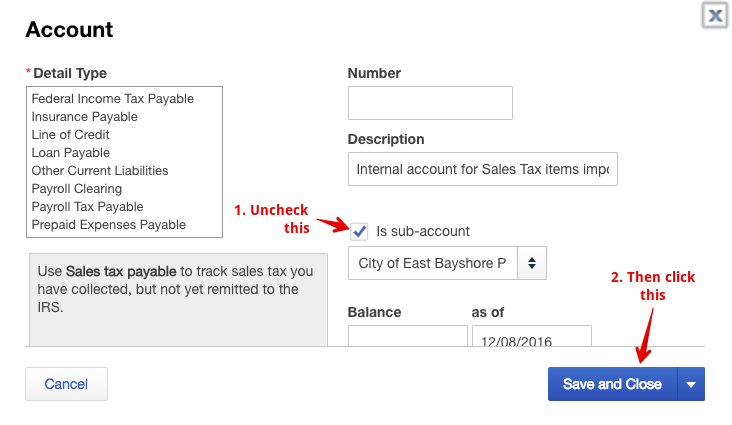
Now let’s get rid of those sub accounts with the zero balance. To do this, we have to click the drop down next to Register and choose Edit:

Then we change it from a sub account to a parent account:

Now we make THAT one inactive:

Since I have two of these sub accounts, I’ll do all of this to the other one, but spare you the screen shots.
To clean things up just a bit more, I’ll edit the two Sales Tax Payable accounts that QuickBooks Online needs to track my two sales tax rates and add the account numbers. Now I have a nice clean Chart of Accounts:

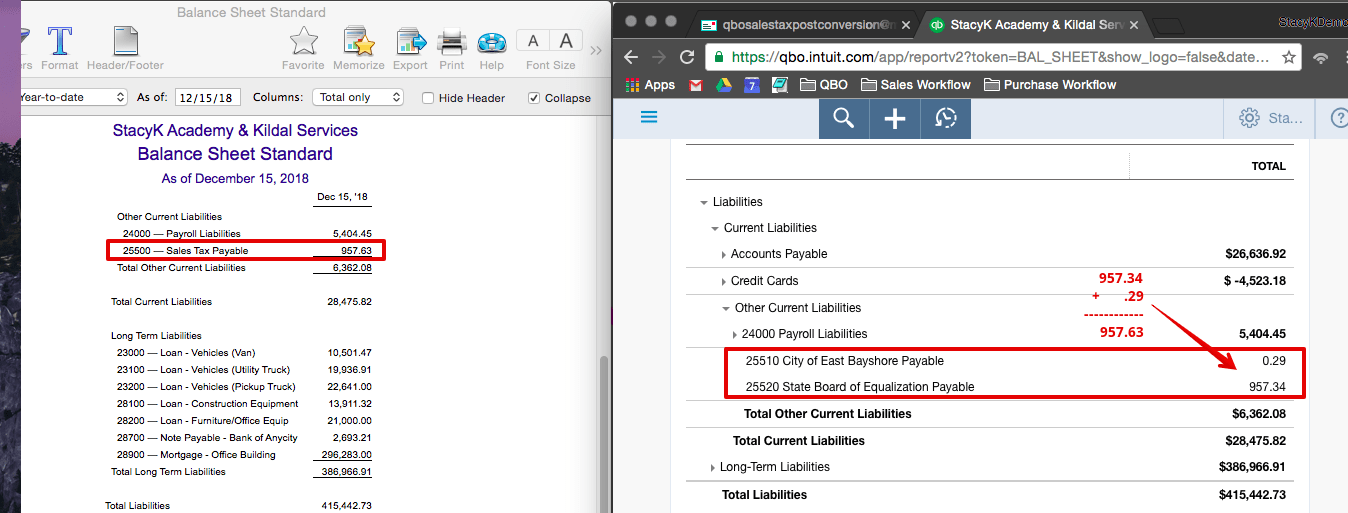
The last thing I want to do is make sure that all this clean hasn’t affected my balances, so I need to pull a Balance Sheet in both QuickBooks Desktop (here, I’ve used QuickBooks for Mac) and QuickBooks Online. I want to set the report to Accrual basis and the date range to All:

If the numbers don’t match, please note #5 and especially #6 below, in Woody’s checklist of Post QuickBooks Desktop to QuickBooks Online ConversionSales Tax Clean Up:
- Go to products & services list and delete all unwanted service items that are really the sales tax items from QBD.
- Make all sub Sales Tax Payable accounts as parent accounts
- Delete the sales tax payable accounts
- Merge the sales tax agency accounts into the Sales Tax Agency Payable account, if needed
- Sales tax center may still be jacked up, so make an adjustment.
- Draw line in sand, move on, stop over-analyzing.
Bottom line, the process isn’t too difficult – once you know what to do. However, it can be pretty frustrating if you’ve never done it before, or don’t have someone with whom you can obsess over all of it via email and text, like Woody and I did recently.


