QuickBooks Online is amazing software. There’s a newish feature – AI created subject line from QBO when sending emails – and I’m going to discuss it here.
I’ve tested most of the other small business bookkeeping tools out there in the last year (Xero, CheqBook, Freshbooks, etc) and I’ve yet to find one that truly compares. I spent the better part of two decades being one of a very few privileged ProAdvisors that Intuit contracted to create and teach QBO content.
That being said, some of the latest AI features in QBO (what Intuit calls Intuit Assist) aren’t always helpful, not necessarily asked for, and quite frankly, my clients have complained about them. One issue I’ve run up against personally is the AI created subject line from QBO.
I have around 50 clients that I work with, either as a monthly service provider, or as a one time or recurring consultant or trainer. Every single one of them has complained or asked me recently how to turn off the AI in QBO once and for all, as opposed to having to dismiss it each time. As annoying as it can be (I’m looking at you, Google Gemini in Google Drive, STOP ASKING ME EVERY TIME, I still don’t want your help!), I think it’s here to stay.
The issue I ran into recently is the AI created subject line from QBO when I send an invoice. I rarely send out emails, so it took me a while to notice: the subject line wasn’t the same as what I set up in my settings:
Pretty simple, right? A simple “here’s your invoice from my business”, which is all that’s needed for a brand new invoice.
The last few times I sent invoices, that’s NOT what the subject line was; I didn’t pay too much attention, and thought I’ll just check my settings later – which I then completely forgot to do.
I have QBO set up to send a copy of each invoice to me, and when I saw this AI created subject line l from QBO, I was horrified. At a cursory glance, it comes across as a DEMAND: “Pay invoice 6661034”, and only after looking more closely, does the “with a few clicks” part at the end soften the messaging.
After seeing that, I absolutely panicked. I didn’t create this message! I’ve had pretty much the same basic email subject line for close to 20 years in Account & Settings > Sales.
After I create a couple of invoices for my “test” customer, I noticed that the messaging was now different than the “PAY INVOICE” demand message:
“New payment request”? What fresh hell is that? That seems to imply that there have been previous payment requests for an invoice that was JUST CREATED and has never been sent!
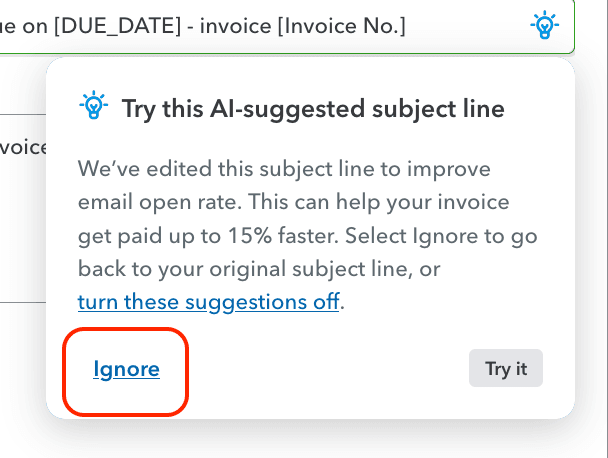
But then I notice that little light bulb at the of that line – could this be the culprit?
Upon clicking I find this:
YES. IGNORE.
I didn’t ask for it, I wasn’t notified of it, and I don’t want it. Which, silly me, I would assume would be obvious because I have a message that I already set up?
I’m not interested in an AI created subject line from QBO, and if I was, I would have found that setting and told the software I wanted it.
So anyway, that little light bulb in the screen you get when you choose “Preview and send” on a new invoice seems to be the only way to not use an AI created subject line from QBO, and it needs to be done each time an invoice is sent. If that’s the case, what’s the point in me choosing a default message in Account and Settings if the default in the “Preview and Send” screen is an AI created subject line from QBO? As much as I love QuickBooks Online, this is not something that’s helping me run my business.
Once a huge app lover, I’m now fast approaching App Fatigue. Earlier this year, I was accepted as a service provider for the Oakland Thrive program, and a requirement of that is that I need to have a scheduling link. I was DREADING having to find One. More. App.
I love it so much I figured I’d share a step-by-step guide to Google Workspace Appointment Scheduling.
One note: there are different features for scheduling, depending on what time of Google account you have. You can check out what’s available here.
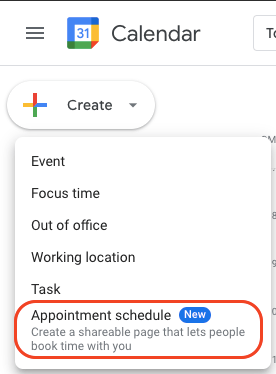
(You may be familiar with Google Calendar appointment slots, but that feature was retired on 8/7/2024, this post is about appointment schedules)
You can also access by opening your Google Calendar on your computer, click the “Create +” button in the top left, then click Appointment Schedule
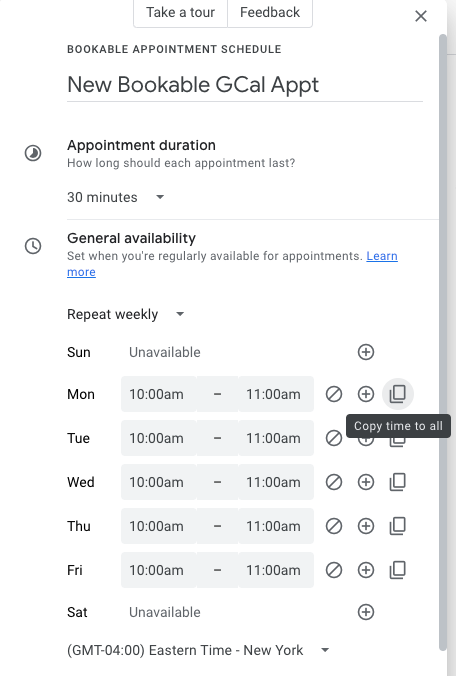
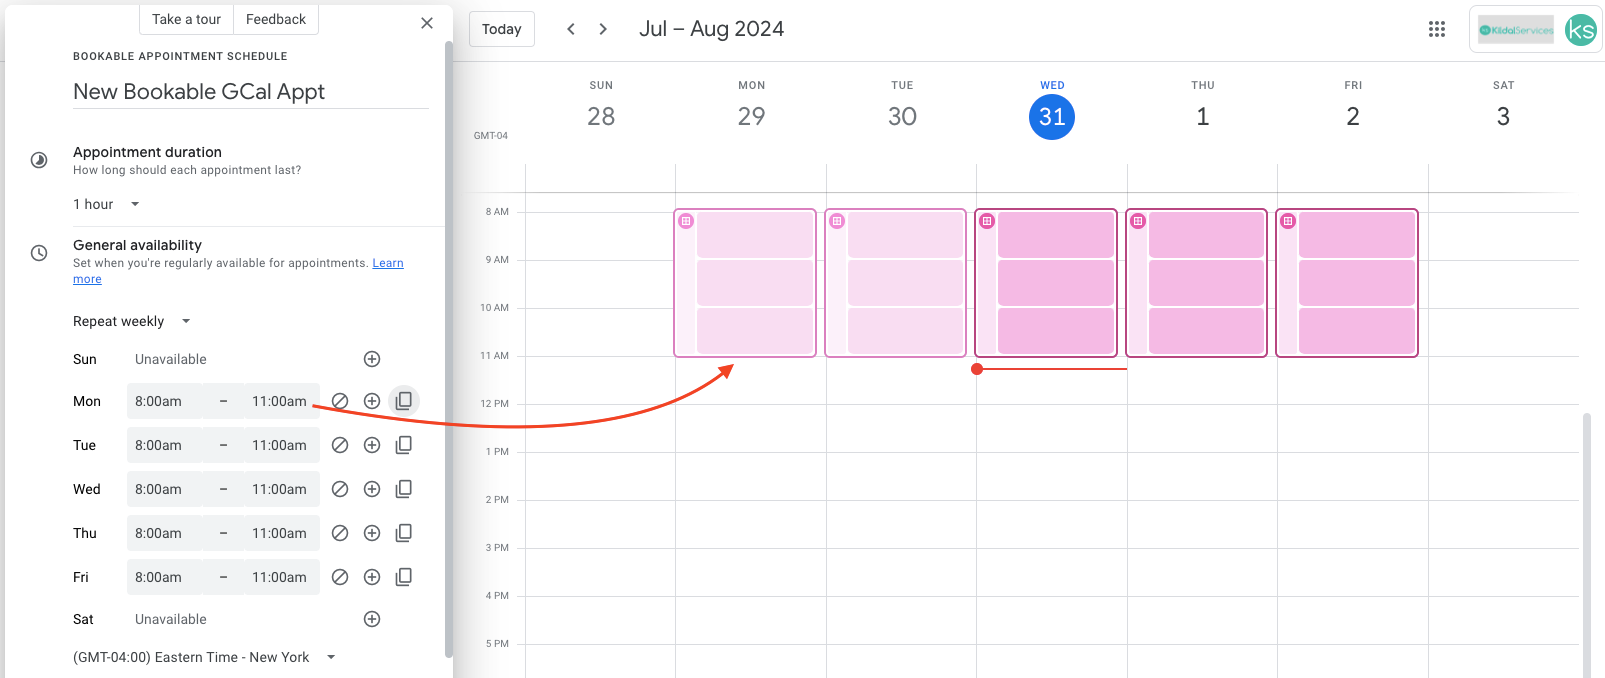
Choosing Your Availability
Next, give it a title, duration and set the availability (hint: the “copy time to all” button is VERY helpful):
You can see your calendar in the window, and the times selected as you change availability:
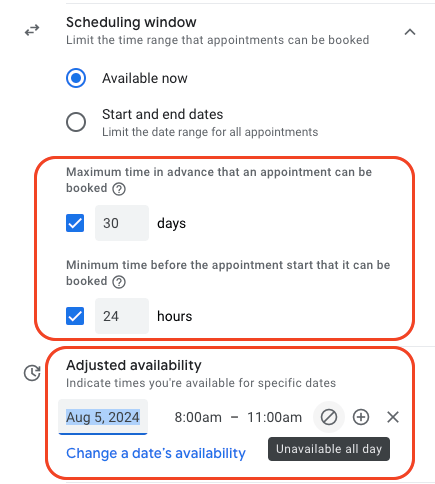
Defining the Scheduling Window
If you’re like me, you want COMPLETE control over your calendar, and since I have anxiety and ADHD, I need ample time to prepare for any meeting, so I want to set parameters for how far out and how soon someone can set up a meeting with me. I also want to be able to exclude any dates were I might have other commitments, like going camping in the summer, or snowmobiling in the winter 🙂
The scheduling window allows you to do this:
You can see here that I’ve set it so that appointments cannot be made more than 30 days in advance, and I need a 24 hour notice before one is set. I’m also blocking out 8/5 as unavailable.
(In this step-by-step guide to Google Workspace Appointment Scheduling, I’ll also show you how you can remove availability directly from the calendar – stay tuned!)
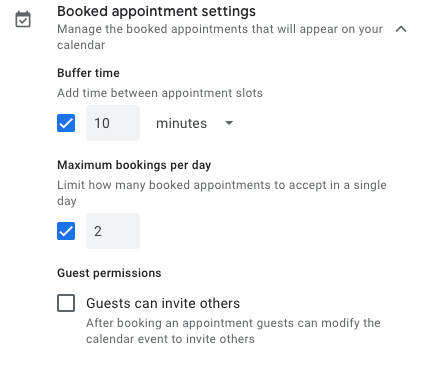
Settings for the Booked Appointments
I’m NOT a fan of back to back appointments, so I want to make sure I have a buffer. Who knows if one might go a little long, or I need more coffee (I won’t, but I still want the option!) or if one of my many, many cats deserves a treat (they all do, because they’re all adorable)? I want a spacer.
I also want to set the number of appointments; my brain won’t remember who I talked to and what we discussed if I jam pack too many in a day.
The last thing I want to do is allow the attendee to be able to invite others.
I can do all of that in this section:
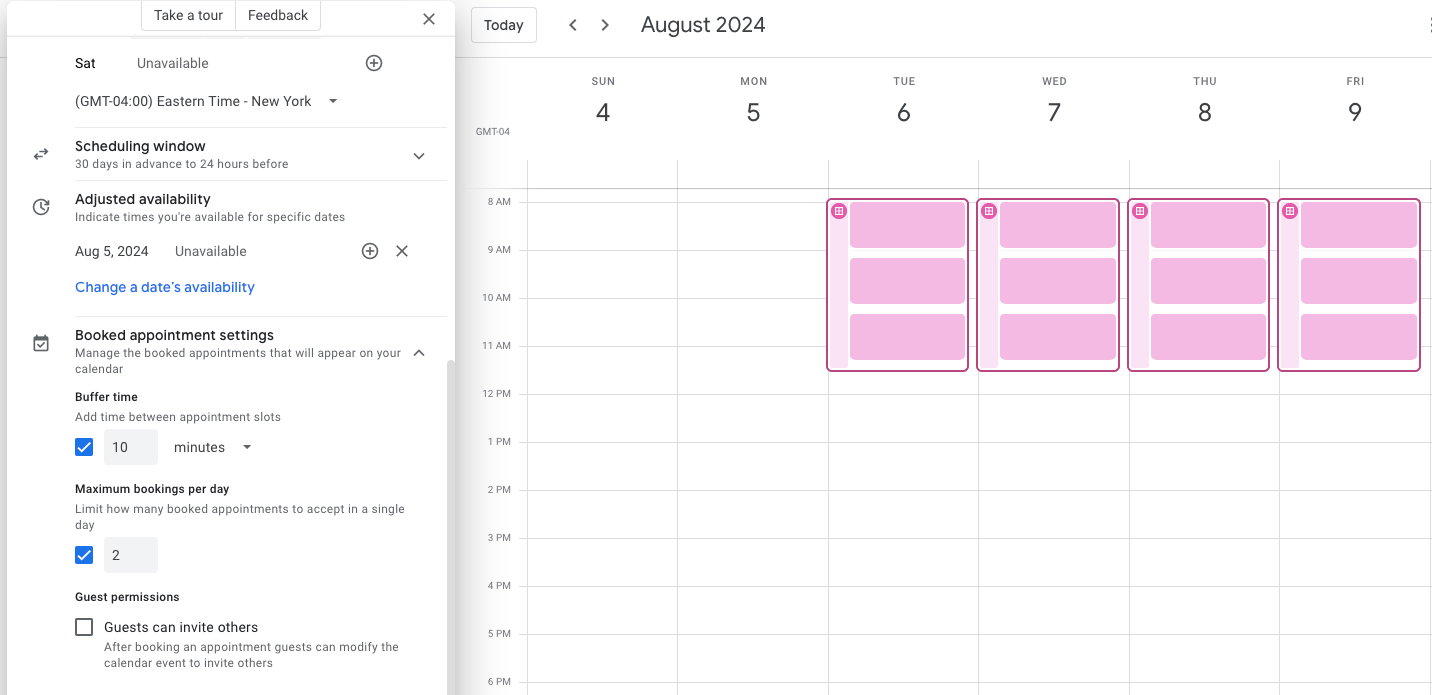
Just want to point out that as I’m making these changes, they immediately show up in my calendar. Here you can see the times I’ve set (8a-11:30a), and the spacing:
Even though I’ve got time in that window for THREE appointments, I’ve set that I don’t want more than 2 per day. So once two slots get filled, a guest won’t be able to schedule for that day
Choosing Multiple Calendars & Assigning Co-Hosts
At my firm, we use Google Workspace Business Plus, which means that I can choose whose calendars to use for scheduling, to make sure that a guest will always be able to get an appointment:
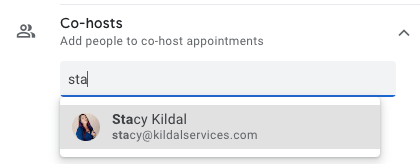
I can also choose someone in my domain to be a co-host:
Once I get through all of those options, I’m going to click the NEXT button at the button of the Appointment scheduling panel to finish customizing.
Photo & Name
In the next panel, I can review the page photo and name for the booking:
Note: this is pulled from your Google account, so changing this would be a global change to everything connected to your Google account.
Location or Video Call Info
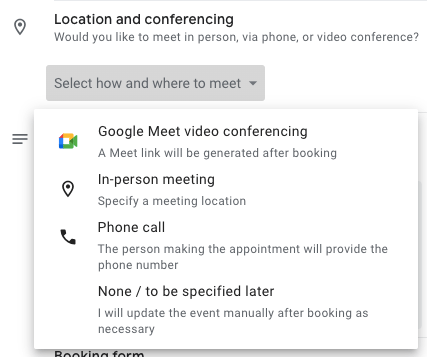
Next, you can choose where/how the meeting will happen. For me, I’m always going to choose Google Meet, but you can choose in person if these meetings will always happen in the same place, like your office. You can also make it just a phone call or leave it blank so you can set it up later:
Description of the Appointment
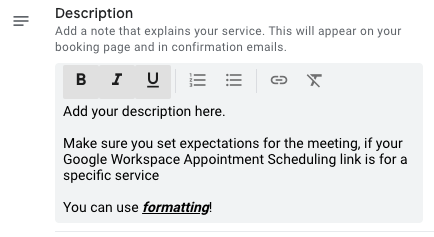
You’ll want to set a description for the appointment being scheduled; this is what attendees will see when they click your link to schedule time with you:
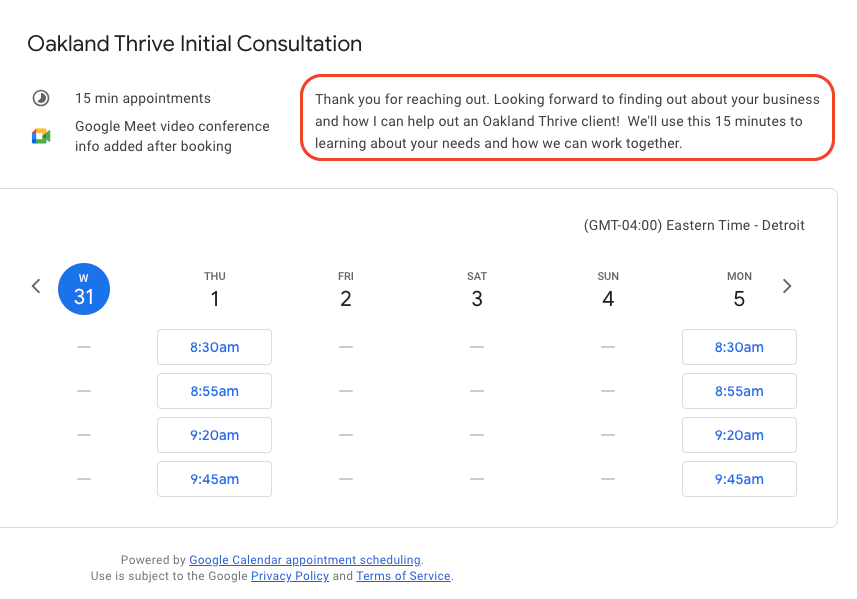
For the Google Workspace Appointment Scheduling that I set up for any Oakland Thrive clients, I have two options: a free 15 minute intro call and a paid 2 hour consulting/training session. For the 15 minute appointment, my description is designed to set expectations. For mine, I took the link and created a custom URL and QR code for Thrive clients to use.
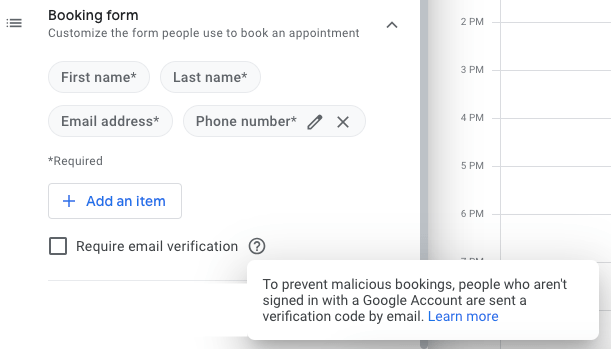
Required Info on the Booking Form
This section is for you set the details you want to get from the person booking time with you. I highly recommend requiring email verification to prevent jerks from spamming you! I also like to require a phone number, just in case there are technical issues, I can just call the client. The last time I used a link, the guest wasn’t able to get her mic to work, so we just opted for the call.
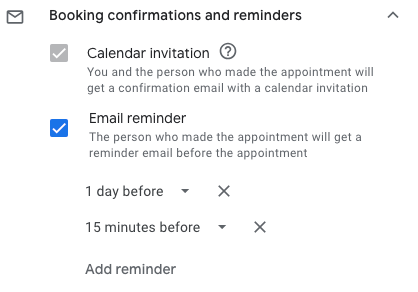
Appointment Reminders!
The default for Google Workspace Appointment Scheduling is to remind you and the attendee of your appointment via email the day before, but you can add additional reminders. Here you can see I’ve set an additional reminder for 15 minutes before:
Once you set the reminders, you’re done! Just click the SAVE button in the bottom right corner of the panel.
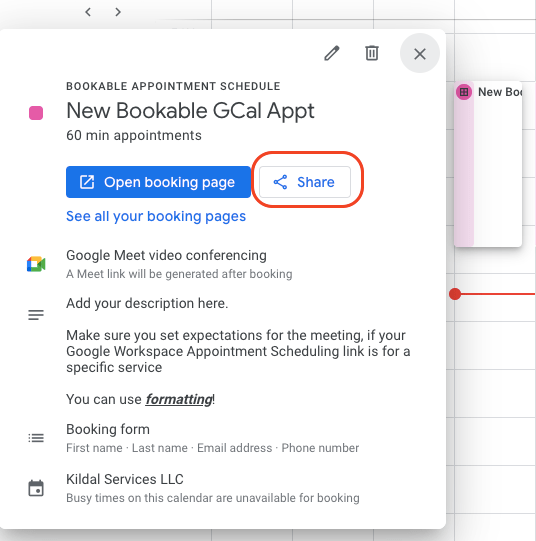
Sharing the Link, Editing Later
To get the link to share, just click the event on your calendar and click the share button to get the link. You can send this to anyone or post a link on your website:
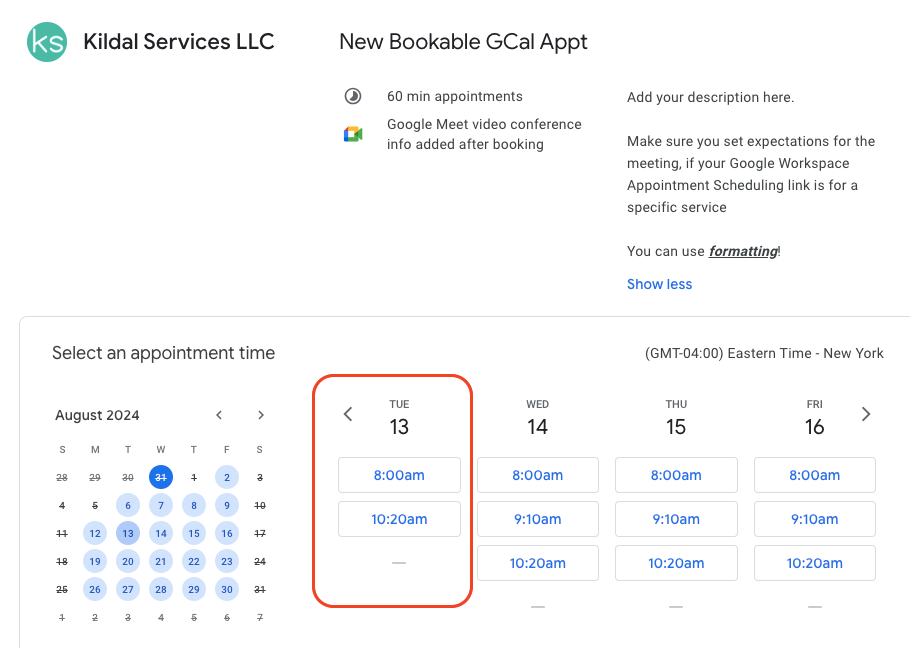
Clicking the “Open booking page” button takes you to what your guests will see when booking with you.
NOTE: To go back to the setup panels, you’ll DOUBLE CLICK the event direct from your calendar.
Adjusting Availability After the Fact
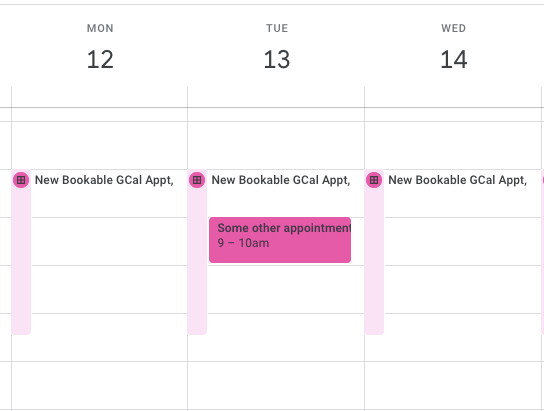
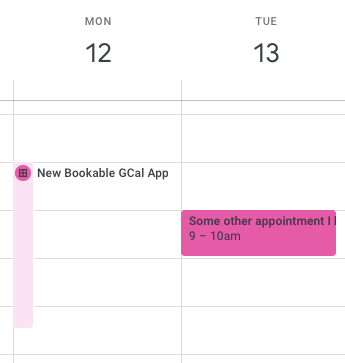
I mentioned earlier in this step-by-step guide to Google Workspace Appointment Scheduling that you can also remove dates directly from the calendar if needed. You can see here that I just have my Google Calendar open, and I have a conflicting appointment on the 13th:
If someone tries to book on the 13th, that time will show as unavailable:
But I want to remove ALL the options for that day, so if I click on the appointment for that day in my calendar, I can delete that by clicking on the Appointment Scheduling for that day, then clicking the garbage can:
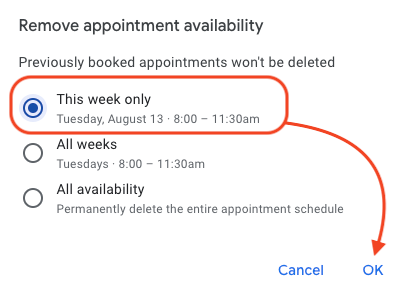
It then gives me a pop up to delete JUST that day, remove that day of the week entirely, or just delete the entire Appointment Schedule. I just want that day, so that’s what I choose and then click OK
Now my day for the 13th will be open for me to prepare for that other appointment!
I hope this step-by-step guide to Google Workspace Appointment Scheduling was helpful! As someone that has resisted using a booking tool for YEARS, this was painless! I’m already using Google Calendar and Google Workspace for business, so not having to sign up for ANOTHER app was the biggest draw for me. Finding out how easy and flexible it is was just icing on the Appointment Scheduling cake!
Are you a ProAdvisor looking to streamline your payroll management, enhance productivity and, increase firm revenue (AND be a hero to your clients)?
Well, my fellow accounting peeps, look no further than QuickBooks Online Payroll! This powerful tool offers a range of features that can help you handle payroll for your clients, making your job as a ProAdvisor much easier. In this blog post, we’ll delve into 4 key features of QuickBooks Online Payroll that can help you supercharge your productivity and get you ready for tax season:
Flexible Accountant Mapping in QuickBooks Online Payroll
Using QB Time Inside QuickBooks Online
Simplified Payroll Item Management in QuickBooks Online Payroll
Managing Employee Documents in QuickBooks Online Payroll
Flexible Account Mapping in QuickBooks Online Payroll
One of the most time-consuming aspects of managing payroll is ensuring that transactions are accurately categorized in a way that is meaningful for your clients. Having numbers in the right places so that you can be that trusted advisor is so important for you and your clients! Flexible Accountant Mapping in QuickBooks Online Payroll can make a HUGE difference here. The ability to customize and map accounts in QuickBooks Online Payroll streamlines this process, ultimately saving you time so you can get back to advisory work.
Chart of Accounts; you’ll start by making sure the Chart of Accounts is organized in a way that makes it easy for you and your clients to evaluate and make decisions about how their business moves forward.
Customize Account Mapping: Use the Flexible Accountant Mapping feature to customize the mapping of different payroll categories to specific accounts. This ensures that expenses, deductions, and taxes are accurately reflected in the client’s financial records.
Ensure Accuracy: Review and double-check the mapping to ensure accuracy. The flexibility of this feature allows you to make changes as needed, ensuring that everything aligns perfectly.
Flexible Accountant Mapping not only saves you valuable time but also guarantees that your clients’ financial reports are accurate and compliant with accounting standards. No more sifting through confusing categories or manually adjusting accounts – QuickBooks Online Payroll does the heavy lifting for you – WOO HOO!
Using QB Time Inside QuickBooks Online
Time tracking is a fundamental aspect of payroll management, and QuickBooks Online Payroll offers an absolutely seamless solution in the form of QB Time. As a ProAdvisor, you’re likely dealing with clients who need to monitor and manage their employees’ working hours. QB Time is now integrated within QuickBooks Online, making it easy to track, report, and manage employee time effectively and without the need to load time tracking data in a separate browser. QB Time is included with the Premium and Elite QuickBooks Online Payroll subscriptions.
Here’s how QB Time can life easier for you and your clients::
Real-Time Tracking: Employees can clock in and out through the QuickBooks Workforce mobile app or web browser. The real-time tracking ensures accurate timekeeping and minimizes disputes or discrepancies.
Simplified Reporting: QB Time generates comprehensive reports, summarizing hours worked, overtime, and any time-off requests. You can easily access and share these reports with your clients, simplifying the process of payroll calculation.
Seamless Integration: QB Time is seamlessly integrated with QuickBooks Online Payroll. This means you can effortlessly transfer time data into payroll, reducing manual data entry and potential errors.
By using QB Time, we can streamline the time tracking process for our clients and enhance productivity. No more manual timesheets or time-consuming reconciliations – QB Time simplifies it all.
Simplified Payroll Item Management in QuickBooks Online Payroll
Effective payroll management requires meticulous attention to detail. QuickBooks Online Payroll understands this, which is why they’ve introduced Simplified Payroll Item Management. This feature makes it easier than ever for ProAdvisors to manage various payroll items, such as deductions, contributions, and benefits.
Here’s how Simplified Payroll Item Management can boost your productivity:
Create Custom Payroll Items: QuickBooks Online Payroll allows you to create and customize payroll items, tailoring them to your clients’ unique needs. Whether it’s healthcare contributions, retirement plans, or bonuses, you can set up and manage these items effortlessly.
Automated Calculations: The software does the calculations for these items, saving you time and reducing the chances of errors. This is particularly beneficial for complex payroll scenarios, such as those involving multiple deductions and benefits for a large number of employees.
Simplified Payroll Item Management in QuickBooks Online Payroll streamlines the setup and management of payroll items, allowing ProAdvisors to focus on more strategic aspects of our clients’ financial management.
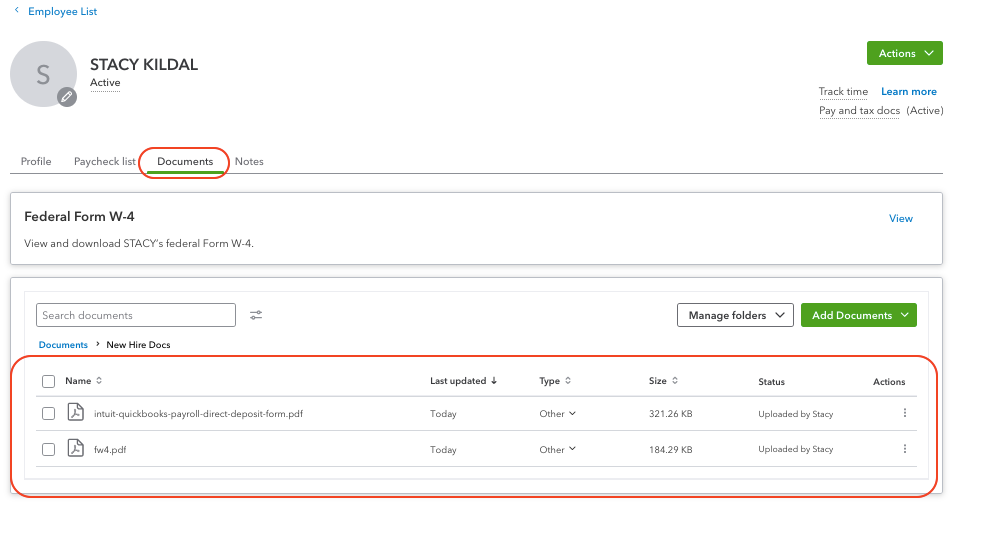
Managing Employee Documents in QuickBooks Online Payroll
As a ProAdvisor, you’re not just responsible for checking payroll calculations – you also need to advise your clients on how to manage a variety of employee documents. QuickBooks Online Payroll offers a dedicated feature for this purpose, making it easier to maintain and access crucial HR documents.
Here’s how this feature can improve your efficiency:
Document Storage: QuickBooks Online Payroll allows your clients to store and organize essential employee documents, such as contracts, tax forms, and identification. This eliminates the need for physical filing and reduces the risk of document loss.
Secure Access: Only authorized users can access and view these documents, ensuring the privacy and confidentiality of sensitive employee information.
Document Reminders: The software can send you reminders for important events, such as contract renewals or performance reviews. This helps you stay on top of critical HR tasks.
Workforce access: Employees can also be invited to use Intuit Workforce, which will enable them to set up their direct deposit, manage their withholding and access pay stubs and W2s and more!
By centralizing document management within QuickBooks Online Payroll, ProAdvisors can save time, reduce paperwork, and enhance our overall productivity.
My go-to for payroll processing, QuickBooks Online Payroll has so many tools to help me and my clients make payroll as frictionless as ever. As a ProAdvisor, embracing these features can help you provide more efficient and accurate services to your clients while also freeing up time for more advisory offerings. So, if you haven’t already, consider adding QuickBooks Online Payroll into your toolkit and witness the transformation in your practice. Your clients will thank you for it!
This post is sponsored by Intuit and QuickBooks Online Payroll.
This post is all about QuickBooks Online Payroll, but before we dig in, I want to mention that as I’m writing this (in January 2023), I have a newfound appreciation for just how freaking easy QuickBooks Online Payroll makes payroll at year end. I promise I’ll tell you why in a bit; before I tell you how it’s making my life better, I want to go over some general features of QuickBooks Online Payroll.
(Yes, I am aware that I haven’t written a blog post in a Very Long Time; the last few years have been sort of… weird. I found that I needed to focus on mental health and I ended up spending a LOT of time in northern Michigan camping, hiking, and biking in 2022. BUT I’M BACK BABY SO LET’S TALK ABOUT QUICKBOOKS ONLINE PAYROLL!)
QuickBooks Online Payroll is Intuit’s online payroll solution, and after at least a decade of using Intuit’s Online Payroll for Accountants, I moved all of my payroll clients to QuickBooks Online Payroll when Intuit discontinued that product. One of my complaints about payroll as a general topic is there is never a vacation from it. I can take a week off and go up north camping, then catch up on the other services I provide clients when I get back, but with payroll that’s just not an option.
Here’s where my longtime love of Intuit’s online based software comes in, and for what it’s worth, in this video from another lifetime ago (that green eye shadow… gahhh), I’m logging in to look at payroll while on my bike, and it wasn’t staged. I did actually get a message while filming this and had to stop, login and reply.
QuickBooks Online Payroll offers a bunch of features to help make processing payroll accurate and efficient; the best part is that I can manage it from anywhere: my home office, a library, or even with my phone in my rooftop tent:
Some of the features that I love for my clients are the expert set up that comes with the Elite subscription level (I’ll share pricing at the end of this post), the tax penalty protection and the 24 hour and same day direct deposit. I love being able to tell clients that YES, we can process a paycheck TODAY and have the direct deposit hit TODAY. Another feature for Elite subscribers is the HR Services; these are delivered through a 3rd party partner called Mineral, Inc. Just recruiting and hiring is difficult enough, so to be able to have tools like handbook templates and help with setting policies or managing conflicts is a relief. For some of my small businesses, being able to offer health and 401k benefits via the QuickBooks Online Payroll HR Advisor actually makes the recruiting part easier!
For my client’s employees, logging into Workforce allows them to view paystubs and make changes to their tax withholding and direct deposit account.
The features that I love for me, as someone who is entering the payroll and creating the paychecks for my clients, are the integration with QuickBooks Time (or even the default time tracking in QuickBooks Online), and automatic tax calculations. QuickBooks Online Payroll uses real-time tax rates and rules to calculate payroll taxes; I can say that I’ve never had an issue with taxes being miscalculated, unless it was because a state unemployment rate didn’t get updated in time. (And when that happens, QuickBooks Online Payroll makes the adjustments needed so that the employer is compliant in paying what is owed.)
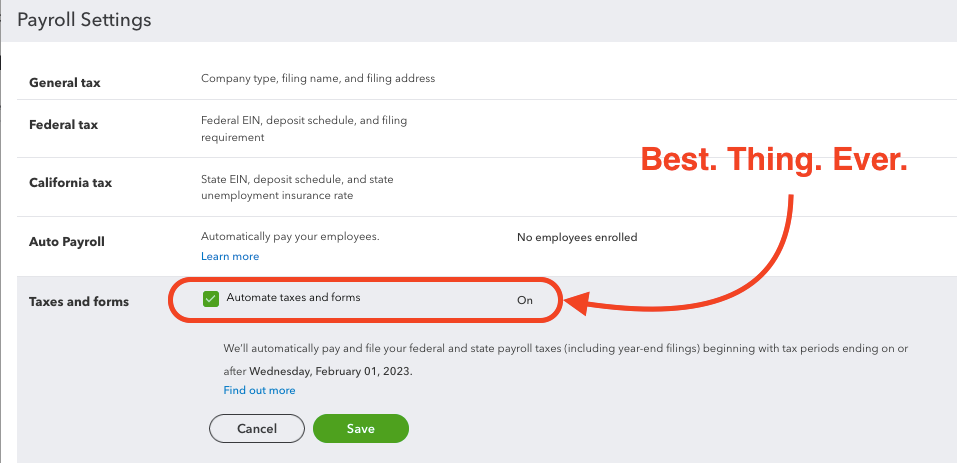
As I mentioned in the first paragraph, QuickBooks Online Payroll is making payroll year end so, sooo much easier for me with the automatic tax calculations, automatic tax filing and liability payments. Why do I love this so much? Because I don’t have to worry about making sure all the 941s, 940s, W2s get efiled on time. I just need to make sure everything ties out before that happens!
I don’t have to send PDFs of the W2s to clients, or make sure they’ve mailed them out to their employees. Between the automatic tax filing and payments and the employee access to Workforce, it’s all taken care of – and my clients can access all of it whenever they need to by logging into QuickBooks Online!
Now we get into the costs; there are three different plans to choose from, each with its own set of features and pricing.
QuickBooks Online Payroll Core is the bottom tier at $45/month plus $5 per employee. It includes the automated tax filing/payment, auto payroll, 1099 E-File & Pay and next-day direct deposit.
QuickBooks Online Payroll Premium is the most popular, mid-range option at $75/month plus $8 per employee. It includes everything that Core does, plus you get QB Time and same day direct deposit.
QuickBooks Online Payroll Elite is the top tier at $125/month plus $10 per employee. This has all of the bells and whistles! It included everything in Core but also expert set up, the HR Advisor and tax penalty protection.
Employers can start at any level and upgrade or downgrade as needed.
For my fellow ProAdvisors: QuickBooks Online Accountant users get the highest tier – QuickBooks Online Payroll Elite free for their firm! There is also pricing for ProAdvisors to offer their clients as well as a revenue share option.
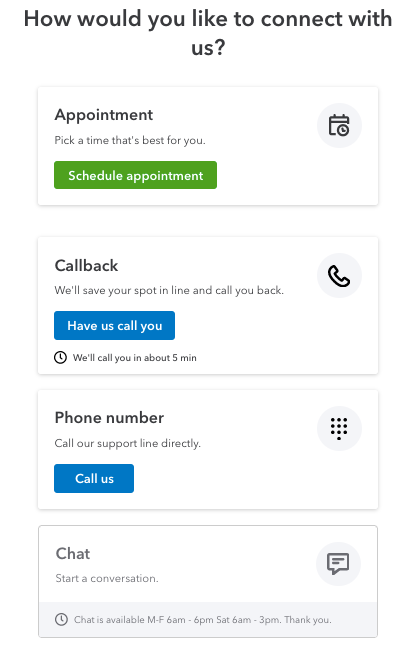
One last thing I want to talk about, is the improvement of support. I’m VERY picky about my support options. I prefer for any app to have an online support page – Intuit’s QuickBooks Community Knowledge Base is AMAZING, but they’ve also made some major changes to Accountant support by providing product experts with prior tax and accounting knowledge and requiring support agents to get certified as part of their training/learning path. They are also working on standardizing the Tier2 support model as well ramping up staffing and social media engagement.
For what it’s worth, I freaking LOVE the QuickBooks Online Payroll chat support. If I can’t find the answer online, I have quite a lot of options to get help by clicking the help icon in the top right corner of any page when logged into QuickBooks Online.
If you just need payroll, or you want to keep it separate from the QuickBooks Online account, the stand alone option is available and transactions exported to QuickBooks Online.
With all of this,QuickBooks Online Payroll is saving me time and reducing my stress level this January!! It’s comprehensive, affordable, and the fact that it’s built right into QuickBooks Online makes it so easy!!
You can keep up to date on all things QuickBooks Online Payroll by bookmarking their updates/product news page here.
This post is sponsored by Intuit and QuickBooks Online Payroll.
I’ve had quite a few clients ask about using late fees in QuickBooks Online lately, so I thought I’d write an article about how to set them up and use them.
To start using late fees in QuickBooks Online, we have to go our Gear Icon > Account and Settings and then choose the Sales tab and find the Late Fees section:
From here, you can set up late fees in QuickBooks Online – flat fee or percentage of remaining balance and the frequency (once per invoice, per month, or per day) as well as an optional one time fee.
In this situation, we’re going to set up a 2% per month fee, with a one time $25 fee:
We’re going to give the customers a 7 day grace period before applying late fees in QuickBooks Online. What this means is that if the due date is the 1st, late fees won’t begin accumulating until the 8th:
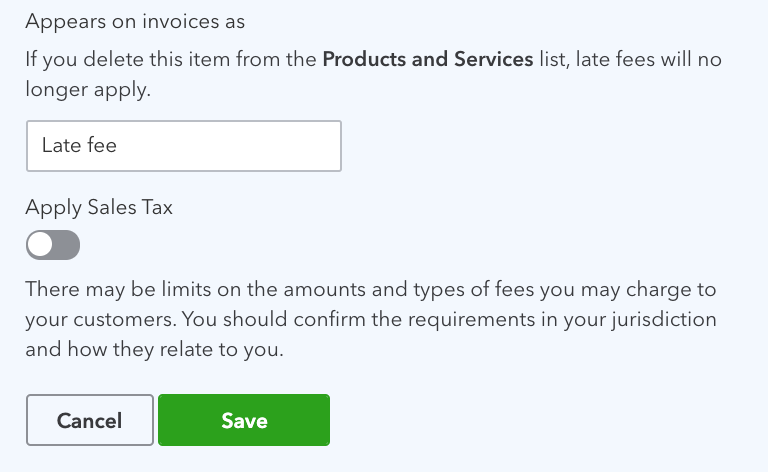
The last steps are deciding what to call these charges on invoices and choosing whether to apply sales tax. We’re going to leave the default “Late fee”, and not apply sales tax, then we’ll click the Save button:
When you click Save – QuickBooks Online will create a new account called “Late fee income”. This account is an Other Income type:
If you’d like, you can edit this account:
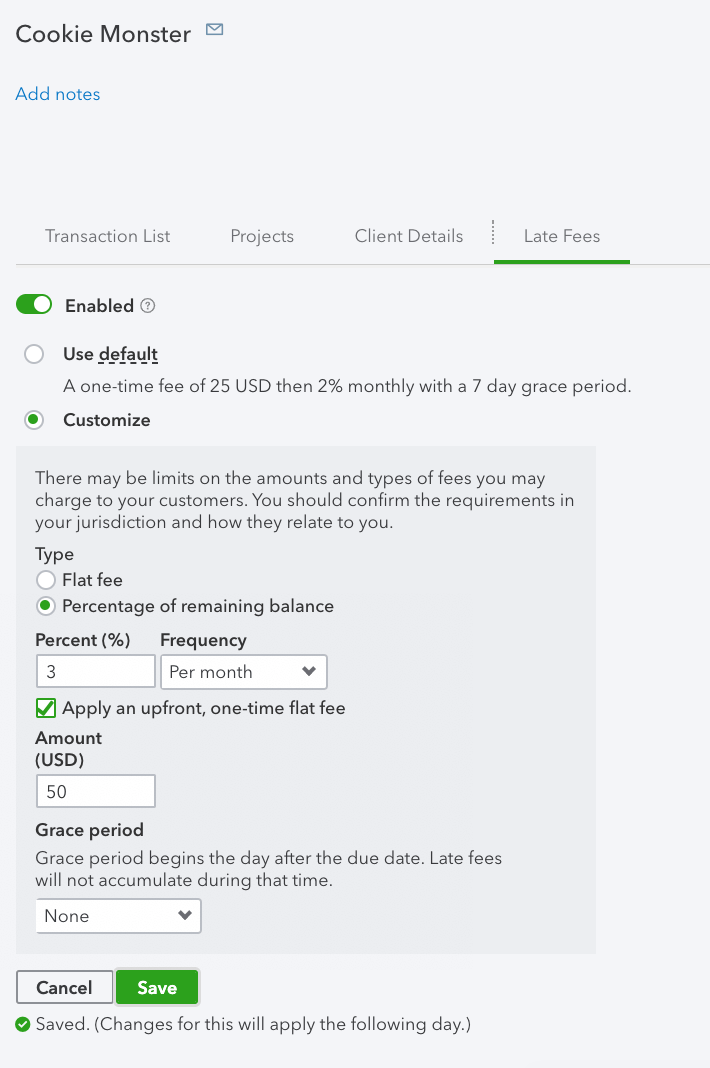
Oh wait – did you mention that you want to be able to customize this, on a customer level? No worries there! We can choose to disable late fees for a customer, or override the default late fees. If we click on the Sales tab in the left nav, then chose the Customers tab (or Clients, or whatever your QBO calls customers) then click on the customer name to get to the Customer Detail page to customize late fees in QuickBooks Online for a specific customer.
For the customer below, we’re changing the 2% to 3% per month, and the one time fee from $25 to $50:
NOTE: Late fees in QuickBooks Online won’t be applied to invoices created before the feature was turned on
They only work for invoices created on or after the feature is turned on. This means that any existing past due invoices won’t have late fees enabled for them. You can tell if an invoice is eligible when you open it. In the header, under the due date, you’ll see this:
For invoices created AFTER late fees in QuickBooks Online was enabled, you’ll see this:
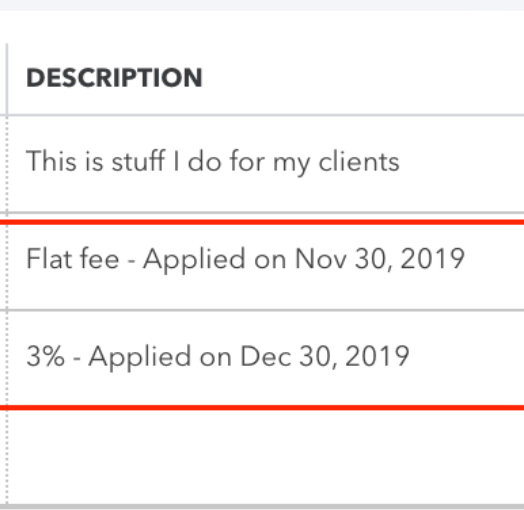
Once you have late fees enabled, when you DO encounter a customer with a past due invoice, you’ll see that invoice automatically updated with late fees added as a line item.
Below, we can see that this customer had the one time $50 fee applied, then 3% per month.
(Note the 3% is calculated on the total of the invoice – the original balance plus the $50 late fee – not just the original balance)
When we look at the Profit and Loss, we can see these in “Late Fee Income”, and they’re in the same period as the original invoice:
When you enable late fees in QuickBooks online, an item is automatically created and can be found in the Product and Services list.
The amount and description are both left blank, so that when late fees in QuickBooks Online are applied, QBO can add the description and total, according to preferences applied during setup:
If you’ve been using QuickBooks desktop and the late fee feature there, you’ll know that rather than add line items to the original invoice, QuickBooks desktop creates a NEW invoice with “FC” in the reference number to apply late fees. Historically, our clients have found it much more difficult to get these paid and have to be voided. Late fees in QuickBooks Online makes collections much more simple by adding the line items to the original invoice.
Good luck in your quest for speedy payment from customers; hopefully you won’t need to use this feature 🙂
Released in June 2019, Receipt Capture in QuickBooks Online allows users to directly upload receipts to the QuickBooks online banking center where QBO will read the receipt and either match to an existing transaction or allow users to add a new transaction.
There are two ways to add receipts: drag/drop to the Receipts center or email to a special Receipt Capture email.
The first thing we want to do is add senders, otherwise the only people that will be able to email are the Master Admin and of the QBO account and Accountant Firm users. We’ll need to go to Banking > Receipts > Manage senders.
For first use, you’ll be asked to register your email for Receipt Capture in QuickBooks Online. Because I was logged in as the Accountant Firm user, that email address became connected this client QBO account. It is possible to connect to multiple clients; in order to send to a different client, you need to toggle your Accountant user name to off in the active client account, switch to the another client QBO account, then toggle your Accountant user on, then send the email.
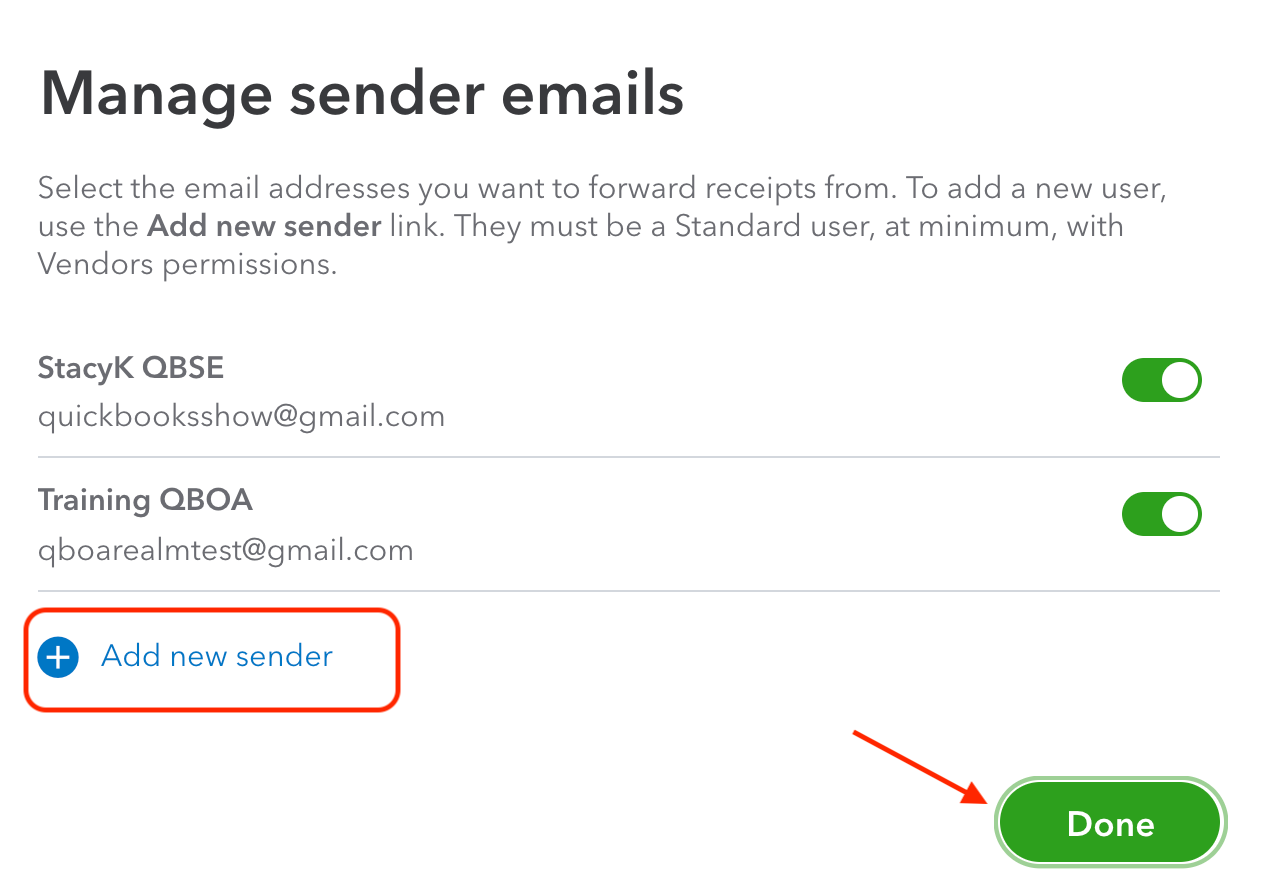
In the screenshot below, you see the Master Admin of the QBO account and myself, the Accountant User. To add additional users, just click the “Add new sender” link as needed, choose from the list of current QBO users (Note: At the time of this writing, only current QBO users with at least vendor only access may be added as sender) then “Done” when you’re all set:
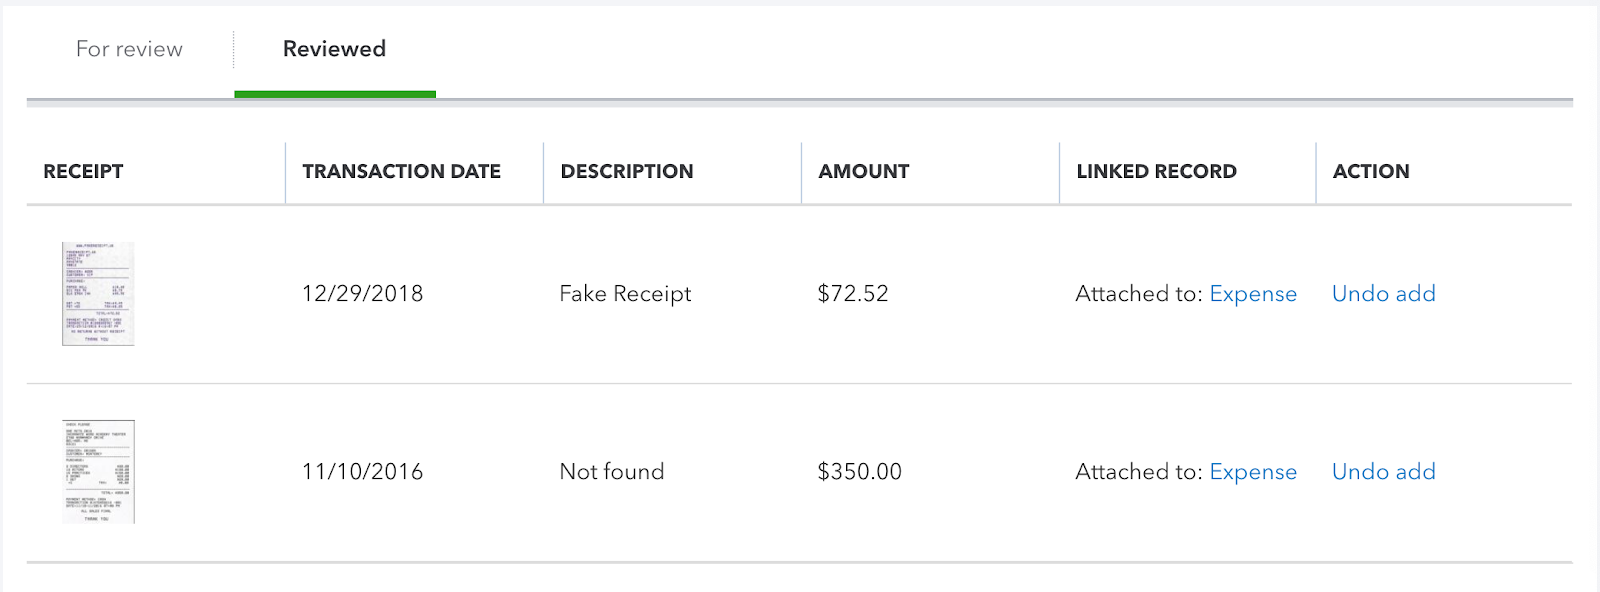
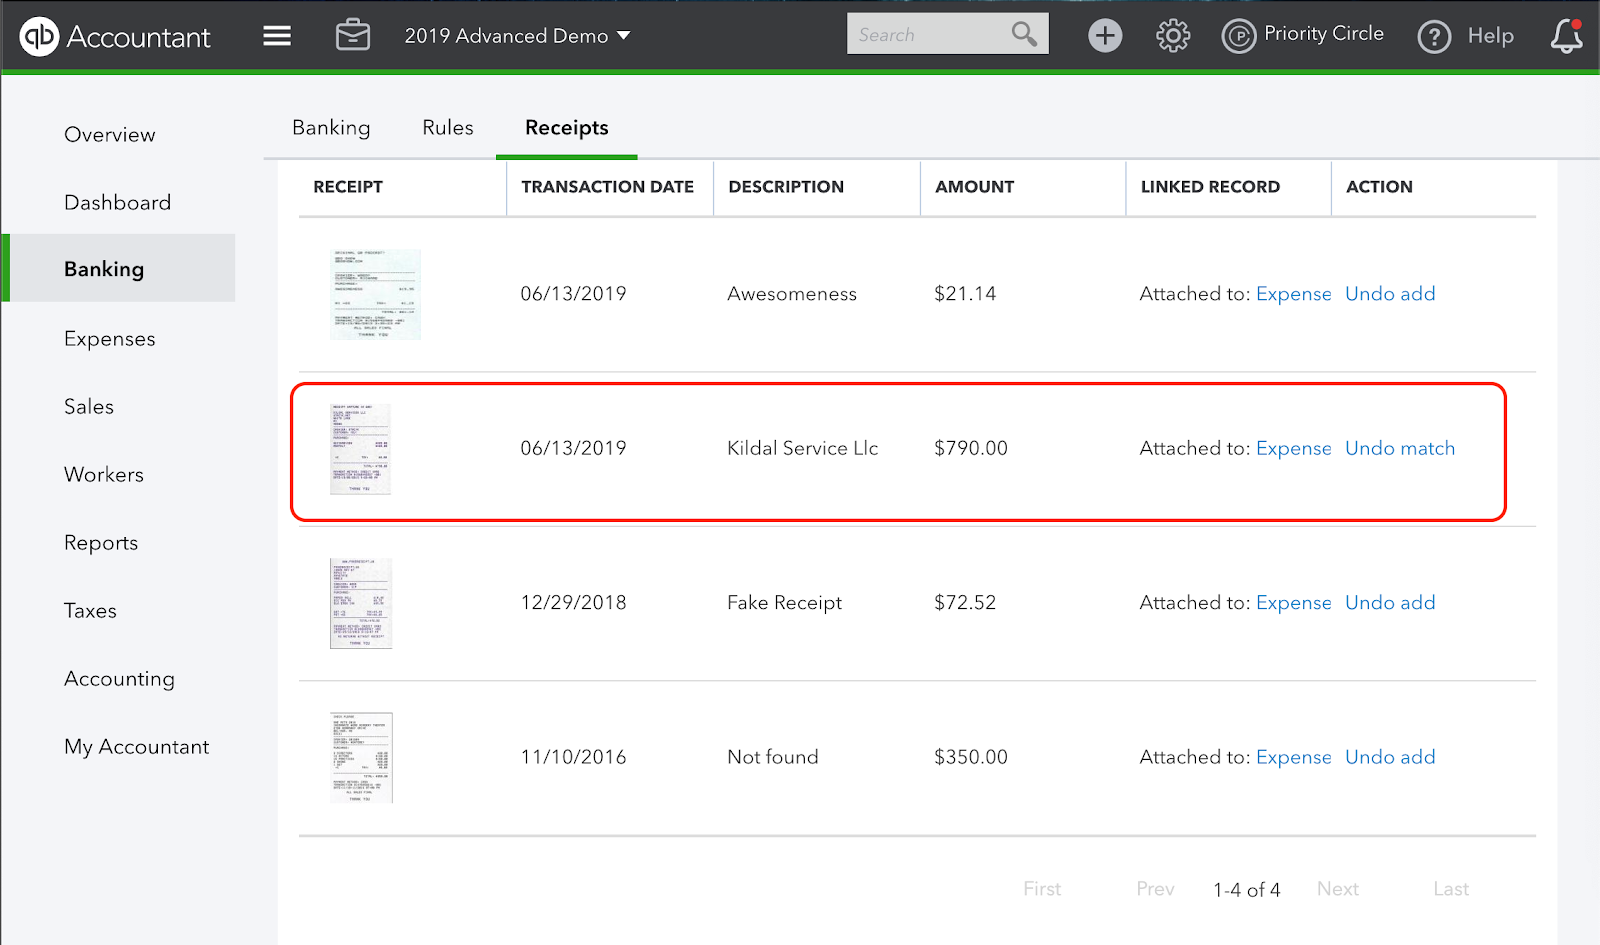
Before we start adding receipts, let’s take a look at the Receipts center. If you’re familiar with the QBO bank feeds, you’ll feel right at home. We have a “For review” tab and a “Reviewed” tab. Here we have two receipts that have already been uploaded and added. We can click on the “Expense” link in the Linked Record column, or if necessary, we can choose “Undo add” in the Action column:
Clicking on the first receipt in the above screenshot, we can see the receipt attached:
I want to show you a few things: both ways to add a receipt, as well as how you either manually add an expense and how cool it is when QBO Receipt Capture matches an existing transaction.
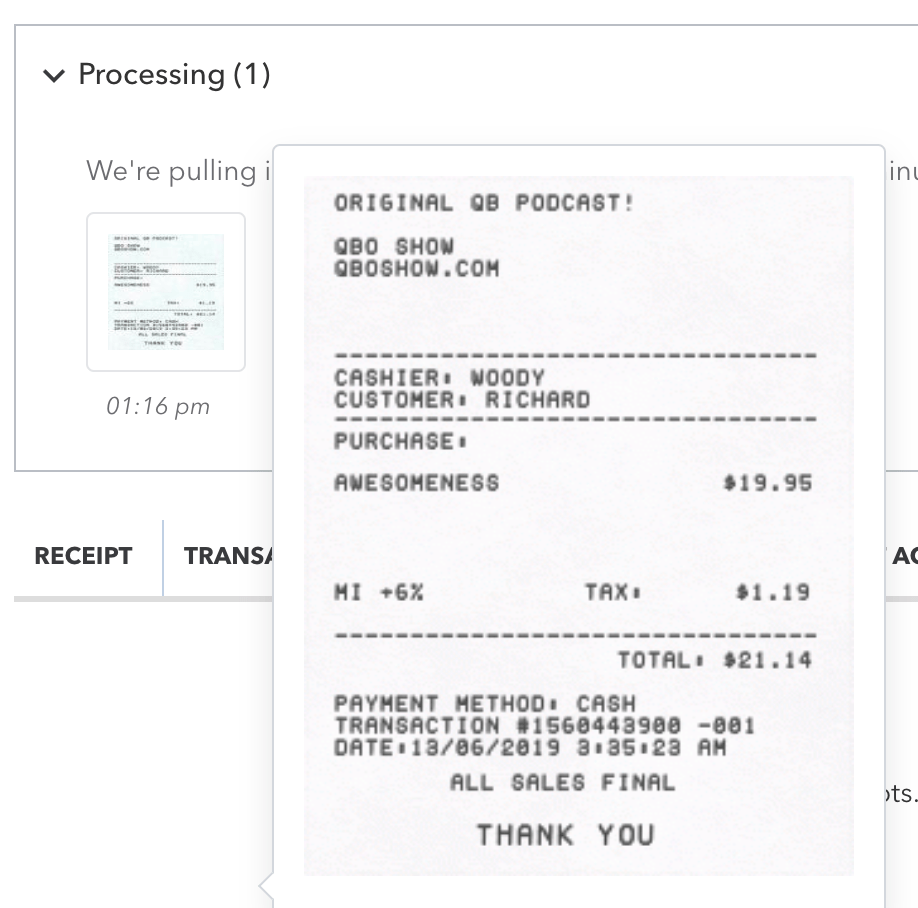
We’ll start by emailing a receipt and manually. You can see here that it shows up in the Receipts center immediately, but it does take a few minutes for QBO to read it:
While it’s processing, you can hover your mouse over it for a preview:
Once this was processed, I was able to quickly add the expense to QBO:
Again, here’s the expense transaction, showing the receipt attached to it:
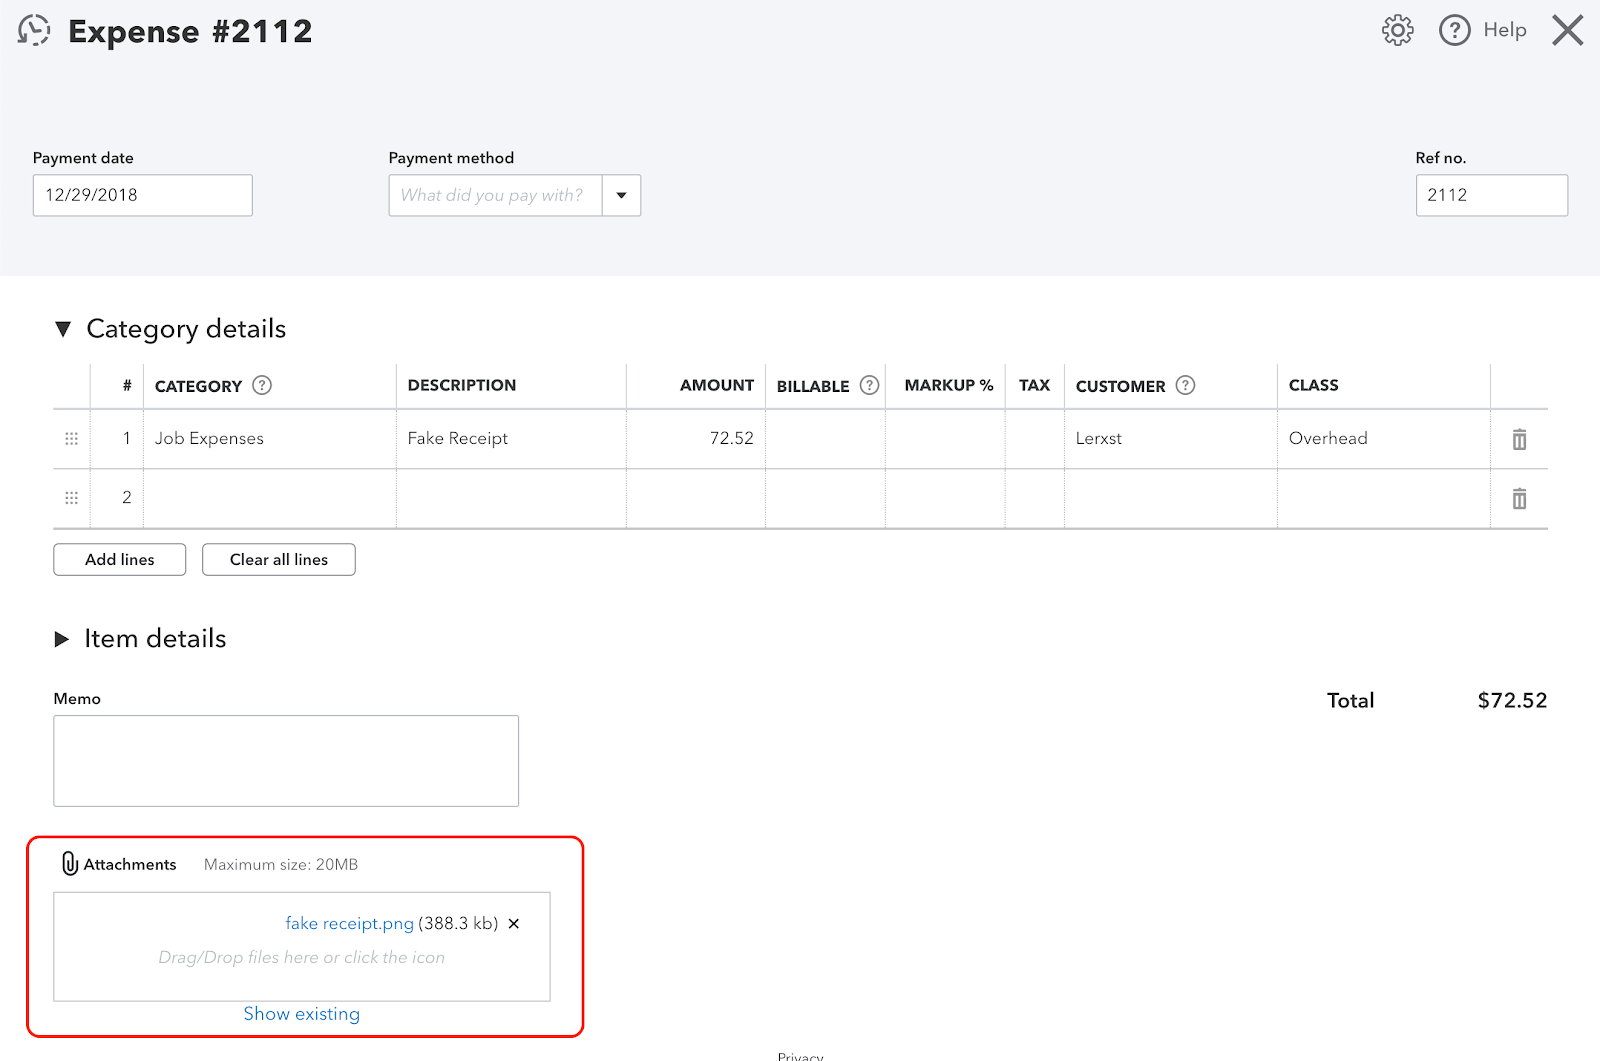
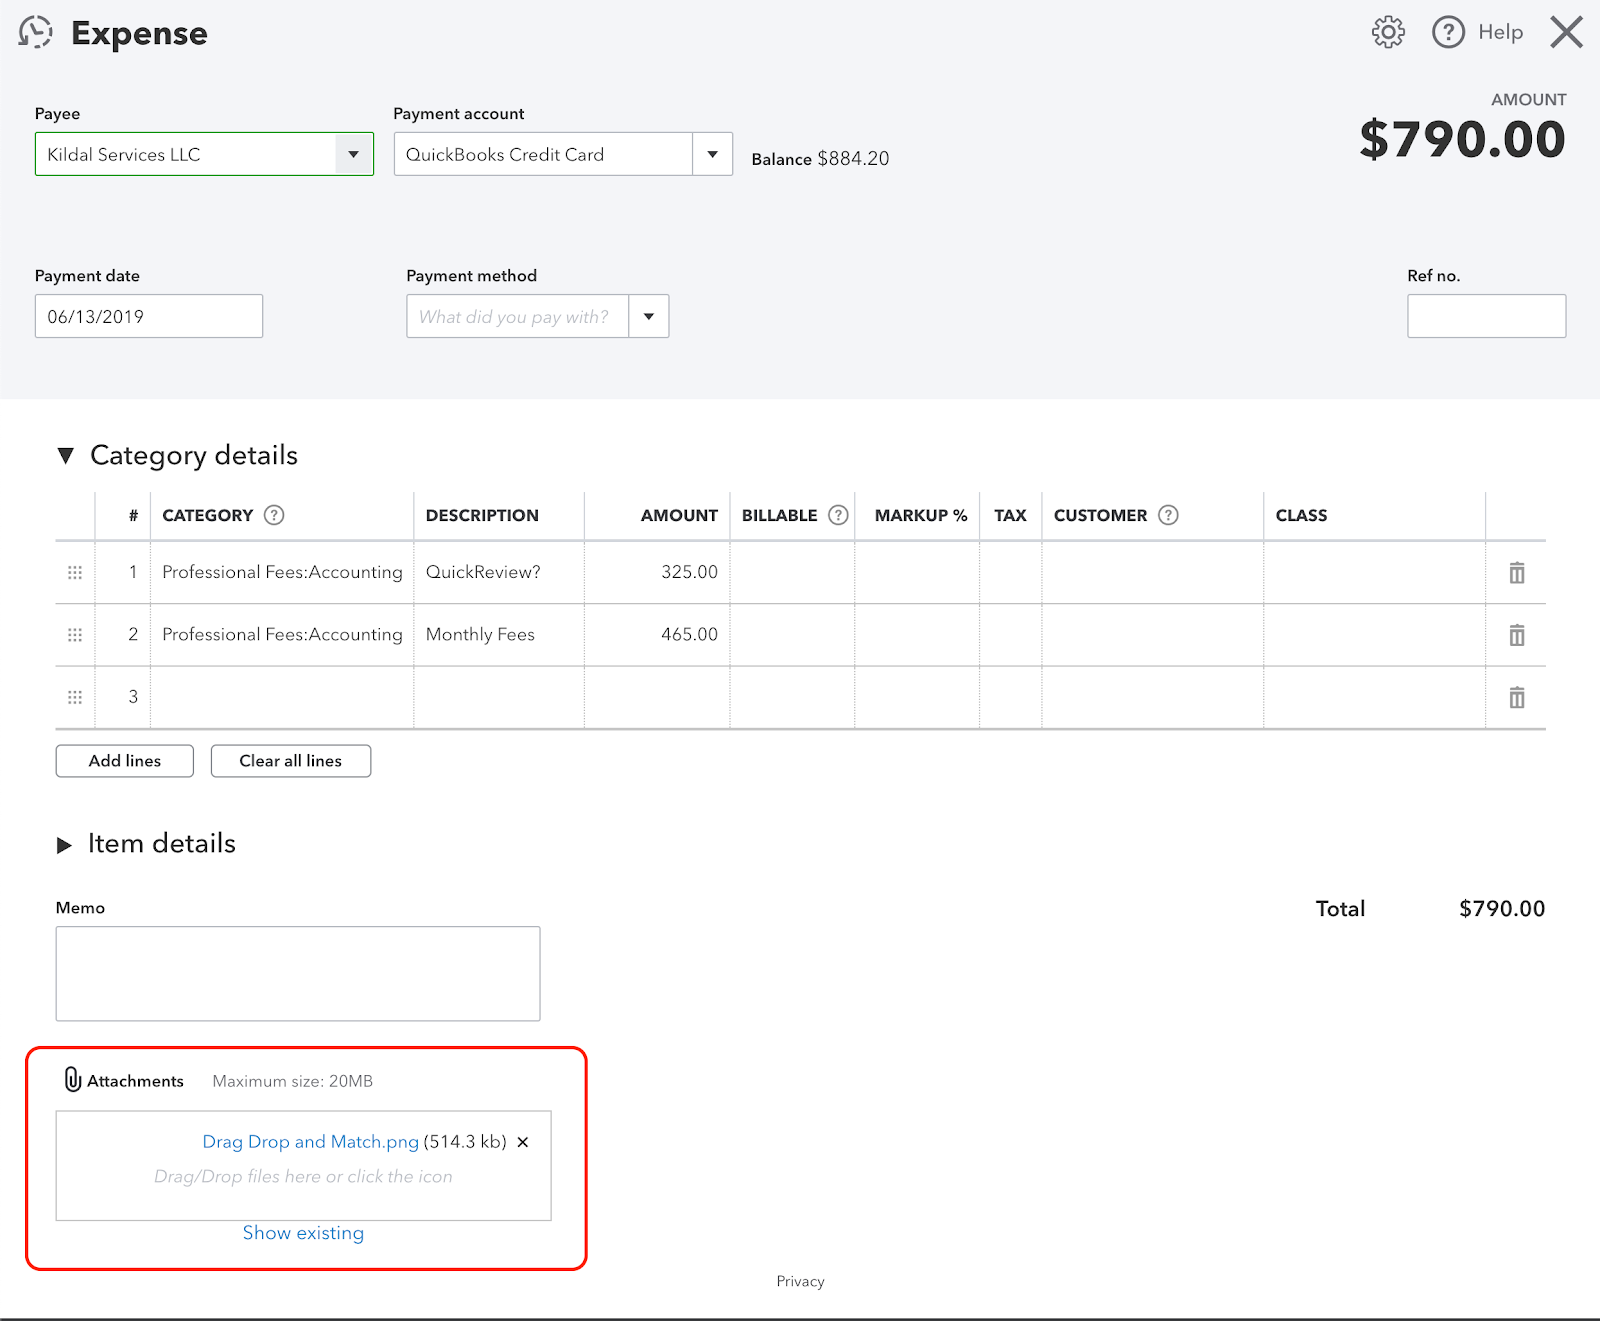
Now, let’s do the drag/drop to match a transaction that I added specifically to for this fake receipt I created just to write this article!
Here you can see it in the Reviewed tab in the Receipts center:
And here’s the original expense, with the receipt attached:
Don’t forget – you can even use Receipt Capture in QuickBooks Online with the mobile apps as well: