Once a huge app lover, I’m now fast approaching App Fatigue. Earlier this year, I was accepted as a service provider for the Oakland Thrive program, and a requirement of that is that I need to have a scheduling link. I was DREADING having to find One. More. App.
I love it so much I figured I’d share a step-by-step guide to Google Workspace Appointment Scheduling.
One note: there are different features for scheduling, depending on what time of Google account you have. You can check out what’s available here.
(You may be familiar with Google Calendar appointment slots, but that feature was retired on 8/7/2024, this post is about appointment schedules)
Why Choose Google Workspace Appointment Scheduling?
For me, the reasons are pretty simple:
- No need for another app
- No need for another login and password
- No need for another subscription payment
But there are other great reasons for using it:
- Customizable Booking Pages: Tailor your scheduling page to reflect your availability and preferences.
- Seamless Integration: It integrates directly with Google Calendar, ensuring real-time updates and easy access.
- Automated Reminders: Reduce no-shows with automated email reminders and notifications.
- Easy to Share: Share your booking link via email or social media, making scheduling convenient for everyone involved.
Step-by-Step Guide to Google Workspace Appointment Scheduling
Accessing Your Scheduling Page
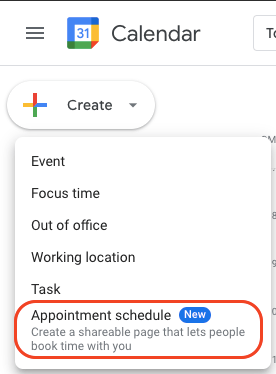
I think the easiest way to start is by clicking this link: https://calendar.google.com/calendar/u/0/r/appointment
You can also access by opening your Google Calendar on your computer, click the “Create +” button in the top left, then click Appointment Schedule
Choosing Your Availability
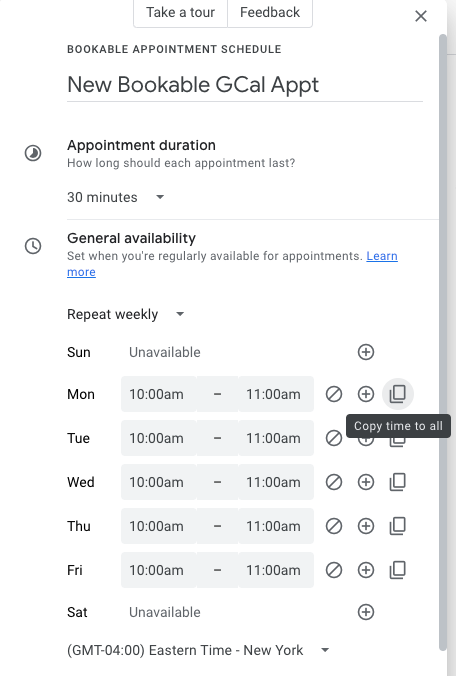
Next, give it a title, duration and set the availability (hint: the “copy time to all” button is VERY helpful):
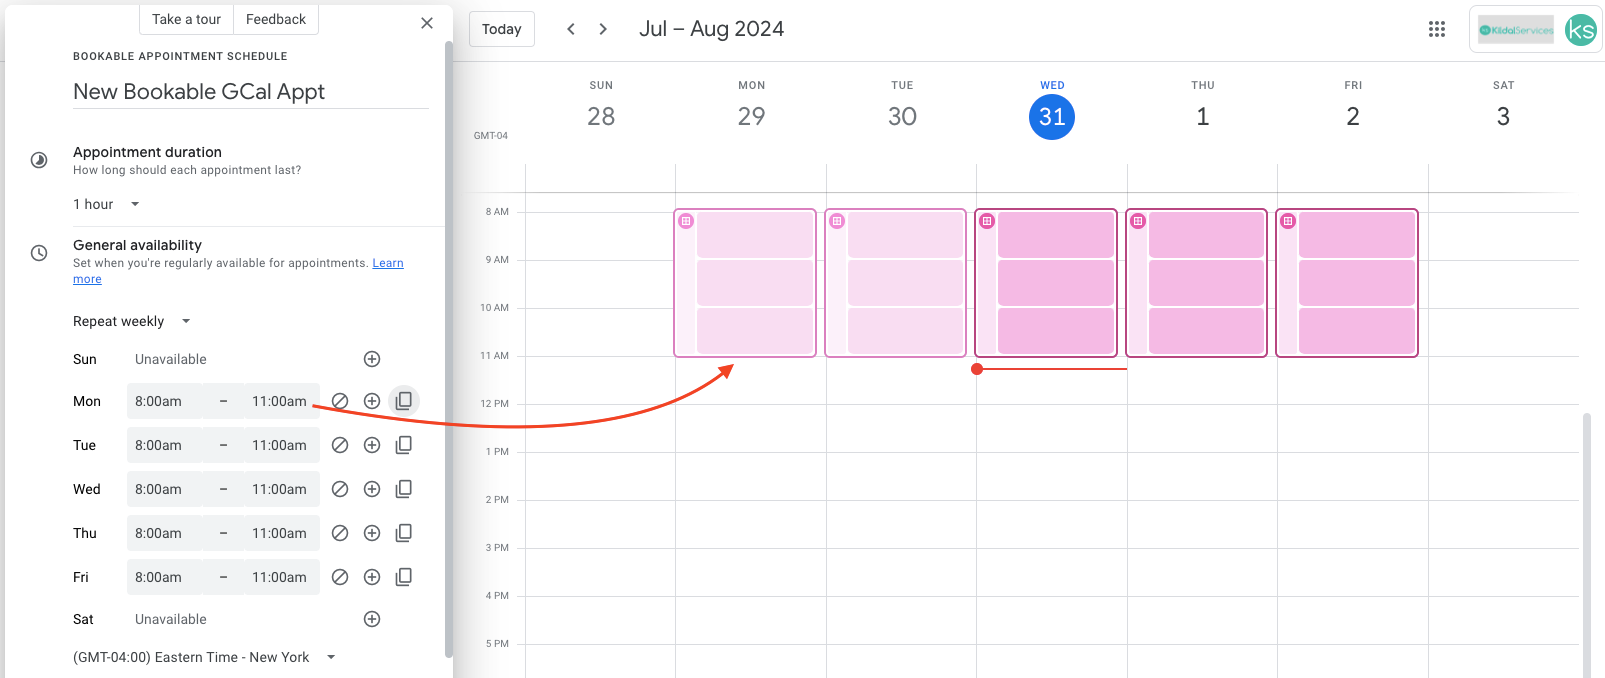
You can see your calendar in the window, and the times selected as you change availability:
Defining the Scheduling Window
If you’re like me, you want COMPLETE control over your calendar, and since I have anxiety and ADHD, I need ample time to prepare for any meeting, so I want to set parameters for how far out and how soon someone can set up a meeting with me. I also want to be able to exclude any dates were I might have other commitments, like going camping in the summer, or snowmobiling in the winter 🙂
The scheduling window allows you to do this:
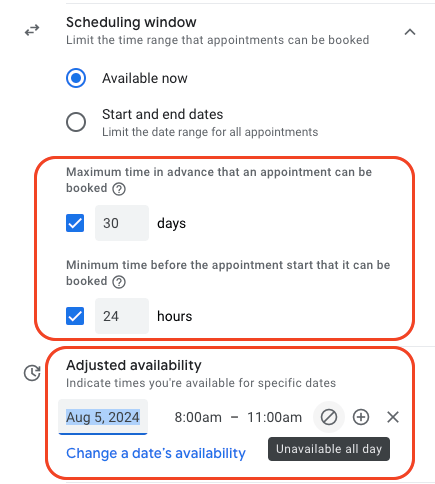
You can see here that I’ve set it so that appointments cannot be made more than 30 days in advance, and I need a 24 hour notice before one is set. I’m also blocking out 8/5 as unavailable.
(In this step-by-step guide to Google Workspace Appointment Scheduling, I’ll also show you how you can remove availability directly from the calendar – stay tuned!)
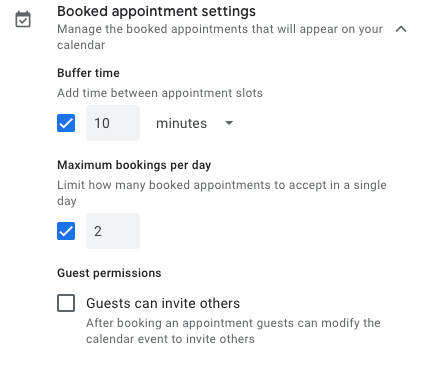
Settings for the Booked Appointments
I’m NOT a fan of back to back appointments, so I want to make sure I have a buffer. Who knows if one might go a little long, or I need more coffee (I won’t, but I still want the option!) or if one of my many, many cats deserves a treat (they all do, because they’re all adorable)? I want a spacer.
I also want to set the number of appointments; my brain won’t remember who I talked to and what we discussed if I jam pack too many in a day.
The last thing I want to do is allow the attendee to be able to invite others.
I can do all of that in this section:
Just want to point out that as I’m making these changes, they immediately show up in my calendar. Here you can see the times I’ve set (8a-11:30a), and the spacing:
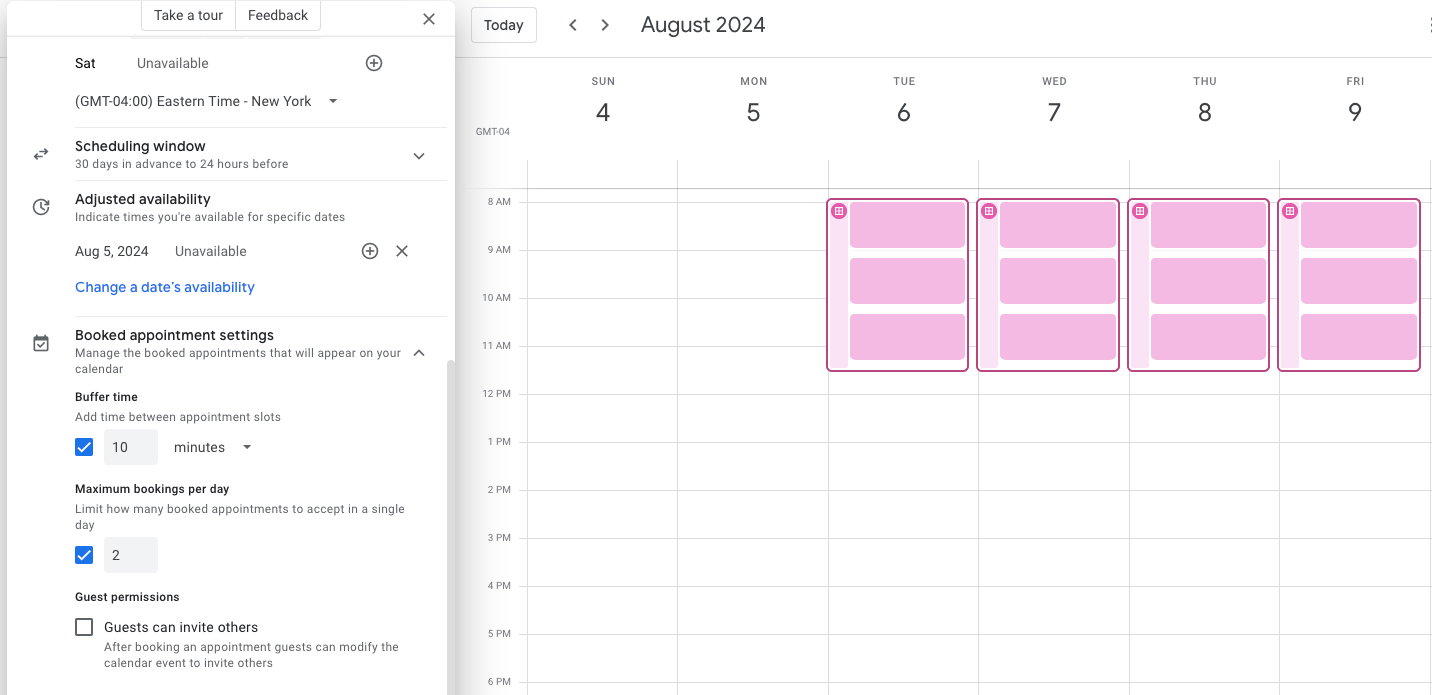
Even though I’ve got time in that window for THREE appointments, I’ve set that I don’t want more than 2 per day. So once two slots get filled, a guest won’t be able to schedule for that day
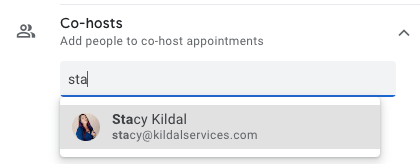
Choosing Multiple Calendars & Assigning Co-Hosts
At my firm, we use Google Workspace Business Plus, which means that I can choose whose calendars to use for scheduling, to make sure that a guest will always be able to get an appointment:

I can also choose someone in my domain to be a co-host:
Once I get through all of those options, I’m going to click the NEXT button at the button of the Appointment scheduling panel to finish customizing.
Photo & Name
In the next panel, I can review the page photo and name for the booking:
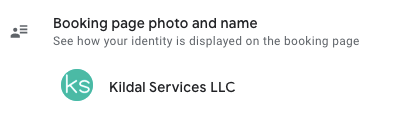
Note: this is pulled from your Google account, so changing this would be a global change to everything connected to your Google account.
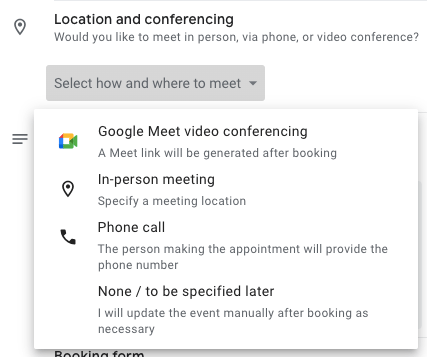
Location or Video Call Info
Next, you can choose where/how the meeting will happen. For me, I’m always going to choose Google Meet, but you can choose in person if these meetings will always happen in the same place, like your office. You can also make it just a phone call or leave it blank so you can set it up later:
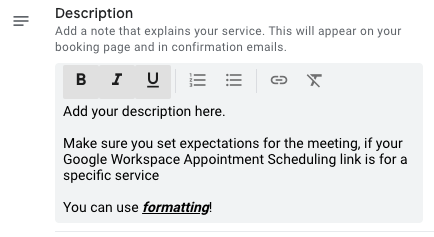
Description of the Appointment
You’ll want to set a description for the appointment being scheduled; this is what attendees will see when they click your link to schedule time with you:
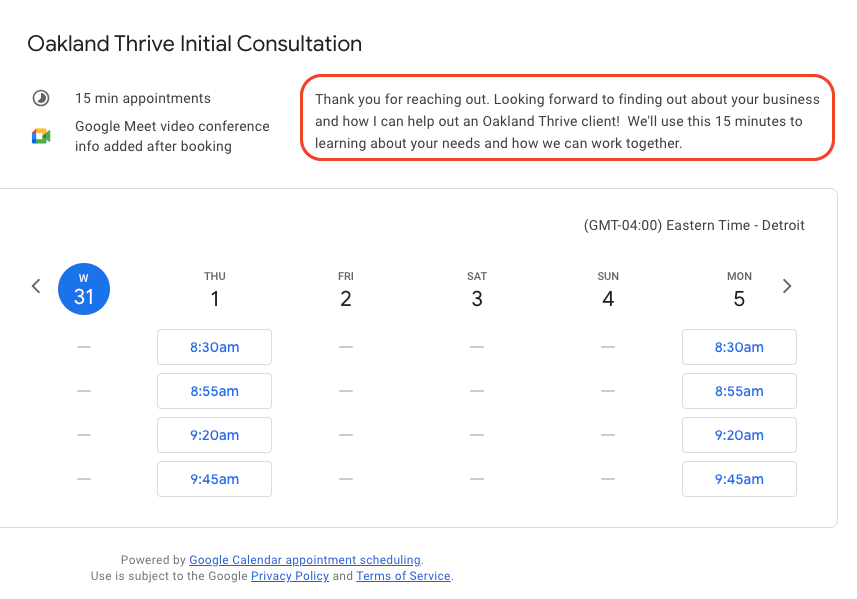
For the Google Workspace Appointment Scheduling that I set up for any Oakland Thrive clients, I have two options: a free 15 minute intro call and a paid 2 hour consulting/training session. For the 15 minute appointment, my description is designed to set expectations. For mine, I took the link and created a custom URL and QR code for Thrive clients to use.
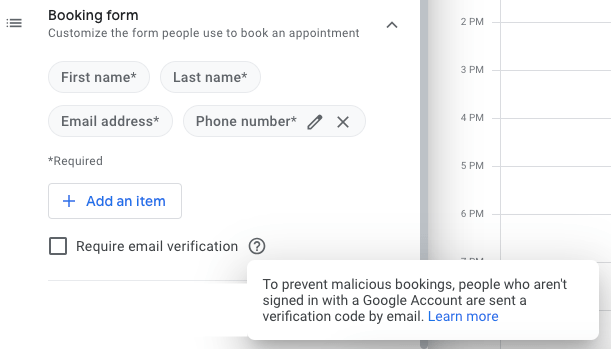
Required Info on the Booking Form
This section is for you set the details you want to get from the person booking time with you. I highly recommend requiring email verification to prevent jerks from spamming you! I also like to require a phone number, just in case there are technical issues, I can just call the client. The last time I used a link, the guest wasn’t able to get her mic to work, so we just opted for the call.
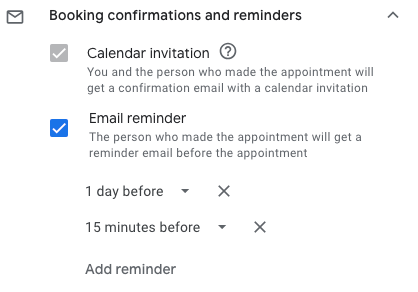
Appointment Reminders!
The default for Google Workspace Appointment Scheduling is to remind you and the attendee of your appointment via email the day before, but you can add additional reminders. Here you can see I’ve set an additional reminder for 15 minutes before:
Once you set the reminders, you’re done! Just click the SAVE button in the bottom right corner of the panel.
Sharing the Link, Editing Later
To get the link to share, just click the event on your calendar and click the share button to get the link. You can send this to anyone or post a link on your website:
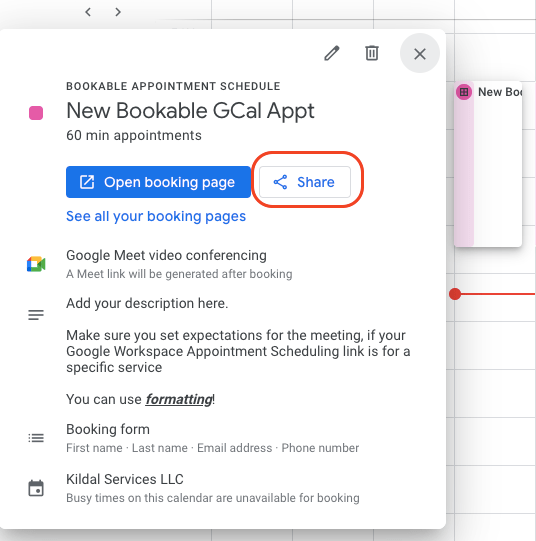
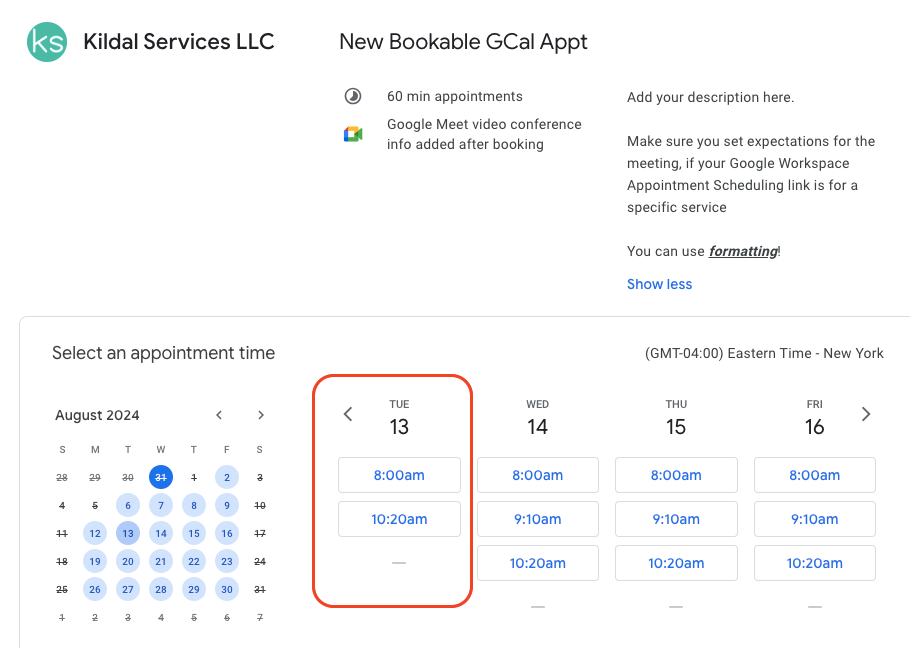
Clicking the “Open booking page” button takes you to what your guests will see when booking with you.
NOTE: To go back to the setup panels, you’ll DOUBLE CLICK the event direct from your calendar.
Adjusting Availability After the Fact
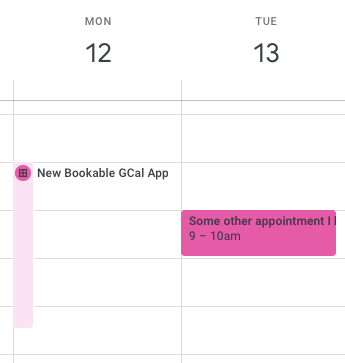
I mentioned earlier in this step-by-step guide to Google Workspace Appointment Scheduling that you can also remove dates directly from the calendar if needed. You can see here that I just have my Google Calendar open, and I have a conflicting appointment on the 13th:
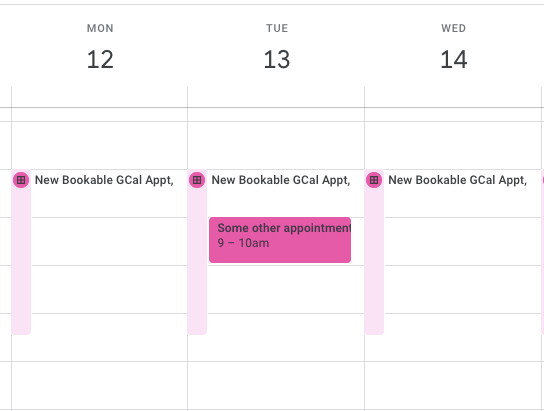
If someone tries to book on the 13th, that time will show as unavailable:
But I want to remove ALL the options for that day, so if I click on the appointment for that day in my calendar, I can delete that by clicking on the Appointment Scheduling for that day, then clicking the garbage can:

It then gives me a pop up to delete JUST that day, remove that day of the week entirely, or just delete the entire Appointment Schedule. I just want that day, so that’s what I choose and then click OK
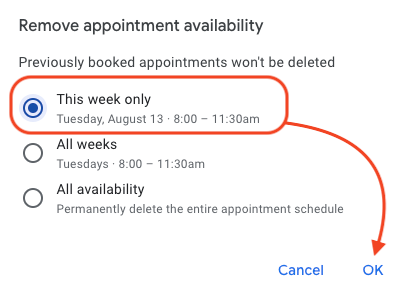
Now my day for the 13th will be open for me to prepare for that other appointment!
I hope this step-by-step guide to Google Workspace Appointment Scheduling was helpful! As someone that has resisted using a booking tool for YEARS, this was painless! I’m already using Google Calendar and Google Workspace for business, so not having to sign up for ANOTHER app was the biggest draw for me. Finding out how easy and flexible it is was just icing on the Appointment Scheduling cake!
objectively transition future-proof markets


