I don’t have to tell you it’s busy season. You’re probably so swamped getting W-9s, sending W-2s and doing everything a busy ProAdvisor does this time of year that you don’t even have time to read this post. At least use your Pocket app and read it… later-ish. Basically, I’m going to sort of beg here: please read this.
I’d like to encourage all my colleagues in the industry to start a list TODAY. One one side of the paper, make note of what you LOVE about your practice. On the other side of the paper, write a list of what you HATE about your practice.
Busy season is a bit like removing a bandaid. You know it’s going to hurt, but after it’s over, you’re relieved and talk yourself into thinking it wasn’t that bad. That’s why NOW is the perfect time to start your list. While you’re in the midst of things – use an app like Google Keep or Wunderlist and add to it as things come to you.
This will be the first step in redesigning a practice that works for you.
I did this a few years ago and here’s what my list looked like:
LOVE
Solving problems
Helping clients grow their business
QBO!
Apps that help clients and me
HATE
Clients with bookkeeping “emergencies”
No time for myself
Stress
How many hours are you working? Do you have time to cook dinner? Have you seen your family?
Get started. I’ll have more hints and tips this busy season to keep your sanity. And you’re always welcome to join the next session of the StacyK Academy, where I’ll provide the tools and processes that let me grow my LOVE list and eliminate my the HATE.
Step by Step: Convert QuickBooks Desktop to QuickBooks Online
So you or your client wants to make the move from QuickBooks Pro, Premier, Mac, or Enterprise to having access the books virtually anywhere? QuickBooks Online, yes? Mmmm. yes please!
I shall happily guide you through this process. Come with me, and let’s go down this path together. I promise you’re in good hands; I’ve been doing this for a very long time.
If you haven’t seen QuickBooks Online in a while, things have changed a quite a lot, but this is great news! It’s so easy to create a QuickBooks Online account and convert your QuickBooks Desktop data these days. Just a few clicks of the mouse, really.
If you’re an accounting professional using QuickBooks Online Accountant, you have a few options.
You can have your client create an account, then invite you as an accountant user.
If you’d like to offer a discount and build the subscription cost into your fees, you could add them to your Wholesale Billing account.
You could do what I do – place the order via an Intuit Reseller (I just happen to be one, and if you’d like, you can place orders through me – I share commissions!), get a discount, but the client pays for the subscription. This last option, we remain Master Admin until we get QuickBooks Online setup, then we invite the client and transfer the Master Admin status over to the client and say on as Accountant User.
Once you have the QuickBooks Online subscription set up, you’ll want to get your QuickBooks desktop file ready to convert. I’ll show how to do this with Pro & Premier editions first, and then we’ll go over converting a QuickBooks Enterprise file (yah, you can convert these too!)
Converting from QuickBooks Pro or Premier to QuickBooks Online
Before you do the actual conversion, you want to do any clean up work in the .QBW file; if you’re a small business, I would recommend finding a QuickBooks ProAdvisor to do this. (Fortunately, you’re reading this and guess what? That’s what we do at Kildal Services.) You’ll also want to check out this article to see what will convert and how they’re handled in QuickBooks Online.
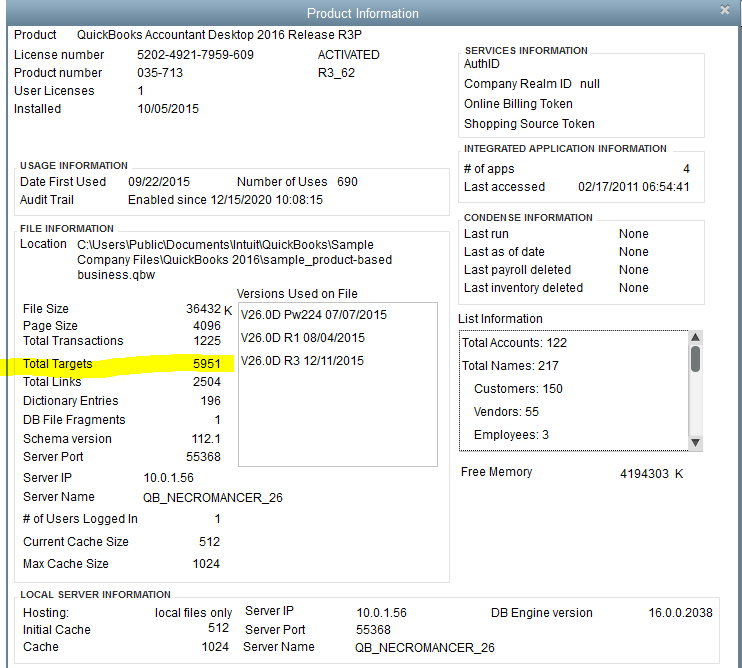
Once all of that is done, you need to make sure your file can be converted. Open it in QuickBooks desktop, and hit F2 on your keyboard– look at the number of targets. If it’s under 350k, you’re good to go. If not, you need to condense file.
^ F2 Screen in QuickBooks Desktop
With a file that meets the target requirements, now you’ll want to verify the data by clicking File > Utilities > Verify Data. The official recommendation from Intuit is to “Verify and rebuild, if prompted”. However, at Kildal Services, our standard practice is to verify, rebuild even if not prompted, create a portable file, restore the portable file, and then convert that restored portable file.
Why go through all of this? Just to make sure there are no broken data base links and to reduce as many issues as possible before converting. If there is data corruption in the .QBW file, this will remove as much of it as possible – without sending it to Intuit’s Data Services. (And frankly, if the file is that bad, you probably shouldn’t be converting it anyway.)
Open the file, click the Company > Export Company File to QuickBooks Online near the bottom of the menu:
Now, just follow the prompts –
Login to QuickBooks Online:
Choose the account you want to which you want to convert the desktop file:
If you’re converting a file with Inventory to a QuickBooks Plus account, you’ll need to answer the question about whether to bring in inventory, and if so, what date to begin using the FIFO valuation method (QuickBooks Pro & Premier use Average Cost:
JANUARY 25, 2016 UPDATE, per Intuit Product Specialist, Woody Adams:
When you convert existing activity from QB Desktop to QB Online:
If you elect to turn on inventory in QBO, sales transactions with inventory parts dated before the FIFO start date record the sale only, no adjustments to inventory asset or cost of goods sold. A separate adjustment is created at the time of conversion to record the historical QBD weighted average inventory valuation for each inventory product outside of the individual sales transactions. These sales transactions dated before the FIFO start date can not be updated.
If you elect to turn on inventory in QBO, sales transactions with inventory parts dated after the FIFO start date record the sale and and the cost of the products sold via the FIFO method.
If you elect NOT to turn on inventory in QBO, sales transactions with inventory parts show three lines for each inventory part to account for the sale of the product, the removal from inventory, and the cost of the sale. Be aware of this and notify your clients not to re-send these invoices if they do not want to share this sensitive cost information with customers.
Now, QuickBooks Online will tell you to sit back, relax and let it do all the work while it copies your file onto the World Wide Web:
Last, you’ll see this screen, telling you that you can go take a nap, and that you’ll get an email when the data is ready. It usually doesn’t take that long, unless you have a giant file, just so you know:
The email confirmation looks like this:
Converting from QuickBooks Desktop with Multi-Currency turned on to QuickBooks Online
One super cool thing that was released just before writing this: users can now convert a QuickBooks desktop file that has multi-currency turned on. For years and years and years, if the desktop file had that preference set, it was impossible to convert that file. In the summer of 2015, Intuit added multi-currency to the US version of QuickBooks Online, and in December 2015, the ability to do this was finally granted to us. YAY!
The difference here is that you’ll be asked to confirm your home currency during the conversion wizard,, similar to how you’re asked to confirm the switch to FIFO inventory:
The rest of the conversion process is the same as what I’ve just outlined, and after conversion, Multi-currency will be turned on in QuickBooks Online. Your home currency will remain the same in QuickBooks Online as it was in desktop, if you’ve selected the same in the screen you see above ^. Reminder;just as in desktop, you cannot turn this preference off in QuickBooks Online, so make sure you want it, before conversion.
Converting from QuickBooks Enterprises Solutions to QuickBooks Online
The first step in converting a QuickBooks Enterprise Solutions is to open the data file you want to convert, and hit that F2 button (you can get to the same screen by clicking CTRL +1) again.
Once the Product information screen is up, you’ll click CTRL+ b q
Next, just close the Product Information screen – you can do that by clicking the OK button at the bottom.
What happens next is the Export to QuickBooks Online Wizard will open up, and you’ll follow the same instructions that I just detailed when converting QuickBooks Pro/Premier:
Sign in to QuickBooks Online
Choose the QuickBooks Online account to which you want to convert the QuickBooks Enterprise Solutions file
Answer the FIFO question, if applicable
Relax and wait for the email confirmation
I also want to point out a video that my friend Woody Adams created that will show you how to do this, you can find it here.
Verifying data after converting from QuickBooks desktop editions to QuickBooks Online
Now you’ll want to check to make sure your financials all match your desktop.
It’s recommended to compare the Profit & Loss and Balance Sheet reports from both desktop and online. Set the reports in both to All Dates and Accrual basis.
Keep in mind: when moving from QuickBooks desktop to QuickBooks Online, your Cost of Goods and Inventory Asset accounts won’t match – this is because of the move from Average Cost to FIFO inventory valuation.
You’ll also want to verify the open transactions in Accounts Receivable and Accounts Payable accounts.
Last thing to remember: After conversion you’ll most likely see multiple sales tax payable accounts on the Chart of Accounts in QuickBooks Online. There will be one account in QuickBooks Online for each Sales Tax Payable account you had in desktop. In addition, QuickBooks Online, by default, will create a Sales Tax Agency Payable account for each sales tax jurisdiction the desktop file had. To clean this up, you’ll need to make the accounts that came from desktop inactive (delete them) and use the new accounts in QuickBooks Online to track sales tax – make sure you make the proper adjustments to zero out the balances in these accounts. In QuickBooks Online, all sales tax payments must be made by using the Sales Tax Center – you get to this via the left hand navigation bar
For more information on how QuickBooks Online handles importing from QuickBooks Desktop, check out this article.
StacyK’s QuickBooks Desktop to QuickBooks Online Conversion Checklist
Are you a small business, or an accounting professional that services small businesses that are considering moving from QuickBooks Pro, Premier, Enterprise or even Mac to QuickBooks Online? If so, please keep reading.
First: Is QuickBooks Online the best choice? I’ll be the first one to admit that sometimes – albeit rarely – QuickBooks Online isn’t the best solution (but I do try very hard to see if I can get it to work for anyone). If any of the following are a musthave, you’ll either need to look to the Intuit App Center or workarounds (if available, I’ve indicated as such next to each feature) to assist, or you should stick with QuickBooks desktop:
Progress Invoicing (I have a work around)
Receiving Partial Purchase Orders (I have a work around for this, too)
Integrated Labor Costing
Online Bill Pay (Bill.com can manage this as an option)
Sales Orders
Inventory Assemblies (SOS Inventory is a great option)
Using Letters, i.e.: Collection Letters, Credit Letters, etc.
Things to Consider When Converting
Before converting, you have to make sure that your .QBW file can be converted.
Desktop File Targets – While in your QuickBooks Desktop file, hit the F2 button and check to see how many targets there are in it. If the targets in your file are over 350k, you’ll need to condense it or create a period copy before converting, or only import lists
^ Hit F2 to get Product Information Screen in QuickBooks Desktop
If your file is under the 350k targets, you’re good to go, but you need to make yourself aware of how settings, lists and transactions will be converted. There are things that may not get converted or may get converted in a specific way that may not be expected from someone new to QuickBooks Online.
Important (and Awesome) Recent Updates
I want to start with three recent updates that will make many people with happy, because these have historically been deal breakers for moving to QuickBooks Online.
Memorized Transactions – These now convert to Recurring Transactions in QuickBooks Online!
Multi-Currency – For all US, UK, and CA QuickBooks Online accounts, as of December 18, 2015, you can NOW CONVERT DESKTOP FILES WITH MULTI-CURRENCY. Your home currency will remain the same in QuickBooks Online. This is pretty huge, since prior that, there was no way to convert a desktop file that had the multi-currency preference turned on, even if it was no longer being used. It’s sort of sad how excited this news made me.
NOTE: If multi-currency was turned on by accident in your desktop file and never used, I would recommend not converting, as the preference will automatically be turned on during conversion. Instead, I would recommend starting your new QuickBooks Online subscription, and then enter opening balances as of the start date you’ve chosen via a Journal Entry or use Bay State Consulting’s Transaction Pro Exporter to get the data out of the QBW file and their Transaction Pro Importer to get that data into QuickBooks Online.
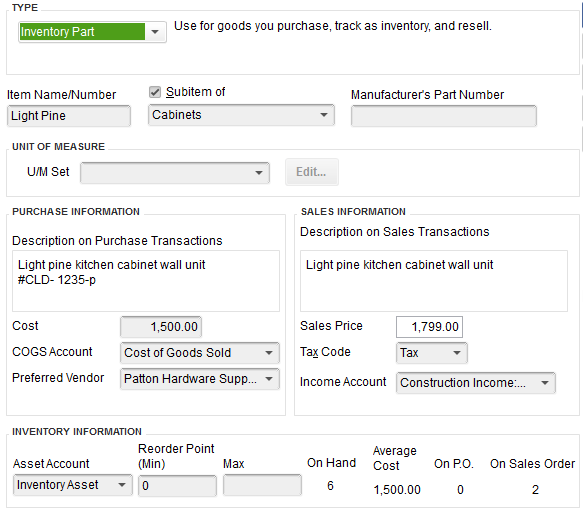
Inventory Items – All items convert beautifully – if you are converting from 2015 or newer versions. (They used to come in as one parent item with two sub items: one pointing to the Inventory Asset account and one pointing to Cost of Goods Sold. This meant either a LOT of cleanup work after conversion, starting from scratch with opening balances, or not converting at all.
^ QuickBooks Desktop Inventory item
^ QuickBooks Online Inventory item after conversion
NOTE: QuickBooks Desktop uses the Average Cost method for inventory valuation, while QuickBooks Online uses FIFO (First In First Out). What this means is that the Inventory Asset account balances will not match on each balance sheet, nor will the Cost of Goods Sold account balances on the P&Ls after conversion. Best practice for conversion is to go from 2016, regardless of maintenance release. However, 2012 and newer versions will need to have the latest release updates so the latest conversion enhancements are available. You can tell if your installation has the latest inventory conversion enhancements if you get a popup asking about converting to FIFO. If not, options are to update to the latest release, do some work after you convert or download a trial version to upgrade to a newer version of QuickBooks Desktop.
Highlights of Conversion “Translation”
Accounts – Account numbers and the hierarchy of the Chart of Accounts are all converted. QuickBooks Online uses an additional level of categorizing accounts, called “Detail Type”; accounts that are obvious (ie: Undeposited Funds), the Detail Type will be assigned. For others, the detail type will be assigned a generic label within that account type (ie: Other Miscellaneous Income)
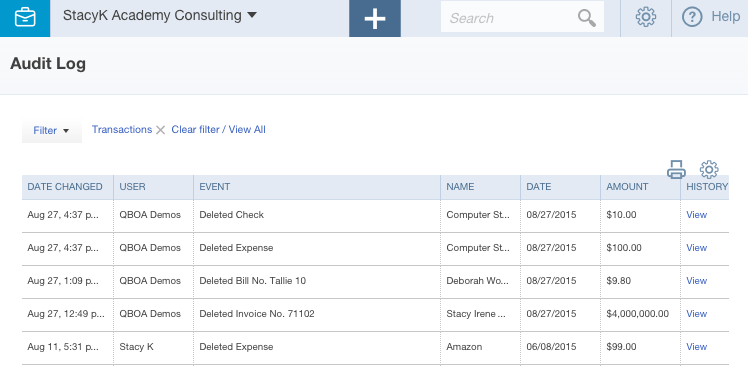
Audit Trail – The desktop Audit Trail does not convert. QuickBooks Online has something (that I think is) better: the Activity Log. While the desktop Audit Trail only shows when transactions are created, modified or deleted, the QuickBooks Online Activity Log will show when users login or logout, edit list items, create/modify/delete transactions. It also shows when 3rd party apps import transactions and even when QuickBooks Online automatically downloads transactions to the Bank Feed. When you convert, each transaction will have a “creation date” that is the date of conversion.
Reporting – while QuickBooks Online does not have as many “canned”, or default reports as QuickBooks desktop, generally those that aren’t can be easily created and memorized. What’s really cool is that any of these reports may be added to a group and the scheduled to be emailed to anyone that needs them on a regular basis automatically.
UPDATE 3/14/16: Budgets – From Intuit: “Budgets now import into QuickBooks Online. In certain cases however, there are some budgets which are not yet supported, and will not be imported. Just check the budgets screen after importing to see if your budgets came over.” If you’re using QuickBooks Online Plus, you’ll be able to create new budgets, and you’ll be able to have multiple budgets per fiscal year – something desktop does not do!
Closing Date Info – while the closing date is converted the password is NOT, so you’ll have to set a new one in QuickBooks Online. There is also no Closing Date exception report… or actual exceptions. Once you convert, any exceptions will not show. QuickBooks Online will begin to track new exceptions, in two ways. If you have reconciled and closed the books, you’ll see changes to cleared transactions in the Bank Reconciliation summary page, in the Changes column:
^ Bank Rec summary page in QuickBooks Online
Regardless of whether the books have been closed, you’ll also be able to view the Voided/Deleted Transactions report, available from the Accountant Toolbox, if logged in as an accountant user:
^ Accountant Toolbox
^ Voided/Deleted Transaction list in QuickBooks Online
Custom Fields on Lists – if the QuickBooks desktop file is using custom fields for customers, vendors, employees or items, these will not convert. QuickBooks Online does have 3 custom fields that can be added to forms such as Invoices or Sales Receipts and 3 separate fields that can be used with Purchase Orders.
Inactive Status – Accounts, customers and vendors that are inactive but have balances will be converted as active list items. If there is no balance, they are converted as inactive – which is also referred to as “deleted” sometimes – in QuickBooks Online. Any employees or items in desktop that are inactive will be converted to active employees or inactive Products & Services in QuickBooks Online, whether there is any balance associated with them.
Customer information – Price Levels, Tax Items, Sales Rep, Customer Type, Credit Limits and Job Status are not converted.
Customer Message List – while the original message will still exist, and you can still add a customer message on transactions, there isn’t a drop down menu to choose from. Each message has to be entered manually on the form.
Employees/Payroll – If you’re using one of Intuit’s desktop payroll solutions, all employee contact information is retained. If you have an active payroll subscription, some additional information will be migrated as well. This includes taxes and payroll items; but not any prior payroll period*. Also, no employee payroll information such as filing status, rates, etc. is converted. Paychecks/liability payments are converted as regular checks. The details on these transactions are not converted, and liability refunds, adjustments, opening balance transactions are converted as Journal Entries. Your desktop payroll subscription will not work with QuickBooks Online. AFTER YOU CONVERT, you may sign up for QuickBooks Online Payroll, Intuit Full Service Payroll or Intuit Online Payroll – each of these has a payroll setup interview that allows you to enter all the info for all employees, company items and any year to date history. If you are already using Intuit Online Payroll, you’ll need to edit your export preferences to connect to the new QuickBooks Online account.
NOTE: If you set up a 401k item with any of these in any Intuit payroll offering, it does not create an actual 401k account, nor will it automatically transfer the funds to any 401k account you already have set up. You will still need to manage all of that outside of the payroll service, as it will only calculate the deductions and show your liabilities.
Reconciliations – all of your reconciled transactions will remain cleared – but no reconciliation reports will convert. One option I’ve heard suggested is for accounting professionals using QuickBooks Online Accountant to upload any previous reconciliation reports to the client’s document folder:
^ Documents in QBOA
Existing Estimates & Purchase Orders – Only QuickBooks Online Plus has the ability to create POs. Estimates are converted to all QuickBooks Online subscriptions, but Purchase Orders only convert to QuickBooks Online Plus. However, the connection between closed Purchase Orders and their corresponding Vendor Bills is lost once the data is converted to QuickBooks Online.
Invoices – all of the invoices will be converted (unless they’re pending) but some information will not convert as you might expect. PO Number will be Custom Field 1, Sales Rep will be Custom Field 2, Subtotals now convert, and Sales Tax will show in the Sales Tax field of each invoice after conversion. Progress Invoice columns won’t convert. (If you need Progress Invoicing, I have a work around for that.)
Statement Charges are available in QuickBooks Online as Delayed Charges, but existing QuickBooks desktop Statement Charges will transfer to QuickBooks Online as Invoices.
Group Items – These do not convert, and QuickBooks Online does not have them at the time of this writing.
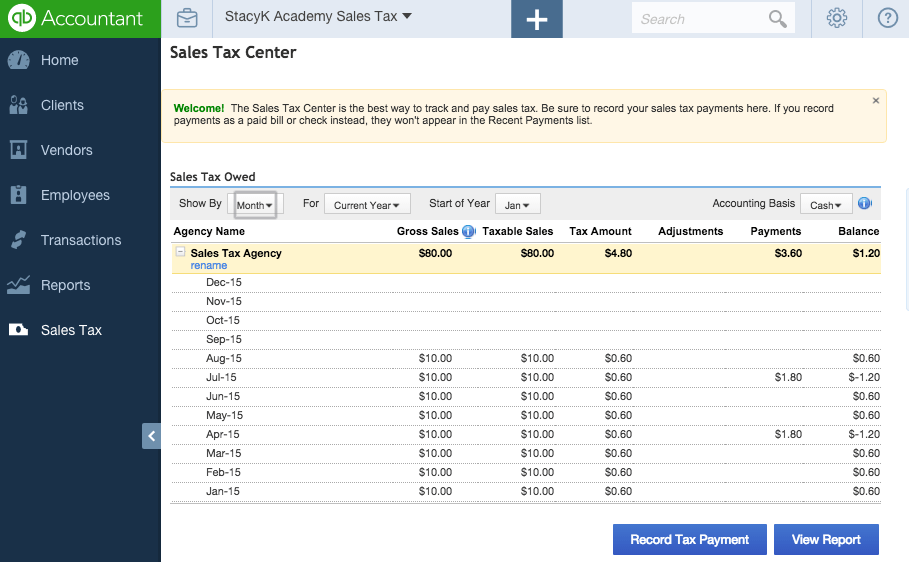
Sales Tax – QuickBooks Online supports multiple sales tax rates and you are able to assign different agencies and rates as needed. Any Sales Tax groups that you have in QuickBooks desktop will convert, but as one combined rate.
NOTE: Once you convert to QuickBooks Online, you’ll most likely see multiple sales tax payable accounts on the Chart of Accounts. For each Sales Tax Payable account you had in desktop, there will one in QuickBooks Online. There will also be a Sales Tax Agency Payable account that QuickBooks Online creates by default for each sales tax jurisdiction. You’ll need to make the accounts that came from desktop inactive and use the new accounts to track and manage sales tax in QuickBooks Online. Your sales tax payments must be made through the Sales Tax Center, accessible from the left hand navigation bar:
^ Sales Tax Center in QuickBooks Online
Online Banking – The connections setup in QuickBooks desktop won’t transfer, but it’s easy to reconnect with QuickBooks Online’s Bank Feed. I know I’m not alone in this when I say the QuickBooks Online Bank Feed is superior to the QuickBooks desktop Online Banking. The ability to see all connected accounts at once and deal with 100 transactions at a time makes this process so much more efficient. The fact that you can simply click a tab to see already accepted transactions – and easily fix client mis-postings – is icing on the cake!
Users/Permissions – Existing QuickBooks desktop user logins won’t convert. Once you import into QuickBooks Online, you’ll need to invite each user. Another feature that QuickBooks Online Plus has, that QuickBooks desktop doesn’t is the ability to have as many Time Tracking and/or Report Only users as you need, and these don’t count towards the subscription defined user limit. Great for entities with Board Members that may only need to view reports!
Wrapping Up
This is not a complete list – I picked these to highlight because over the last 11 years of doing conversions, they seem to be the most important ones to desktop users, and the ones that cause the most surprise or confusion. For more details on exactly how everything converts, I would direct you to this support article, this list of import limitations and this survival guide.
One more comment about targets and converting is that when you convert, if your file is over 350k targets, you do have the option of importing lists only or importing your QuickBooks desktop file. Even if you do decide to convert, you can still import list information into QuickBooks Online after the conversion:
^ Import List screen in QuickBooks Online
It is also important to note that once you create a QuickBooks Online company you have 60 days to convert QuickBooks desktop data; and you can do it over and over again during those 60 days. Any existing data will be overwritten, so if you don’t like the way that your conversion worked the first time, you can tweak your QuickBooks desktop data and try again.
What I have always recommended when making the change is to run QuickBooks desktop and QuickBooks Online parallel for the first 30 days (which is free with a new QuickBooks Online subscription), to make sure it’s a good fit. Yes, the time it takes to do the double entry is a bit of a pain, but it’s much less so than just jumping in and finding out a few weeks later that QuickBooks Online really isn’t going work.
Converting from QuickBooks Online to QuickBooks desktop is an entirely different article… which I am never going to write, because I believe everyone should be on QuickBooks Online.
*From Intuit support: “We now support bringing over payroll history (for the prior YTD payroll setup) for about 70% of all importers with DT payroll. If payroll items are mapped correctly, and they are supported by QBOP, we will bring them over unless some mismatch is found. Constantly improving on this too, to enable a higher success rate.” Unfortunately, I have not yet seen this in action when converting clients with desktop payroll.
This is an update to an article that first appeared on the Sleeter blog in 2013.
Special thanks to Woody Adams, Micah Sampson, Matthew Bernier, Le’Darien Diez & Sachin Goregaoker for helping me with this!
We’ve all been to business trainings, worked with coaches, or read business books about identifying our “target market”, our “dream client” or our “ideal client”.I have done great exercises with a coach to look at my client base and find industries in which I have clusters of clients. In this process, I identified the industries I enjoyed working with, the demographics of the decision makers and the size of these businesses.BUT, it wasn’t until sitting in a StacyK Academy webinar that it really sunk in that there is more to a dream client than just that.Stacy pushed me even further to determine how culture and personality fits were important too.
I considered questions such as:
Does the client respect our time?
Is the client a jerk?
Do they show up without an appointment and expect immediate service?
Do they bring us a bottle of vodka on April 15th?
I was able to finally consider and identify which cultural and personality traits in a client work well with my firm’s style, and which are not a good fit.Once that message really sunk in, I took the definition of my dream client beyond the industry category and really focused on which personalities and business styles I enjoy working with – and you can too.
After you have identified an ideal client, it’s important to determine the best way to serve that client’s needs.I recommend the following steps to really identify what your dream client needs:
Identify some clients already in your client base that fit into that dream client category.
Ask them what their accounting software doesn’t do for them that they wish it would.
Ask them what information they want from you that they aren’t getting.
Ask them what work they would love to offload to you so they can focus on growing their bottom line.
Research the industry to find out what key performance indicators are crucial to their success and determine what you can help them track.
Evaluate software and apps to help deliver the services and information your client needs.Test them out and identify what you believe will best meet your clients’ needs.
Once you have a solution identified, select one or two clients that you know enjoy trying new things and ask them to help you field test that solution.
Once you have a strong service line offering for that dream client and have started delivering those services to existing and new clients, StacyK Academy also teaches us to reevaluate our client base on a regular basis.Using the Client Scoring model from StacyK Academy, it’s easy to see if you are still working with your dream clients.From your original work about what your ideal client really is, you develop a grading scale and review your client list with your whole team and grade your clients on all the factors that makes a client a dream client for your firm. This enables you to keep working in what we all strive for – enjoyable work and clients, along with a business that produces great work and makes some money for you while you’re at it!