If you use QuickBooks Online Essentials, you may know that you cannot assign expenses to customers or jobs (what QBO calls sub-customers); this is a feature that is only available in QBO Plus or Advanced. What if I told you that you can get a Profit & Loss by job by using tags in QuickBooks Online Essentials for Job Costing?
I swear, you can do this, and I’ll show you how.
The first thing is making sure that we have tags turned on in two places.
Go to the Gear Icon > Account and settings > Sales tab and in the Sales form content section, click the pencilicon, then toggle Tags to on. Click the Save button:
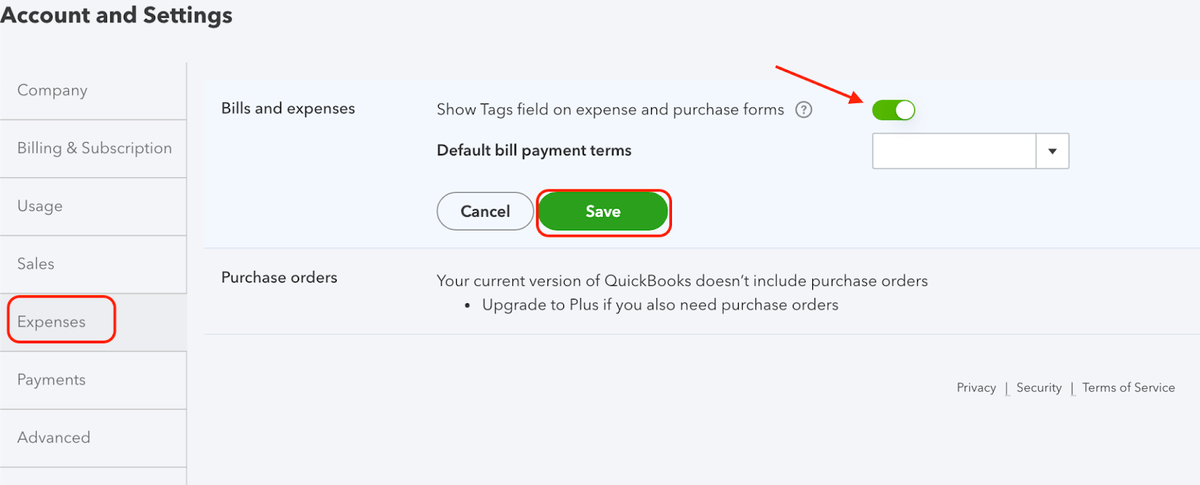
Now, in the Expenses tab, click the pencilicon in the Bills and expenses section, and toggle Show Tags field on expense and purchase forms to on, then click Save:
Once you do that, click the Done button in the bottom right corner of the Account and Settings screen to exit.
Great! Now we need to make sure we have our customers and jobs entered. I’m not going into detail about that, but you can check out this page in the QuickBooks Community for a video and instructions, if you’ve never entered a customer into QBO.
We have ours all set; a parent customer with two sub customers/jobs:
Get Profit and Loss reports in QBO Essentials by using tags in QuickBooks Online Essentials for Job Costing
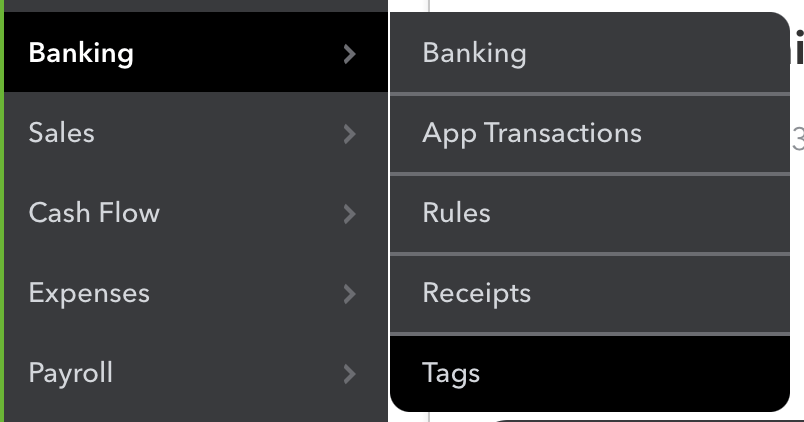
You’re probably wondering: “I thought this was about using tags in QuickBooks Online Essentials for Job Costing?” – and this is the part where we set up the tags. To do this, from the left nav, click Banking > Tags. (FYI, I don’t know why Tags are in Banking…)
You can also get there this way:
Because we know we have one customer and two different projects that we’re working on for them, we’re going to create a Tag Group that is the same name as the parent customer, and a tag for each of the sub customers/jobs. We’ll click the green New button from the Tags center, then choose Tag group and enter the customer name:
We add the name and (I love this!) get to choose a color for this tag. While we’re in this screen, we have the option of adding our tags for each of the sub customers/jobs as well, but only after we click the green Save button:
Once I hit that save button, I can now add tags without leaving this screen but entering the name (the same as the sub customer/job I’ve already added) and clicking the Add button:
Just click the green Done button in the bottom right to get back to the Tag list/center.
Tags can also be added from the Tag list by using the green New button like we did when adding the Tag group, or by dropping the arrow down in the Action column for the Tag group in which you want to add the Tag and choosing Add Tag:
Now that we have our tag group (Customer name) and tags (sub customers/jobs) set up, we can start adding tags to transactions. Be aware that there are limits: 40 Tag groups and 300 tags, regardless of what subscription level of QBO you have.
We can’t add tags to specific line items, but you can add multiple tags. So if you have a transaction that needs to split between two customers or sub customers/jobs… you’ll have to enter two separate transactions and tag accordingly. Not ideal, but using tags in QuickBooks Online Essentials for Job Costing is a workaround for users that don’t have QBO Plus or Advanced so… ¯_(ツ)_/¯
Here’s an invoice with a tag assigned:
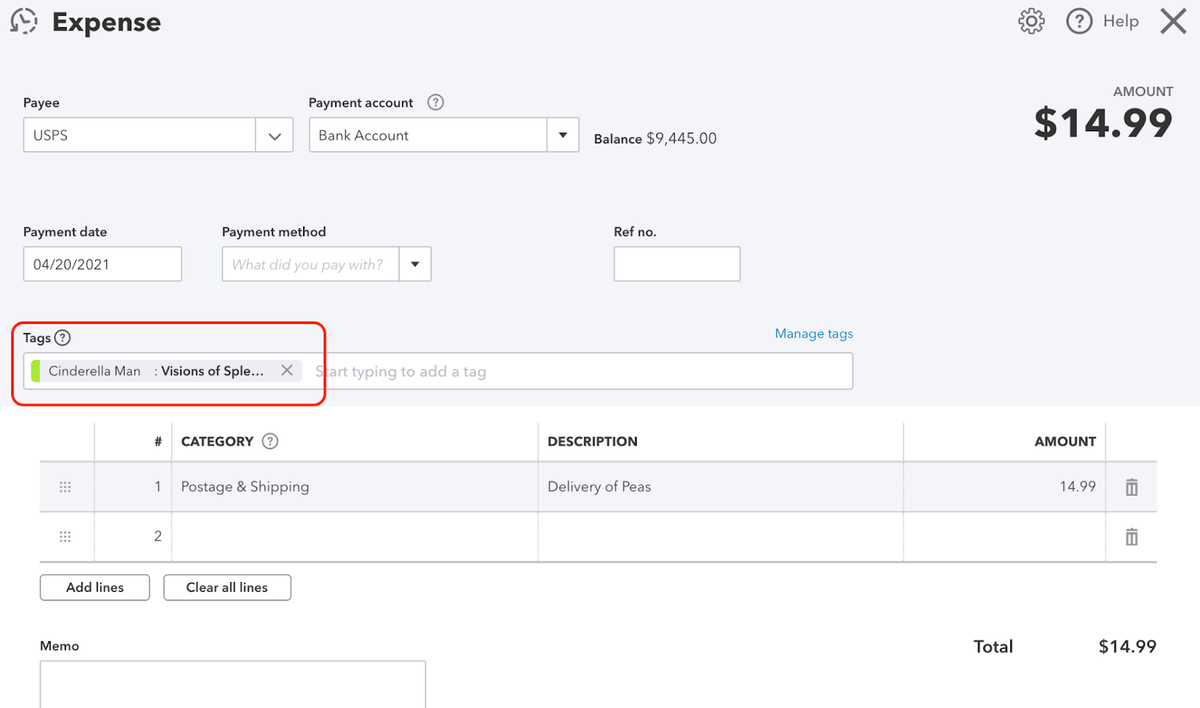
And here is an expense with a tag assigned:
As you work on each job, you’ll assign the tag for any expenses related to the project, and the reporting is available from the Tag List (Center?) by choosing Run report from the action column:
Reports can also be accessed by going to Reports > Business Overview > Profit & Loss by Tag:
A couple of notes about reporting:
When generating Tag reports from the Report Center, the reports came up blank, even when the date range is set to All Dates. This is because the default report filters by “Ungrouped tags”. This can be remedied easily enough by clicking on the Customize button and then selecting the Tag Group from the drop down in the “Group by’ field. See image below for this customization.
Clicking “Run Report” on the Tag group from the Tag list will open a Transactions List by Tag Group report
Clicking “Run Report” on the Tag from the tag list will open a Profit and Loss by Tag Group report, filtered for just that tag (yes, the report says “Tag Group” even though it’s filtered
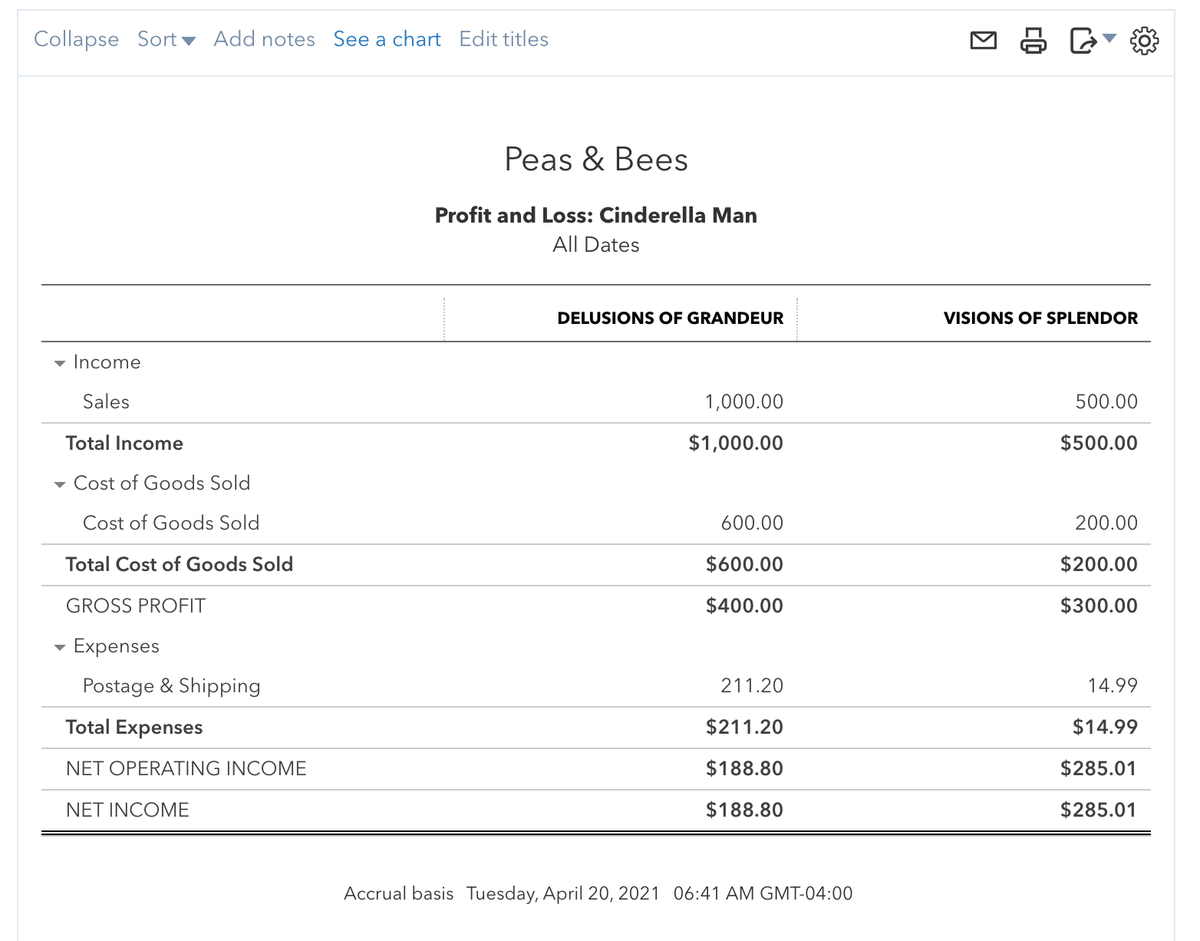
Below you can see the beautiful Profit and Loss report by sub customer/job that using tags in QuickBooks Online Essentials for Job Costing will produce.This report was created from the report center and customized as mentioned in #1 above; the title has also been changed to show the parent customer:
You need invoice for time and expenses, but you don’t want the recipient to see the details, right? This quick video will show you how you can add billable time or billable expenses to a bundle item in QBO, so those details won’t show.
Note: first you need to make sure that you have QuickBooks Online Plus or QuickBooks Online Advanced and have the “Show Items table on expense and purchase forms” as well as “Track expenses and items by customer” and “Make expenses and items billable” all enabled.
Then you need to create your bundle item. You can add any item(s) to the bundle; it won’t matter which or how many. We’ll be deleting them when we add billable time or billable expenses to it on the invoice. The item I created for this post just has one component:
Once you have the preferences set and the bundle item created, we can create the invoice, then we can add billable time or billable expenses to it.
Add the bundle item to the invoice, then add the billable time and billable expenses from the drawer, one at a time. After you’ve added it, you can drag/drop it “into” the bundle item.
When you finish adding and moving all the billable time, delete the placeholder line within the bundle item. All done!
When you’re done, the invoice recipient won’t see the details:
Back from a bit of a summer break, we’re diving right in with a guest blog post. My friend and co-host of QBOShow.com, Woody Adams, has written this piece about automating data entry in QuickBooks Online. there are a variety of options to choose from, and below are a few:
Bank Rules/Auto-add—google vendor upload show result
Invoice automatically for unbilled activity—invoice L1386
Let’s dig in to automating data entry using QuickBooks Online, and thanks so much to Woody for writing this!
First, we all know why we prefer QuickBooks Online Plus over Essentials, right? Need I remind you…
5 Users included (can expand to 25) + 2 Bookkeeper/Accounting Firms + Unlimited Reports Only Users
Class/ Location Tracking
Purchase Orders
Inventory using FIFO valuation/ track profitability with two-sided items
Billable Time/ Expenses, Two-sided items
Budgeting
100 + Reports
Yeah, two-sided items is my sleeper hit, but I just think Plus is most akin to QB Pro, minus a few features still: Labor burden tracking, finance charges, loan manager (LOL), Estimate v Actual reporting, single unit of measure, just thinking of some of the key gaps…still, Plus is the QuickBooks Online most similar in feature set. That being said, QuickBooks Online supports data entry automation in a better way than QB Desktop. While both platforms can Auto-send reports and enter Memorized (Recurring) transactions, this is where QuickBooks desktop ends re automating transaction or form entry. And this is the part of the story that QuickBooks Online continues…
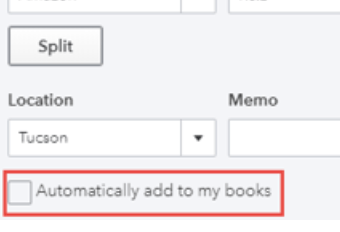
“Automatically add to my books”
This feature lives inside of a bank rule. It is a tiny checkbox at the bottom of the rule window. The box is NOT default checked and probably for good reason. Imagine the havoc. However, if you are establishing a rule for how a bank feed transaction is to be categorized and the correct Payee is assigned, and you do not need to review the activity, but can just let it dive into the register once the rule is applied, then this feature is your new best friend.
Literally, I kid you not, the downloaded transactions skips the For Review tab and just ends up in the books. You can see the Mode too the bank feed applied when click the blue link at top left of transaction that is NOW in the register…
Invoice Automatically for Unbilled Activity
Quite a mouthful, eh? Even if you are not from Canada…
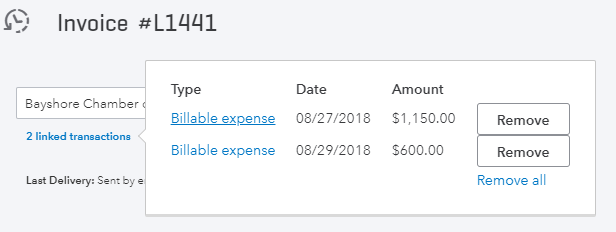
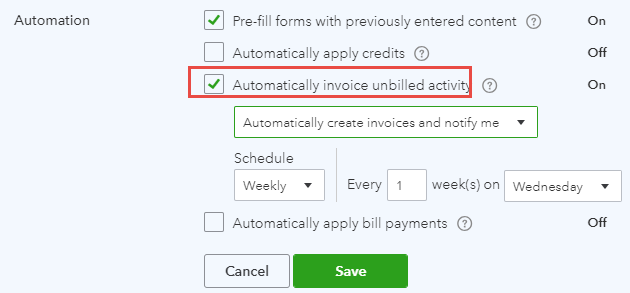
Go to Gear icon, Account and Settings, Advanced tab. You will see this sub-section entitled “Automation”. It’s the 3rd option. See screenshot below. This will enter invoices for any unbilled activity from the following posting or non-posting events: Bills, checks, expenses, time, delayed charges and bank feed transaction (not yet supported at the rule level), assuming the Billable box is checked. QuickBooks Online, like QuickBooks desktop will assume you want to create invoices for the yet to be invoiced time, material, expense, but go one step further…regardless of client, create invoices for all unbilled activity based on the interval you choose. What about Journal Entry you say? There is no Billable box on a JE in QuickBooks Online Plus at this time. Why do I say Plus you ask? Cause Plus is required if you want to tag “TME” to a customer, sub-customer or project (sort a’ new) and is the only QuickBooks Online level that offers making this stuff billable. In QuickBooks desktop it is the Add Time/Costs window on route to the invoice. In QuickBooks Online Plus, it can be invoices automatically created. The below invoice was created while I had that automation feature active…Woody forgot he had all this unbilled activity for this customer once, turned on the feature, the next day an invoice was created that had 150 target lines on it. LOL. I saw the invoice. He emailed it to me because we find that kind of thing hilarious…
Qualification: This is a Global setting, no I don’t meant like overseas. I mean it will create invoices like Jack Bauer would; rogue and coming in heavy guns blazin’. If you require to select what customers get what invoices for what unbilled activity, do NOT turn this feature on. Instead, leverage the next feature that QuickBooks desktop also has but only in part…
Recurring Invoices
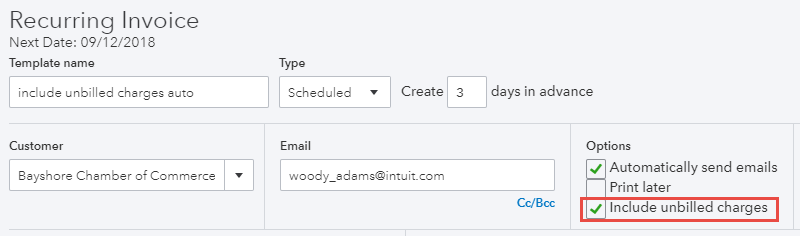
Yes, I know. I been using QuickBooks Online since 2003 and QuickBooks desktop from way before that. I know Desktop has memorized invoices capability. However, when we’re talking about automating data entry using QuickBooks Online, the same recurring invoice feature in QuickBooks Online offers the ability to include unbilled activity. This is great as while I like the more global setting, this feature can focus on a specific customer.
The above recurring invoice template will be created and any unbilled activity tagged to the customer anywhere else in the QuickBooks Online file (bills, checks, expenses, delayed charges, time) will be included. Sweet!
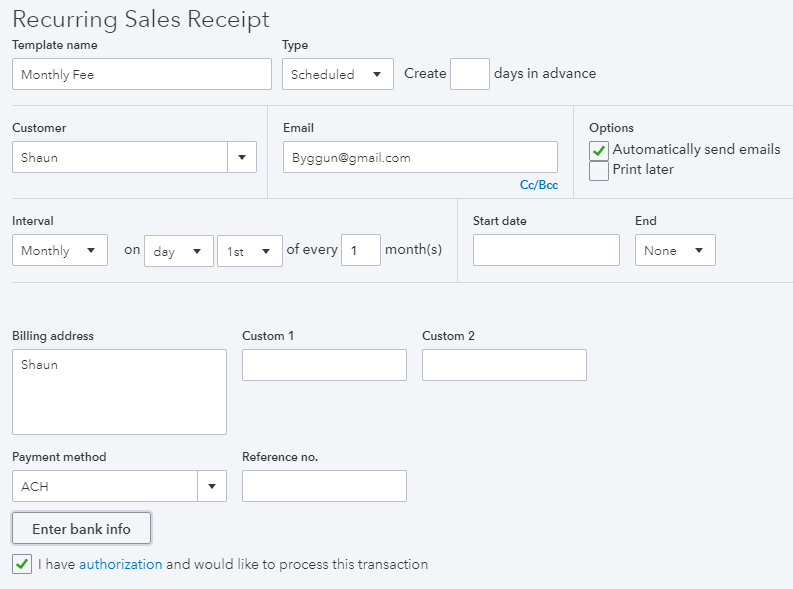
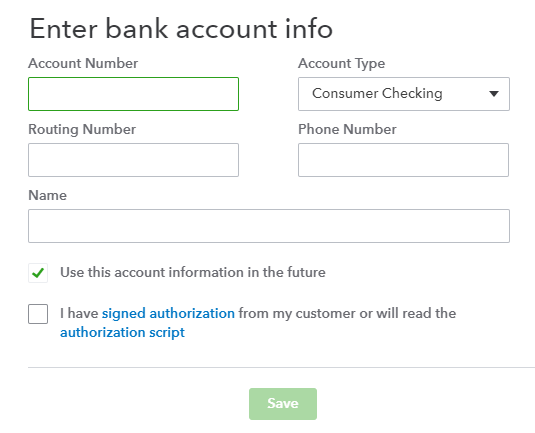
One of the coolest features for automating data entry using QuickBooks Online, period. We do this with most of our subscription billing based clients. In our QuickBooks Online file, we set up a recurring Sales receipt for each client. QB Payments is turned on in Settings. I check the box in the recurring Sales receipt template to auto send to client (input their email address) and I enter their banking/routing numbers in the Payment method field. There is a PCI compliance script you can read to them, a box to check, and then I just leave it alone. Every month the clients gets the emailed receipt, 5 days later I get paid. QB Payments is free and ACH is free so it costs me only the time to set up the recurring transactions for my clients. 5 day funding period might raise a few eyebrows. I have one question to bring them down to a reasonable level: How many days does it take to collect against an open invoice for one of your clients? It’s not 5 days. LOL Maybe you even have to send a drone over to their home or location. As far as you know, Shannon and I have never had to do that…
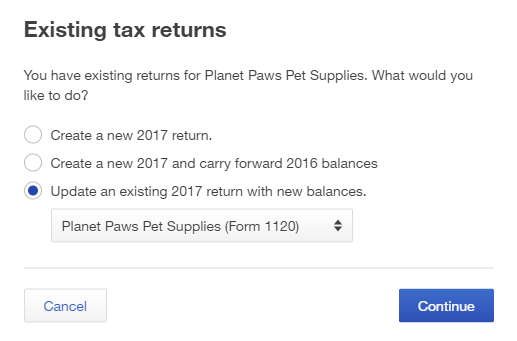
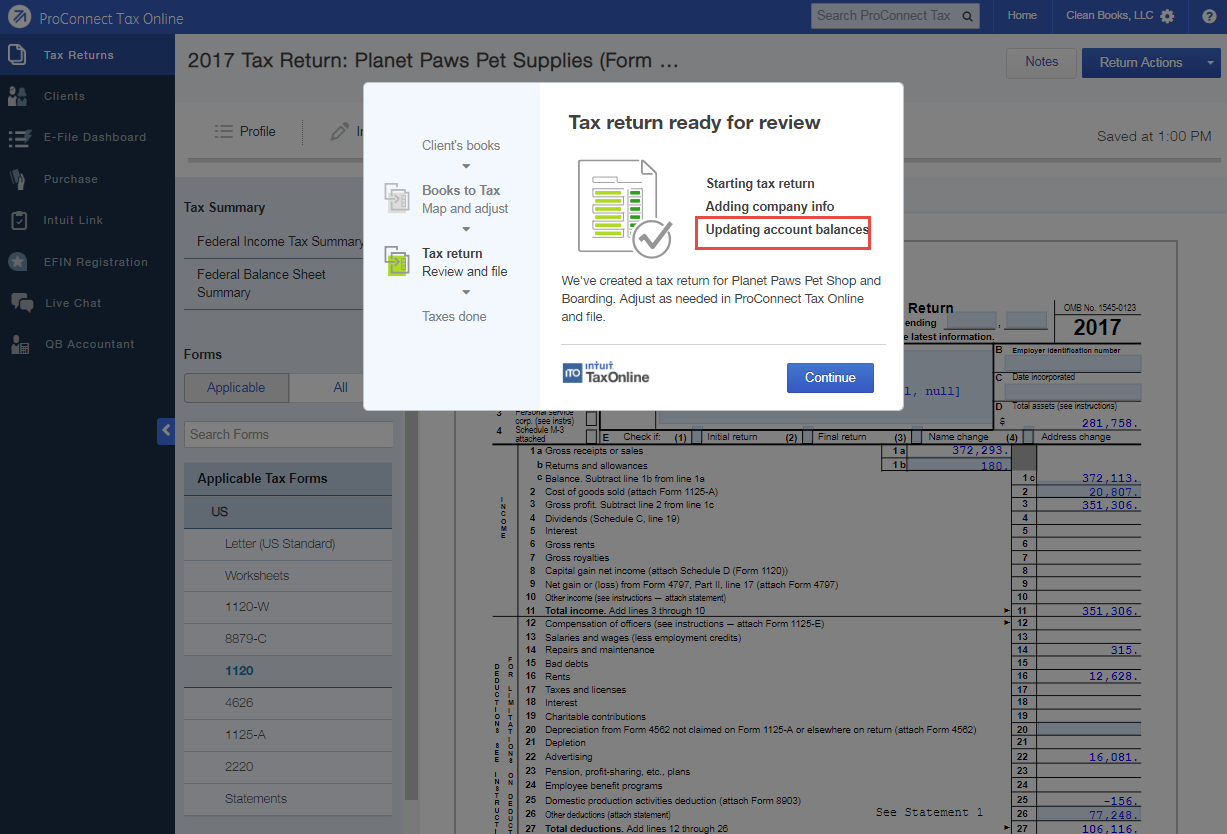
Lastly, automating data entry to the tax return in ProConnect Tax Online. We don’t have any tax clients but I have seen Woody do this in webinars. No, he does not have any tax clients either, but he is a QuickBooks Online nerd just like me and you. And not having to enter data into the data fields in ProConnect Tax Online does qualify as automating data entry.
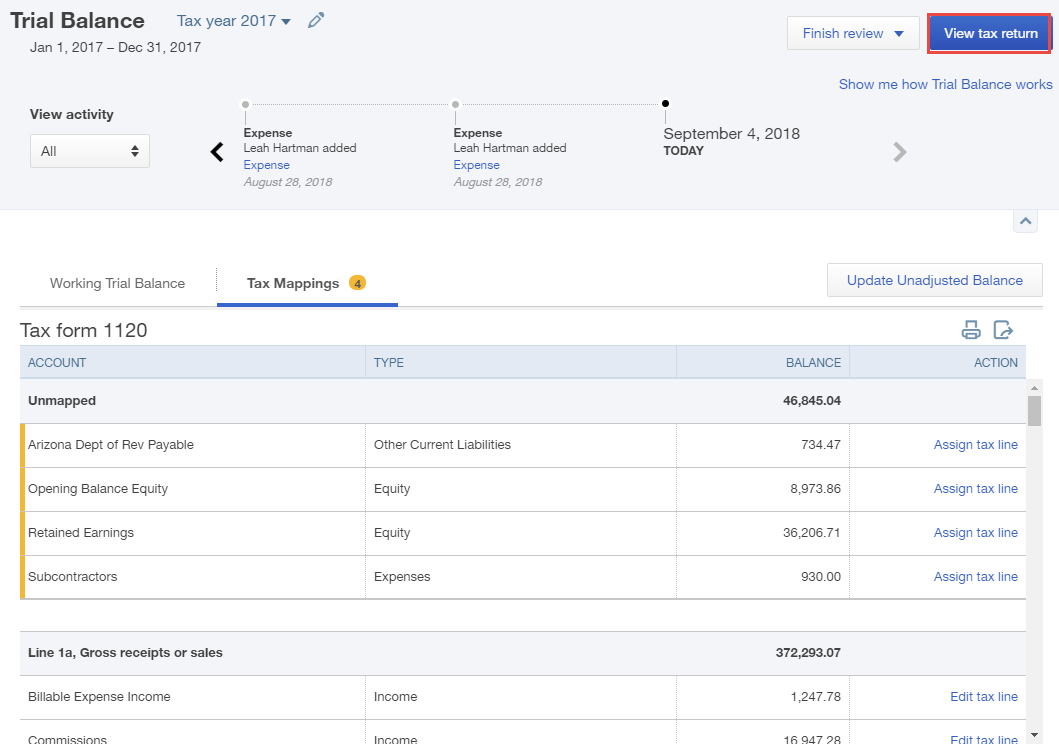
In the Trial Balance tool under the Accountant Toolbox, when in a client QuickBooks Online file from QuickBooks Online Accountant, you will see Trial Balance. This is not the report but a Working trial balance that also is the launch pad for the native integration we know have with ProConnect Tax Online. Pictures worth 15 or 16 words…
By the way, all the above functionality that automates data entry is in QuickBooks Online as it is, with no other apps required. Of course there are several great data fetching apps that help with Automating Data Entry Using QuickBooks Online. Ask me about them someday!
Import/Export Bank Rules: Woody Adams and I have teamed up to bring you the QBO TOP 40 COUNTDOWN (to #QBConnect)
We’ve compiled a list of 40 features, tips and tricks that will help you work better, faster smarter. Keep in mind, there’s no particular order here we both just added to the list until we hit 40!
Import/Export Bank Rules
Got clients that leverage the same vendors for purchases? Do you have some killer bank rules set up in one of their QBO files? You can Export those rules and then Import into the other QBO client file’s bank and credit card window.
As I mentioned in my last blog, there are two parts to solving the clients don’t value services dilemma. The first, showing your value, you can find here. In this blog, I’ll write about one of my favorite topics: finding better clients.
This topic comes up a lot for me: in an interview with JetPack, a video on StacyK Academy, an article about building boundaries for Intuit and in my enewsletter and course material for StacyK Academy. At the risk of becoming redundant, I’ll hit the highpoints here.
DON’T WORK WITH JERKS.
If warning bells go off during the sales process, it isn’t the right client for you.
If they call you at all hours of the day, it isn’t the right client for you.
If you feel a sense of dread when they call or email, it isn’t the right client for you.
There are a lot of people that need bookkeeping services. The ones that are jerks will NEVER value your services, so don’t work with them.
Jerk clients don’t value service; avoid them at all costs
Last summer, Bill.com released their State of Bookkeeping Practices Survey 2016. The statistic that astounded me, that made my peacock blue hair (yes, new color for spring) turn grey, was that 85% of survey respondents said that their workflow depends on the client!
Don’t do that, people! You’re setting yourself up for failure by not using repeatable processes. Being consistent makes it much easier to deliver on what you promised, remember what you need to do and even outsource when you need to.
Set consistent boundaries.
Notice a theme here. Consistency. Consistent boundaries not only define how I treat my clients, they define how my clients treat me. When I’m treated as well as I treat my clients, I feel good about the relationship and valued.
The real secret to ensuring your clients value you is having a good relationship with them. If you have other suggestions for how you share your value with clients, I’d love to hear them!
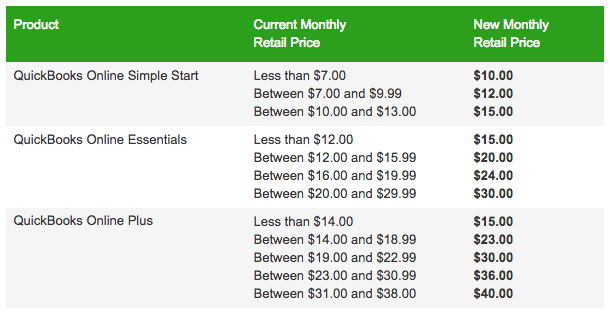
Intuit just announced QuickBooks Online Pricing that will go into effect on March 15, 2017. You can find the entire announcement here: https://stacyk.site/2kfkovP, but here are the highlights.
This only affects QBO accounts that were NOT included in the price increase that was rolled out in October 2016, and only accounts that pay Intuit DIRECTLY. (This means, if you’re an accounting professional and have your clients on Wholesale Billing, it won’t affect their pricing.)
A few other things to mention: accounts paid monthly and annually will see this on the billing cycle following 3/15/2017, and this won’t apply to QBO subscriptions that are bundled with payroll, and if you’re using the “Your Books” feature in QuickBooks Online Accountant, it’ll still be free.
My own suggestion: many accounting professionals fail to review their fees/pricing on a regular basis. Now might be a good time to do this for clients that you haven’t increased in the last 12 months, and notify your clients of the increases to both QBO and your services at the same time.